Перейти к основному содержанию

HP Pavilion 14-c015dx Chromebook Solid State Hard Drive Replacement

Выберете то, что вам нужно

  1. HP Pavilion 14-c015dx Chromebook Solid State Hard Drive Replacement, Keyboard: шаг 1, изображение 1 из 1
    • Remove the two 7mm screws with a Phillips Head #1 Screwdriver.

    • These screws may not completely come out of the laptop, so just make sure that you have loosened them all of the way.

  2. HP Pavilion 14-c015dx Chromebook Solid State Hard Drive Replacement: шаг 2, изображение 1 из 2 HP Pavilion 14-c015dx Chromebook Solid State Hard Drive Replacement: шаг 2, изображение 2 из 2
    • Starting from the left side, use the metal spudger to pry off the keyboard.

    • Run the spudger across the edges until all plastic clips are popped up and the keyboard is free from the palm rest assembly.

    • Do not pull the keyboard away from the computer while popping the keyboard off, there is a connector cable in the bottom center of the keyboard that will be disconnected in the next step.

  3. HP Pavilion 14-c015dx Chromebook Solid State Hard Drive Replacement: шаг 3, изображение 1 из 3 HP Pavilion 14-c015dx Chromebook Solid State Hard Drive Replacement: шаг 3, изображение 2 из 3 HP Pavilion 14-c015dx Chromebook Solid State Hard Drive Replacement: шаг 3, изображение 3 из 3
    • Detach the circuit connector by flipping up the black flap upwards and gently pulling the connector out by pulling up on the blue release tab.

    • Lift the keyboard away from the computer once the connector is detached.

  4. HP Pavilion 14-c015dx Chromebook Solid State Hard Drive Replacement, Solid State Hard Drive: шаг 4, изображение 1 из 2 HP Pavilion 14-c015dx Chromebook Solid State Hard Drive Replacement, Solid State Hard Drive: шаг 4, изображение 2 из 2
    • Locate these seven 5mm circled screws on the panel that was under the keyboard.

    • Remove the screws with a Phillips Head #1 Screwdriver.

  5. HP Pavilion 14-c015dx Chromebook Solid State Hard Drive Replacement: шаг 5, изображение 1 из 3 HP Pavilion 14-c015dx Chromebook Solid State Hard Drive Replacement: шаг 5, изображение 2 из 3 HP Pavilion 14-c015dx Chromebook Solid State Hard Drive Replacement: шаг 5, изображение 3 из 3
    • Locate the ribbon cable near the top of the keyboard area.

    • At the cable base, lift the white tab with a fingernail and then gently pull on the blue tab of the cable to release it.

  6. HP Pavilion 14-c015dx Chromebook Solid State Hard Drive Replacement: шаг 6, изображение 1 из 3 HP Pavilion 14-c015dx Chromebook Solid State Hard Drive Replacement: шаг 6, изображение 2 из 3 HP Pavilion 14-c015dx Chromebook Solid State Hard Drive Replacement: шаг 6, изображение 3 из 3
    • Locate the ribbon cable just above the touchpad.

    • Disconnect the cable by lifting the white tab at the base of the cable with a fingernail and then pulling on the blue section of the cable.

  7. HP Pavilion 14-c015dx Chromebook Solid State Hard Drive Replacement: шаг 7, изображение 1 из 2 HP Pavilion 14-c015dx Chromebook Solid State Hard Drive Replacement: шаг 7, изображение 2 из 2
    • Locate these eight 7mm screws on the bottom of the laptop.

    • Remove using a Philips Head #1 screwdriver.

  8. HP Pavilion 14-c015dx Chromebook Solid State Hard Drive Replacement: шаг 8, изображение 1 из 1
    • Flip the computer back over, and using the metal spudger, remove the plastic palm rest assembly.

    • Go little by little around the edge and carefully pry off the plastic palm rest assembly.

  9. HP Pavilion 14-c015dx Chromebook Solid State Hard Drive Replacement: шаг 9, изображение 1 из 3 HP Pavilion 14-c015dx Chromebook Solid State Hard Drive Replacement: шаг 9, изображение 2 из 3 HP Pavilion 14-c015dx Chromebook Solid State Hard Drive Replacement: шаг 9, изображение 3 из 3
    • Locate the plastic flap holding the metal strip in place.

    • Disconnect the cable by lifting the white tab at the base of the cable with a fingernail and then gently pulling on the blue section of the cable.

  10. HP Pavilion 14-c015dx Chromebook Solid State Hard Drive Replacement: шаг 10, изображение 1 из 2 HP Pavilion 14-c015dx Chromebook Solid State Hard Drive Replacement: шаг 10, изображение 2 из 2
    • Locate these 3 screws and unscrew using a Philips Head #1 screwdriver.

  11. HP Pavilion 14-c015dx Chromebook Solid State Hard Drive Replacement: шаг 11, изображение 1 из 3 HP Pavilion 14-c015dx Chromebook Solid State Hard Drive Replacement: шаг 11, изображение 2 из 3 HP Pavilion 14-c015dx Chromebook Solid State Hard Drive Replacement: шаг 11, изображение 3 из 3
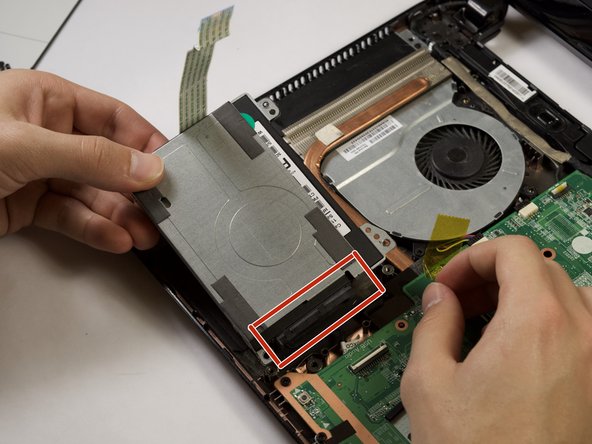
    • Lift up the hard drive slightly and remove the black cable strip connecting the hard drive to the computer

    • Do not lift the hard drive very high, the connector cable is not very long and may get damaged if you pull too far

    • You may need to use some force and wiggling to release it.

Заключение

To reassemble your device, follow these instructions in reverse order.

Еще один человек закончил это руководство.

William Busby

Участник с: 01/23/17

234 Репутация

Автор 2 руководств

Команда

Cal Poly, Team 22-8, Maness Winter 2017 Участник Cal Poly, Team 22-8, Maness Winter 2017

CPSU-MANESS-W17S22G8

4 членов

Автор 5 руководств

0 Комментариев

Добавить комментарий

Просмотр статистики:

За последние 24часов: 1

За последние 7 дней: 3

За последние 30 дней: 21

За всё время: 796