Введение
The motherboard contains multiple important internal components, such as the SSD card and the Wi-Fi card.
This guide will illustrate the prerequisite removal of the keyboard panel and then the battery pack, revealing the motherboard. Multiple screws will be removed followed by lifting the motherboard up and out of the internal casing.
Выберете то, что вам нужно
-
-
Turn the laptop over.
-
Remove all nine 3mm screws on back panel with a Phillips Head 1 driver.
-
-
-
Pry off the four rubber bumpers, located at the top corners and center of the back panel, off with a pair of tweezers.
-
Unscrew the four 3mm screws under the bumpers using a Phillips Head 1 screwdriver.
-
-
-
Flip the laptop right side up and open the clamshell.
-
Starting at the bottom right corner, slide the opening tool into the crevice between the blue and silver panels.
-
Carefully pry the top casing up around the edges, moving counterclockwise.
-
-
-
Close the laptop and orient it on its side (clamshell hinge up), carefully holding it steady to ensure its safety.
-
Insert the opening tool inside of the hinge and pry with an even amount of force to disconnect the keyboard panel from the fan grate.
-
-
-
Reorient the laptop in an upright fashion and open the clamshell.
-
If needed, continue to pry the silver keyboard panel from the rest of the hardware with minimal force.
-
Slowly slide the silver keyboard panel towards you while lifting gently to separate the halves.
-
-
-
While keeping silver keyboard panel hovering above the laptop, locate the touchpad connector ribbon attached to both the silver panel and motherboard.
-
With your finger, flip up the white clasp that holds the connector, releasing the connector ribbon.
-
Unpeel the connector ribbon from its position on the motherboard.
-
-
-
With your finger, flip up the white clasp that connects the larger keyboard connector to the motherboard, releasing the connector ribbon.
-
Gently pull the connector ribbon from the clasp.
-
-
-
-
Lift the keyboard panel up and away from the CPU, completely revealing the mainframe.
-
-
-
With the internal hardware exposed, disconnect the battery cable from the motherboard.
-
If tightly fastened, gently wiggle the plug out of the jack.
-
-
-
Remove the three 4mm screws around the perimeter of the battery pack with a Phillips Head 1 screwdriver.
-
-
-
Flip up the two white clasps that hold the connector ribbon to the battery to release the ribbon.
-
Remove the 'motherboard to USB board' connector ribbon from its place.
-
-
-
Detach the speaker cable from its fastener on the motherboard by pulling it out with your fingers or using a spudger.
-
-
-
Using your fingers, gently pry out the two L-shaped speaker panels from between the external casing and battery pack.
-
-
-
Remove the two Wi-Fi antenna cables that are attached to the Wi-Fi card by pulling them up.
-
-
-
Using your fingers, pull the cooling fan cable from its fastener on the motherboard
-
-
-
Remove the 3mm screw that holds down the Wifi mini-PCI card using a Phillips Head 1 driver.
-
-
-
Remove the three 3mm screws that hold the cooling fan in place using a Phillips Head 1 driver.
-
-
-
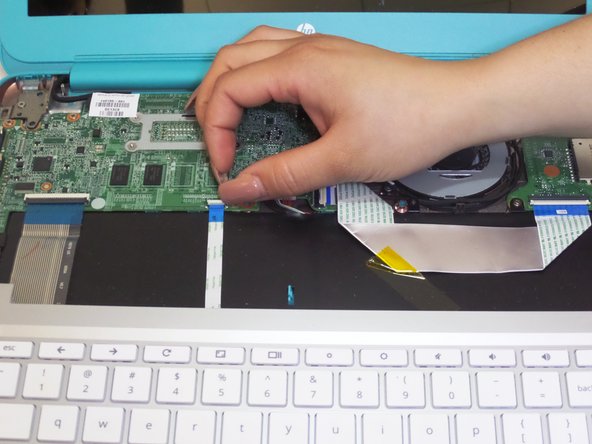
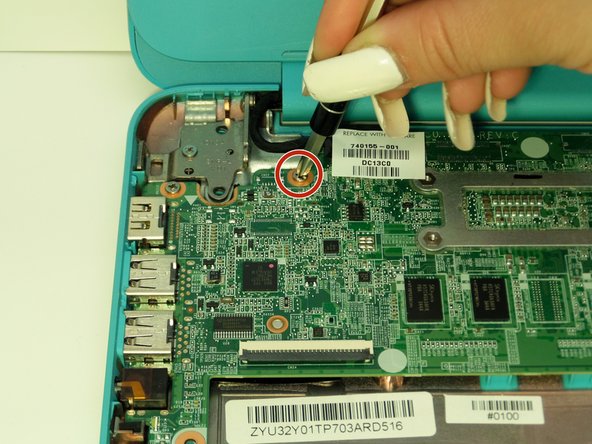
In the upper right hand corner of the device, remove the 6mm screw holding the PCB board in place by using a Phillips Head 1.
-
-
-
Remove the three 3mm screws from the surface of the motherboard using a Phillips Head 1.
-
-
-
Carefully lift the motherboard up towards the screen as if it was hinged on one side.
-


To reassemble your device, follow these instructions in reverse order.
To reassemble your device, follow these instructions in reverse order.
Команда

CSU Fullerton, Team S2-G2, Bruce Fall 2017 Участник CSU Fullerton, Team S2-G2, Bruce Fall 2017
CSUF-BRUCE-F17S2G2
3 членов
Автор 6 руководств