Введение
This model's RAM is located in an unusual place, underneath the motherboard. The motherboard must first be carefully lifted before you can access the RAM.
Выберете то, что вам нужно
-
-
Pull the battery out towards you while your fingers are still holding the latches in place.
-
-
-
Remove the thin plastic cover using the flat metal spudger to expose another screw.
-
Remove one 7 mm screw with a Phillips #0 screwdriver.
-
-
-
Underneath each rubber foot, there is a screw.
-
Use the Phillips #1 screwdriver to remove a 4.8 mm screw on each side.
-
-
-
-
Remove the following six screws with a Phillips #1 screwdriver:
-
Two 7 mm screws.
-
Two 7 mm screws.
-
Two 4.8 mm screws.
-
-
-
Remove two 2.4 mm broadhead screws from the CD Drive bay with a Phillips #0 screwdriver.
-
-
-
Flip the laptop back over. Then, with the laptop open, move the plastic prying tool around the top cover to pry it from the enclosure.
-
-
-
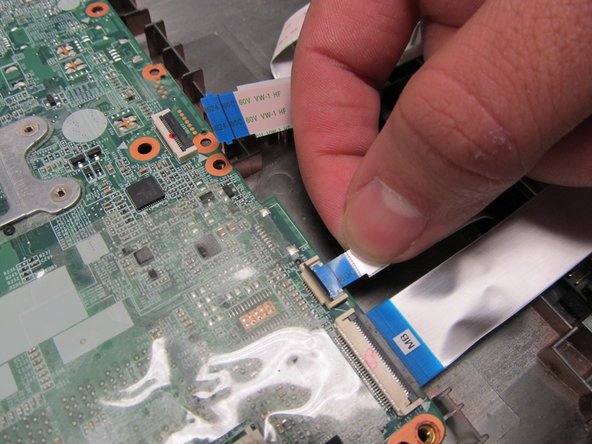
Remove the ribbon connecting the keyboard to the motherboard.
-
You may now fully lift the front panel from the rest of the laptop.
-
-
-
Remove four 5.6 mm screws with a Phillips 1 screwdriver.
-
Remove one 3 mm screw with a Phillips 1 screwdriver.
-
-
-
The motherboard has two slots for the RAM. The process for removing each one is the same
-
Pull the metal tabs away from the RAM.
-


To reassemble your device, follow these instructions in reverse order.
To reassemble your device, follow these instructions in reverse order.
Отменить: Я не выполнил это руководство.
3 участников успешно повторили данное руководство.
Команда

UC Davis, Team 1-4, Oliver Fall 2016 Участник UC Davis, Team 1-4, Oliver Fall 2016
UCD-OLIVER-F16S1G4
4 членов
Автор 8 руководств