Перейти к основному содержанию

HP Pavilion G60-120US Midframe Replacement

Выберете то, что вам нужно

  1. HP Pavilion G60-120US Midframe Replacement, Battery: шаг 1, изображение 1 из 1
    • Make sure the laptop is turned off.

    • Turn the laptop over to reveal the battery.

  2. HP Pavilion G60-120US Midframe Replacement: шаг 2, изображение 1 из 2 HP Pavilion G60-120US Midframe Replacement: шаг 2, изображение 2 из 2
    • Slide and hold the battery release switch to the left to release the battery from the device.

  3. HP Pavilion G60-120US Midframe Replacement: шаг 3, изображение 1 из 2 HP Pavilion G60-120US Midframe Replacement: шаг 3, изображение 2 из 2
    • While holding the battery release switch, grab the battery and pull it upward gently.

  4. HP Pavilion G60-120US Midframe Replacement, Keyboard: шаг 4, изображение 1 из 1
    • Using the Phillips #0 screwdriver, remove the seven 4.0mm screws on the battery compartment of the laptop.

  5. HP Pavilion G60-120US Midframe Replacement: шаг 5, изображение 1 из 2 HP Pavilion G60-120US Midframe Replacement: шаг 5, изображение 2 из 2
    • Using the Phillips #0 screwdriver, remove two 4.0mm screws from the hard disk cover.

    • Remove the hard disk cover.

  6. HP Pavilion G60-120US Midframe Replacement: шаг 6, изображение 1 из 2 HP Pavilion G60-120US Midframe Replacement: шаг 6, изображение 2 из 2
    • Remove the hard drive by pulling gently and disconnecting the hard drive from the laptop.

    • Gently pull on the black and red wiring on the bottom left to separate the wire from the component.

  7. HP Pavilion G60-120US Midframe Replacement: шаг 7, изображение 1 из 1
    • Remove the two 4.0 mm Phillips #0 screws from the hard disk compartment.

  8. HP Pavilion G60-120US Midframe Replacement: шаг 8, изображение 1 из 3 HP Pavilion G60-120US Midframe Replacement: шаг 8, изображение 2 из 3 HP Pavilion G60-120US Midframe Replacement: шаг 8, изображение 3 из 3
    • Using the Phillips #0 screwdriver, remove the two 4.0 mm screws from the memory card cover.

    • Remove the memory disk cover.

  9. HP Pavilion G60-120US Midframe Replacement: шаг 9, изображение 1 из 3 HP Pavilion G60-120US Midframe Replacement: шаг 9, изображение 2 из 3 HP Pavilion G60-120US Midframe Replacement: шаг 9, изображение 3 из 3
    • Using the Phillips #0 screwdriver, remove the 4.0 mm screw from the Wi-Fi chip cover.

    • Remove the Wi-Fi chip cover.

  10. HP Pavilion G60-120US Midframe Replacement: шаг 10, изображение 1 из 2 HP Pavilion G60-120US Midframe Replacement: шаг 10, изображение 2 из 2
    • Using the Phillips #0 screwdriver, remove the two 3.0 mm screws securing the Wi-Fi chip in place.

    • Grab the Wi-Fi chip and pull up gently to the left to disconnect it from the laptop.

  11. HP Pavilion G60-120US Midframe Replacement: шаг 11, изображение 1 из 2 HP Pavilion G60-120US Midframe Replacement: шаг 11, изображение 2 из 2
    • Disconnect the two wires connecting the chip's base.

    • Remove the Wi-Fi chip.

  12. HP Pavilion G60-120US Midframe Replacement: шаг 12, изображение 1 из 1
    • Using the Phillips #0 screwdriver, remove the seven 4.0 mm screws on the bottom of the laptop.

  13. HP Pavilion G60-120US Midframe Replacement: шаг 13, изображение 1 из 3 HP Pavilion G60-120US Midframe Replacement: шаг 13, изображение 2 из 3 HP Pavilion G60-120US Midframe Replacement: шаг 13, изображение 3 из 3
    • Turn the laptop back to its upright state.

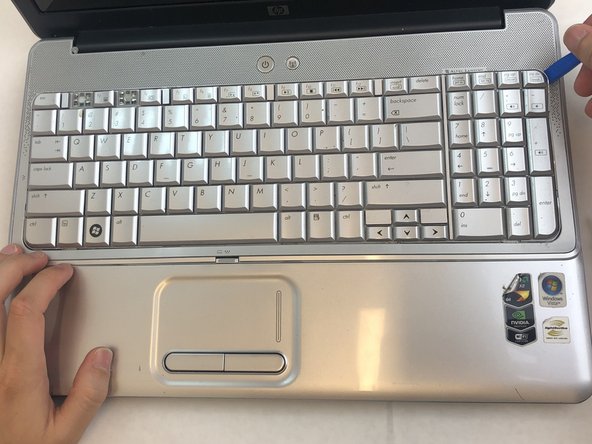
    • Insert an opening tool into the upper right corner of the keyboard and gently lift it to separate it from the laptop.

    • Be sure not to apply excessive pressure to prevent the bending and breaking of the keyboard.

    • Do not pull the keyboard all the way out because there is a wiring connection under the keyboard.

  14. HP Pavilion G60-120US Midframe Replacement: шаг 14, изображение 1 из 3 HP Pavilion G60-120US Midframe Replacement: шаг 14, изображение 2 из 3 HP Pavilion G60-120US Midframe Replacement: шаг 14, изображение 3 из 3
    • Grab the wiring and gently pull it out to disconnect it from the laptop.

    • Don't use excessive force.

    • Remove the keyboard.

  15. HP Pavilion G60-120US Midframe Replacement, Display Assembly: шаг 15, изображение 1 из 2 HP Pavilion G60-120US Midframe Replacement, Display Assembly: шаг 15, изображение 2 из 2
    • Insert an opening tool into the top right side of the corner, and gently lift the rest of the cover to separate if from the laptop.

    • Avoid using excessive force which may break the cover.

    • Do not completely pull out the cover; there is a wire still attached to the laptop.

  16. HP Pavilion G60-120US Midframe Replacement: шаг 16, изображение 1 из 2 HP Pavilion G60-120US Midframe Replacement: шаг 16, изображение 2 из 2
    • Using your fingertips, detach the ribbon cable by gently lifting up the black tab located on the bottom end of the cable.

    • Separate the cable and remove the cover.

  17. HP Pavilion G60-120US Midframe Replacement: шаг 17, изображение 1 из 3 HP Pavilion G60-120US Midframe Replacement: шаг 17, изображение 2 из 3 HP Pavilion G60-120US Midframe Replacement: шаг 17, изображение 3 из 3
    • Remove the mouse and touchpad cable by lifting the black tab and gently pulling the cable out.

  18. HP Pavilion G60-120US Midframe Replacement: шаг 18, изображение 1 из 3 HP Pavilion G60-120US Midframe Replacement: шаг 18, изображение 2 из 3 HP Pavilion G60-120US Midframe Replacement: шаг 18, изображение 3 из 3
    • Detach the white screen wiring on the bottom left side by gently pulling out.

    • Detach two black screen cables on the middle left side by gently pulling out the cables.

    • Pull out the black cable on the upper right side of the laptop.

    • Use gentle pressure while removing the wires.

  19. HP Pavilion G60-120US Midframe Replacement: шаг 19, изображение 1 из 3 HP Pavilion G60-120US Midframe Replacement: шаг 19, изображение 2 из 3 HP Pavilion G60-120US Midframe Replacement: шаг 19, изображение 3 из 3
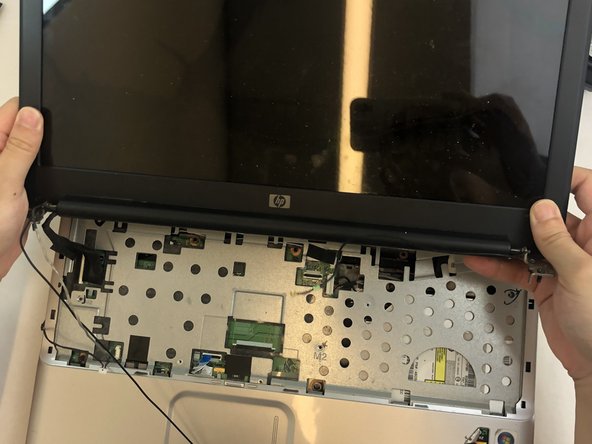
    • Using the Phillips #0 screwdriver, remove the four 4.0 mm screws on both hinges of the laptop's screen.

  20. HP Pavilion G60-120US Midframe Replacement: шаг 20, изображение 1 из 2 HP Pavilion G60-120US Midframe Replacement: шаг 20, изображение 2 из 2
    • Gently lift and detach the display assembly from the laptop’s base.

  21. HP Pavilion G60-120US Midframe Replacement, Midframe: шаг 21, изображение 1 из 1
    • Using the Phillips #0 screwdriver, remove the four 4mm screws from the midframe.

  22. HP Pavilion G60-120US Midframe Replacement: шаг 22, изображение 1 из 3 HP Pavilion G60-120US Midframe Replacement: шаг 22, изображение 2 из 3 HP Pavilion G60-120US Midframe Replacement: шаг 22, изображение 3 из 3
    • Using an opening tool, gently lift each corner of the midframe.

    • Use caution when applying pressure with the opening tool as it may break while attempting to lift the midframe.

    • Detach and remove the midframe from the main body of the laptop.

Заключение

To reassemble your device, follow these instructions in reverse order.

Еще один человек закончил это руководство.

Won Chan Park

Участник с: 09/17/19

670 Репутация

Автор 6 руководств

Команда

0 Комментариев

Добавить комментарий

Просмотр статистики:

За последние 24часов: 0

За последние 7 дней: 3

За последние 30 дней: 3

За всё время: 152