Эта версия возможно содержит некорректные исправления. Переключить на последнюю проверенную версию.
Выберете то, что вам нужно
-
Этот шаг не переведен. Помогите перевести
-
Shut down the computer.
-
Disconnect all external devices and cables from the computer.
-
-
Этот шаг не переведен. Помогите перевести
-
Locate the gray sliding tab next to the black bar where the battery is located.
-
Slide the gray sliding tab to the left until you hear a distinct click.
-
The inside edge of the battery should pop up.
-
-
Этот шаг не переведен. Помогите перевести
-
Grasp the inside edge of the battery.
-
Lift the inside edge of the battery up to detach the battery from the laptop.
-
-
Этот шаг не переведен. Помогите перевести
-
With the battery removed, locate the hard drive access panel.
-
-
Этот шаг не переведен. Помогите перевести
-
Identify the two screws that attach the hard drive access panel.
-
Remove the identified screws with your #00 Philips screwdriver.
-
Lift the left edge of the access panel up and to the right to detach the hard drive access panel from the laptop.
-
-
Этот шаг не переведен. Помогите перевести
-
Identify the plastic tab located on the left side of the hard drive.
-
Grasp the tab, gently lift up, and slide the tab to the left to remove the hard drive from the laptop.
-
-
Этот шаг не переведен. Помогите перевести
-
Locate the two screws holding down the RAM access cover
-
Unscrew the two screws with a size 00 Philips screwdriver.
-
-
-
Этот шаг не переведен. Помогите перевести
-
Lift up on the screw side of the RAM access cover to remove it.
-
-
Этот шаг не переведен. Помогите перевести
-
Gently pull apart the metal tabs located on both sides of the stick of RAM.
-
The RAM stick should tilt upwards.
-
-
Этот шаг не переведен. Помогите перевести
-
Repeat the previous two steps for the remaining stick of RAM.
-
-
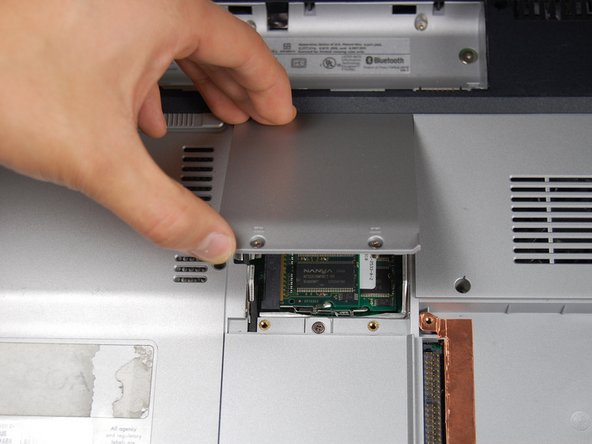
Этот шаг не переведен. Помогите перевести
-
Locate the small panel below the panel you just removed.
-
Loosen the one screw in the middle with a #00 Phillips screwdriver. Again, the screw will not fall out of the panel when loosened.
-
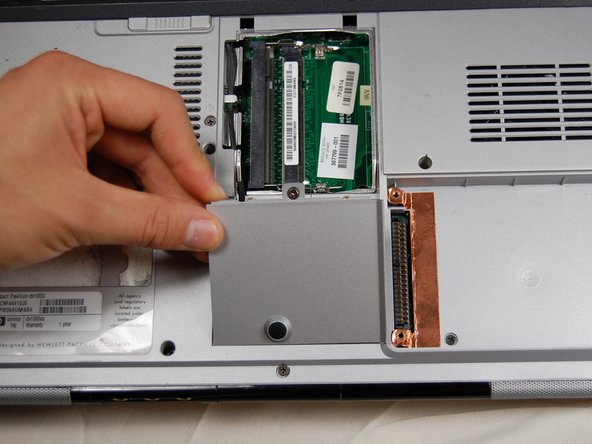
Lift the panel up and out of its slot to remove.
-
-
Этот шаг не переведен. Помогите перевести
-
Identify the two connections at the top of the bluetooth card.
-
Using your fingers, gently pull up on the white clip until it releases.
-
Remove the black clip in the same manner as the white clip
-
-
Этот шаг не переведен. Помогите перевести
-
Locate the two clips on either side of the Bluetooth card.
-
Using your fingers, press the clips outwards, away from the card until the card pops up.
-
Grab the card gently from the top and pull the card up and out of the slot.
-
-
Этот шаг не переведен. Помогите перевести
-
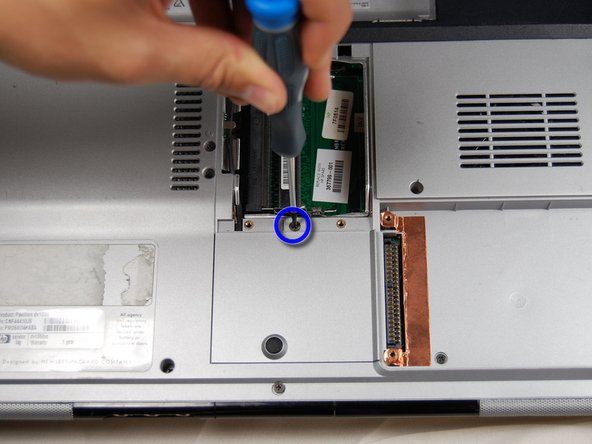
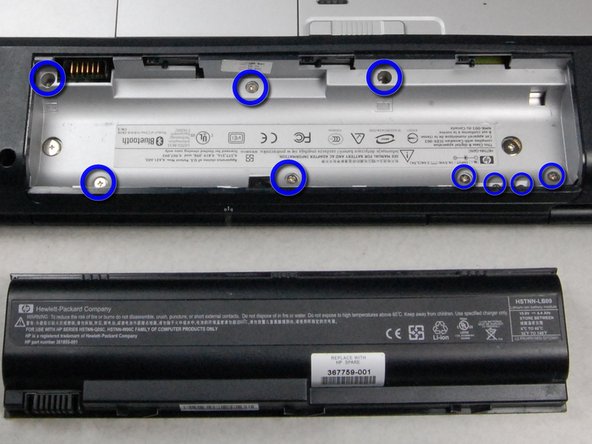
Remove and set aside all of the highlighted screws in the first picture with a #00 Phillips screwdriver.
-
Remove and separately set aside all of the highlighted screws in the second picture with a #00 Phillips screwdriver.
-
-
Этот шаг не переведен. Помогите перевести
-
Turn the laptop right side up, and open it to reveal the keyboard.
-
Press the two white clips forward and lift the tape out of the clip.
-
-
Этот шаг не переведен. Помогите перевести
-
Locate the MediaKeys. They are the black strip right above where the keyboard was.
-
Using the spudger, gently pry up the MediaKeys.
-
-
Этот шаг не переведен. Помогите перевести
-
Remove the two screws next to the left hinge of the monitor with a #00 Phillips screwdriver.
-
Keep these screws separate from the other screws you have removed.
-
-
Этот шаг не переведен. Помогите перевести
-
Using the spudger, loosen the casing behind the battery and the two sides.
-
The case should lift easily upwards and outwards towards you if you are facing the battery compartment.
-
-
Этот шаг не переведен. Помогите перевести
-
Remove the highlighted screws with the #00 Phillips screwdriver.
-
-
Этот шаг не переведен. Помогите перевести
-
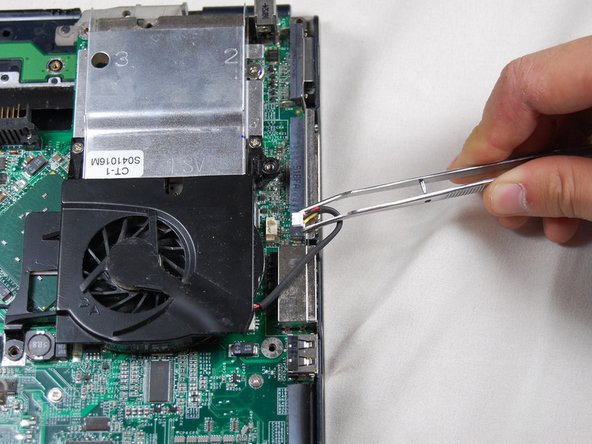
Squeeze the white plastic part of the wire connected to the computer and gently pull. This will detach the fan from the computer.
-
-
Этот шаг не переведен. Помогите перевести
-
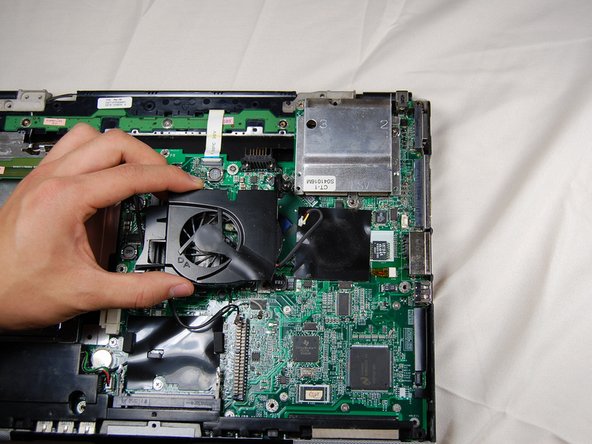
With the wire removed, the fan should lift up easily from the board.
-


Отменить: Я не выполнил это руководство.
8 участников успешно повторили данное руководство.
Команда

Cal Poly, Team 10-37, Forte Spring 2011 Участник Cal Poly, Team 10-37, Forte Spring 2011
CPSU-FORTE-S11S10G37
5 членов
Автор 9 руководств
Один комментарий
At removing the fan. Try not removing the 1 screw near the heat sink. Because if you dont have an strong screwdriver, or screwdriver designed for the cpu heatsink/cooler. The temp will go crazy. Try to copy the tension on the other heatsink screw if you did removed it. I think i tensioned it nearly tight. And it came back normal. But tanks for the tutorial because an stupid cockroach egg got inside to my cooling system. Im still using it in 2022 works like a charm.