Перейти к основному содержанию

HP Pavilion g6-2228tx RAM Replacement

Выберете то, что вам нужно

  1. HP Pavilion g6-2228tx RAM Replacement, Battery: шаг 1, изображение 1 из 2 HP Pavilion g6-2228tx RAM Replacement, Battery: шаг 1, изображение 2 из 2
    • Push the battery latch to the left to release the battery.

    • Remove the battery from the device.

  2. HP Pavilion g6-2228tx RAM Replacement, Hard Drive: шаг 2, изображение 1 из 2 HP Pavilion g6-2228tx RAM Replacement, Hard Drive: шаг 2, изображение 2 из 2
    • Use a Phillips #0 screw driver to loosen the screw. The screw will not detach from the cover.

  3. HP Pavilion g6-2228tx RAM Replacement: шаг 3, изображение 1 из 3 HP Pavilion g6-2228tx RAM Replacement: шаг 3, изображение 2 из 3 HP Pavilion g6-2228tx RAM Replacement: шаг 3, изображение 3 из 3
    • Place your hand on the cover and slide the cover down.

    • Use your hand to lift the cover from the bottom right and slide the cover to the right to remove the cover.

  4. HP Pavilion g6-2228tx RAM Replacement: шаг 4, изображение 1 из 2 HP Pavilion g6-2228tx RAM Replacement: шаг 4, изображение 2 из 2
    • Place one finger on the right side of the hard drive.

    • Push the hard drive to the left and lift the hard drive up to remove it from the device.

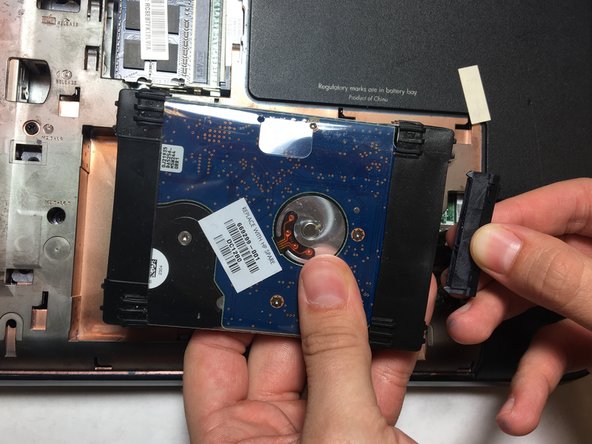
  5. HP Pavilion g6-2228tx RAM Replacement: шаг 5, изображение 1 из 2 HP Pavilion g6-2228tx RAM Replacement: шаг 5, изображение 2 из 2
    • Disconnect the connecting part by pulling the part to the right.

    • Remove the hard drive from the device.

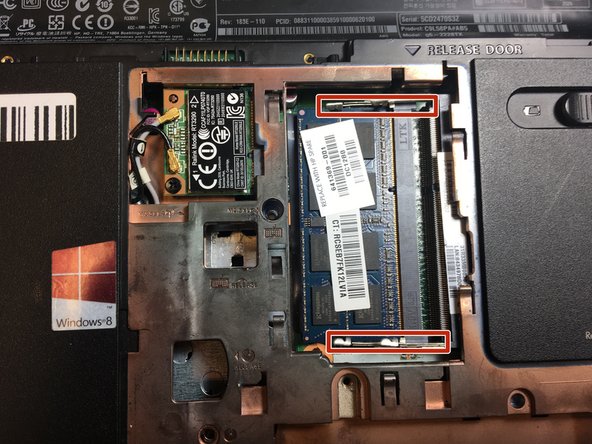
  6. HP Pavilion g6-2228tx RAM Replacement, RAM: шаг 6, изображение 1 из 2 HP Pavilion g6-2228tx RAM Replacement, RAM: шаг 6, изображение 2 из 2
    • The silver hinges holds the RAM in place.

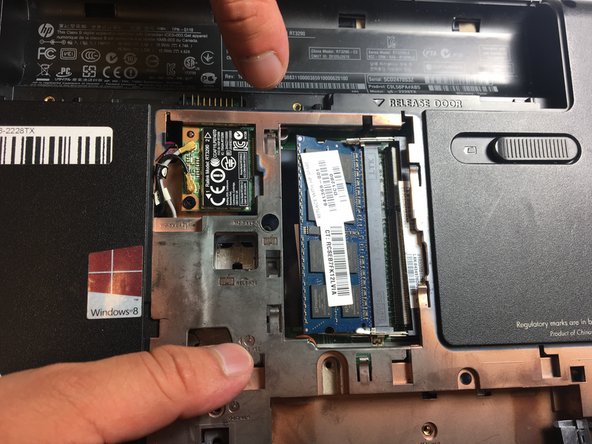
  7. HP Pavilion g6-2228tx RAM Replacement: шаг 7, изображение 1 из 2 HP Pavilion g6-2228tx RAM Replacement: шаг 7, изображение 2 из 2
    • Use two fingers to push both silver hinges outward to release the RAM.

    • The released RAM will pop up.

  8. HP Pavilion g6-2228tx RAM Replacement: шаг 8, изображение 1 из 1
    • Pull the RAM stick to the left and remove it from the device.

Заключение

To reassemble your device, follow these instructions in reverse order.

Hai Lin

Участник с: 10/19/18

446 Репутация

Автор 4 руководств

Команда

UC Davis, Team S4-G6, Lore Fall 2018 Участник UC Davis, Team S4-G6, Lore Fall 2018

UCD-LORE-F18S4G6

3 членов

Автор 4 руководств

0 Комментариев

Добавить комментарий

Просмотр статистики:

За последние 24часов: 1

За последние 7 дней: 5

За последние 30 дней: 24

За всё время: 674