Перейти к основному содержанию

Эта версия возможно содержит некорректные исправления. Переключить на последнюю проверенную версию.

Выберете то, что вам нужно

  1. Этот шаг не переведен. Помогите перевести

    : шаг 1, изображение 1 из 1
    • Working on your device while it is turned on may result in electric shock. Make sure to shut down and unplug your device before you begin.

    • Flip your device over so the bottom panel is facing up.

  2. Этот шаг не переведен. Помогите перевести

    : шаг 2, изображение 1 из 1
    • The battery is held in by a latch in the front and tabs in the back.

    • Slide the lock switch left, towards the center of the computer.

    • Lift up the battery, rotating it up and away from you, then pull it out.

    • To put the battery back in, line it up with the battery bay and the holes for the tabs. Then let the battery rotate towards you and press down until the latch engages and you hear a click.

  3. Этот шаг не переведен. Помогите перевести

    : шаг 3, изображение 1 из 1
    • Unscrew one Phillips #1 screw from the back panel.

    • The screw is on a spring and attached to the panel. It will pop up, but will not separate from the back panel.

  4. Этот шаг не переведен. Помогите перевести

    : шаг 4, изображение 1 из 2 : шаг 4, изображение 2 из 2
    • Slide the back panel down and pull it up.

  5. Этот шаг не переведен. Помогите перевести

    : шаг 5, изображение 1 из 1
    • Unscrew the 7 mm Phillips #1 screw next to the keyboard icon.

  6. Этот шаг не переведен. Помогите перевести

    : шаг 6, изображение 1 из 1
    • Flip the laptop over and open the screen.

  7. Этот шаг не переведен. Помогите перевести

    : шаг 7, изображение 1 из 2 : шаг 7, изображение 2 из 2
    • A ribbon cable is attached to the back of the keyboard. Avoid lifting or moving the keyboard more than a couple inches before you disconnect the ribbon cable or you may damage it.

    • Carefully pry up one of the top corners of the keyboard with a prying tool. Slide the tool along the top of the keyboard to release it from the housing. Pull the top of the keyboard towards you an inch or two.

    • The keyboard may make some cracking noises as you pry it from the casing. This is expected.

    • Pull the keyboard up and away from you, as it is held in by clips in the front. It is not yet disconnected.

  8. Этот шаг не переведен. Помогите перевести

    : шаг 8, изображение 1 из 1
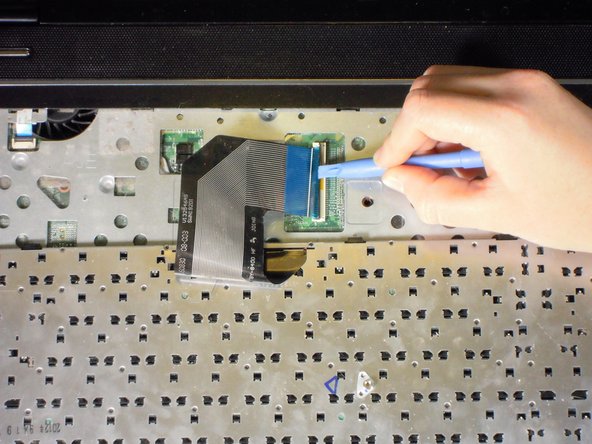
    • Gently turn keyboard over, towards you, to reveal the silver cable ribbon.

  9. Этот шаг не переведен. Помогите перевести

    : шаг 9, изображение 1 из 3 : шаг 9, изображение 2 из 3 : шаг 9, изображение 3 из 3
    • Using a prying tool, flip the black clip up and to the right. Pull the silver cable out and to the left, the keyboard is now detached from the laptop.

Финишная черта

8 участников успешно повторили данное руководство.

John Sutton

Участник с: 04/24/14

1 566 Репутация

Автор 8 руководств

Команда

Cal Poly, Team 11-51, Amido Spring 2014 Участник Cal Poly, Team 11-51, Amido Spring 2014

CPSU-AMIDO-S14S11G51

4 членов

Автор 21 руководств

3 Комментариев

Good guide. It helped me going quicker at getting to the keyboard. Thank you!

antoniotavares - Ответить

The keyboard for this computer is HP part number 640208-001 and it is not available anymore in HP. It is available in Amazon, however.

antoniotavares - Ответить

Добавить комментарий

Просмотр статистики:

За последние 24часов: 0

За последние 7 дней: 2

За последние 30 дней: 21

За всё время: 11,045