Перейти к основному содержанию

HP Pavilion x360 11-p110nr Speakers Replacement

Выберете то, что вам нужно

  1. HP Pavilion x360 11-p110nr Speakers Replacement, Speakers: шаг 1, изображение 1 из 3 HP Pavilion x360 11-p110nr Speakers Replacement, Speakers: шаг 1, изображение 2 из 3 HP Pavilion x360 11-p110nr Speakers Replacement, Speakers: шаг 1, изображение 3 из 3
    • Eleven case screws are located on the bottom of the laptop. Two will be underneath the rubber feet.

    • Use a Phillips #0 screwdriver to remove all 6.7 mm screws from the bottom cover.

    • Carefully take the bottom cover off.

    • Don't force the bottom plate off. There will be a cable connecting the bottom plate to the rest of the laptop. If you pull too hard you risk damaging this cable.

  2. HP Pavilion x360 11-p110nr Speakers Replacement: шаг 2, изображение 1 из 3 HP Pavilion x360 11-p110nr Speakers Replacement: шаг 2, изображение 2 из 3 HP Pavilion x360 11-p110nr Speakers Replacement: шаг 2, изображение 3 из 3
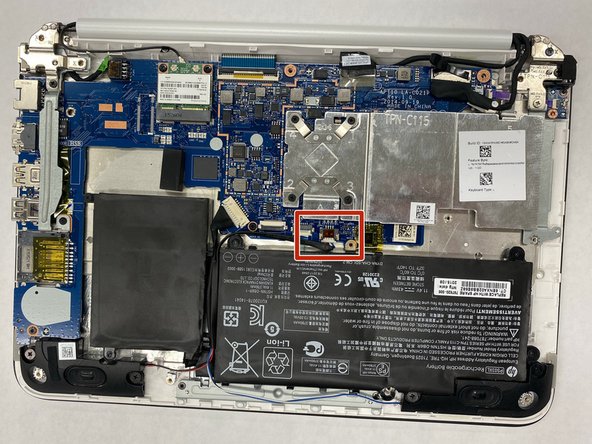
    • Before fully removing the top cover, locate the cable that connects the audio controls.

    • Once located, lift the small black flap and carefully pull the cable out.

  3. HP Pavilion x360 11-p110nr Speakers Replacement: шаг 3, изображение 1 из 3 HP Pavilion x360 11-p110nr Speakers Replacement: шаг 3, изображение 2 из 3 HP Pavilion x360 11-p110nr Speakers Replacement: шаг 3, изображение 3 из 3
    • Remove the large cable connecting the battery to the main board

    • Caution: Lithium Ion batteries provide a risk of electrocution or fire if mishandled. Failure to disconnect the battery before removing the speakers could also lead to risk of electrocution.

  4. HP Pavilion x360 11-p110nr Speakers Replacement: шаг 4, изображение 1 из 3 HP Pavilion x360 11-p110nr Speakers Replacement: шаг 4, изображение 2 из 3 HP Pavilion x360 11-p110nr Speakers Replacement: шаг 4, изображение 3 из 3
    • Locate the cable for the speakers and unplug, as shown.

    • If needed, use the tweezers to gently remove the cable from its connector.

  5. HP Pavilion x360 11-p110nr Speakers Replacement: шаг 5, изображение 1 из 3 HP Pavilion x360 11-p110nr Speakers Replacement: шаг 5, изображение 2 из 3 HP Pavilion x360 11-p110nr Speakers Replacement: шаг 5, изображение 3 из 3
    • Use a Phillips #0 screwdriver to remove the four 5.8 mm screws from the speakers.

    • The speakers are now not secured to the laptop.

  6. HP Pavilion x360 11-p110nr Speakers Replacement: шаг 6, изображение 1 из 3 HP Pavilion x360 11-p110nr Speakers Replacement: шаг 6, изображение 2 из 3 HP Pavilion x360 11-p110nr Speakers Replacement: шаг 6, изображение 3 из 3
    • Lift each speaker out of the laptop.

    • Carefully remove each speaker.

    • The speakers are connected to each other by a wire.

Заключение

To reassemble your device, follow these instructions in reverse order.

Aeorrell

Участник с: 03/27/23

433 Репутация

Автор 3 руководств

Команда

IUPUI, Team 1-2, Harley Spring 2023 Участник IUPUI, Team 1-2, Harley Spring 2023

IUPUI-HARLEY-S23S1G2

3 членов

Автор 3 руководств

0 Комментариев

Добавить комментарий

Просмотр статистики:

За последние 24часов: 0

За последние 7 дней: 0

За последние 30 дней: 4

За всё время: 55