Перейти к основному содержанию

HP Sprocket 2-in-1 Flash Replacement

Выберете то, что вам нужно

  1. HP Sprocket 2-in-1 Flash Replacement, Outer Casing: шаг 1, изображение 1 из 2 HP Sprocket 2-in-1 Flash Replacement, Outer Casing: шаг 1, изображение 2 из 2
    • Remove the back cover and any printer paper inside the device.

  2. HP Sprocket 2-in-1 Flash Replacement: шаг 2, изображение 1 из 2 HP Sprocket 2-in-1 Flash Replacement: шаг 2, изображение 2 из 2
    • Using the Jimmy, slowly pry open the outer edge of the remaining white plastic on the back.

    • Remove the plastic from the device once it lifts out freely.

  3. HP Sprocket 2-in-1 Flash Replacement: шаг 3, изображение 1 из 3 HP Sprocket 2-in-1 Flash Replacement: шаг 3, изображение 2 из 3 HP Sprocket 2-in-1 Flash Replacement: шаг 3, изображение 3 из 3
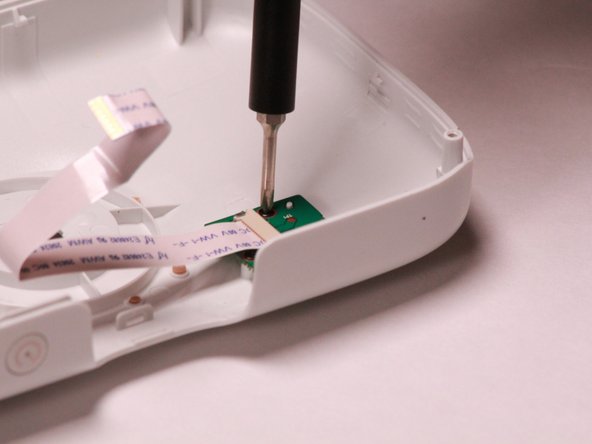
    • Remove two 2.5mm JIS #00 located on the small circuit board in view.

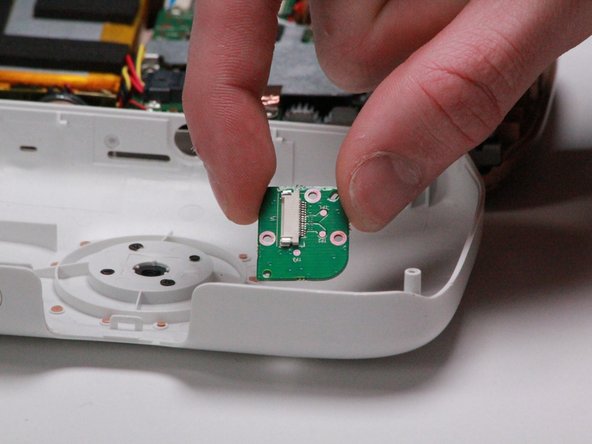
    • Use the Jimmy to remove the board after the screws have been removed.

    • Be careful not to crease or damage the ribbon cable.

  4. HP Sprocket 2-in-1 Flash Replacement: шаг 4, изображение 1 из 3 HP Sprocket 2-in-1 Flash Replacement: шаг 4, изображение 2 из 3 HP Sprocket 2-in-1 Flash Replacement: шаг 4, изображение 3 из 3
    • Remove two 2.5mm JIS #00 screws from the translucent plastic bracket.

    • One will be located beneath the ribbon cable.

    • Remove the translucent plastic bracket by hand.

  5. HP Sprocket 2-in-1 Flash Replacement: шаг 5, изображение 1 из 2 HP Sprocket 2-in-1 Flash Replacement: шаг 5, изображение 2 из 2
    • Remove four 2.5mm JIS #00 screws from the beige casing.

  6. HP Sprocket 2-in-1 Flash Replacement: шаг 6, изображение 1 из 3 HP Sprocket 2-in-1 Flash Replacement: шаг 6, изображение 2 из 3 HP Sprocket 2-in-1 Flash Replacement: шаг 6, изображение 3 из 3
    • Use the iFixit opening tool to slowly work between the white and beige casing around the device.

    • Flip the device over and seperate the white casing from the rest of the device.

    • Be careful not to break the plastic while removing the case.

    • Gently remove the white casing as there is a ribbon cable connecting the two pieces.

  7. HP Sprocket 2-in-1 Flash Replacement: шаг 7, изображение 1 из 1
    • Carefully remove the ribbon cable that connects the flash to the outer casing.

  8. HP Sprocket 2-in-1 Flash Replacement, Flash: шаг 8, изображение 1 из 2 HP Sprocket 2-in-1 Flash Replacement, Flash: шаг 8, изображение 2 из 2
    • Using a Japanese Industrial Standard (J) screwdriver (J00 bit), remove three 2.5mm screws connecting the flash circuit board to the housing.

  9. HP Sprocket 2-in-1 Flash Replacement: шаг 9, изображение 1 из 2 HP Sprocket 2-in-1 Flash Replacement: шаг 9, изображение 2 из 2
    • Carefully remove ribbon from the flash circuit board.

    • Remove flash circuit board from the housing.

Заключение

To reassemble your device, follow these instructions in reverse order.

Paulo Warren

Участник с: 02/05/19

458 Репутация

Автор 4 руководств

Команда

University of Michigan, Team S1-G4, Li Winter 2019 Участник University of Michigan, Team S1-G4, Li Winter 2019

UMIC-LI-W19S1G4

4 членов

Автор 10 руководств

0 Комментариев

Добавить комментарий

Просмотр статистики:

За последние 24часов: 1

За последние 7 дней: 1

За последние 30 дней: 3

За всё время: 239