Введение
If the keys on your keyboard are sticky or broken, follow this replacement guide!
Выберете то, что вам нужно
-
-
Flip the laptop over.
-
Slide the lever with the battery symbol beside it firmly until the battery pops out.
-
Remove the battery from the laptop.
-
-
-
Slide the right lever firmly to the right.
-
Slide the cover towards yourself to remove it.
-
-
-
-
Remove the two 16mm screws with a Phillips #0 screwdriver.
Note that it is not necessary to completely remove these screws. They are meant to be 'captive' and not removed completely. If you unscrew them to that 'first thread' so they are loose and floppy, they are no longer holding the keyboard in place and it is safe to continue to the next step.
-
-
-
Flip the laptop over so the keyboard is visible.
-
Insert the spudger under the left side of the keyboard.
-
Carefully raise the side of the keyboard and firmly pull the left corner of the keyboard until it pops up.
-
Run your fingers under the edges of the keyboard along the top edge of the keyboard, from the top left to the top right, to separate it from the remaining clips.
-
Carefully slide the keyboard up toward the screen and out of the case.
Please keep in mind that the keyboard comes with a metal plate. If you managed to pry one of the plastic rivets out of the keyboard, you've damaged the keyboard...
(I should have read the comments about taking the optical drive out first, haha...)
-
-
-
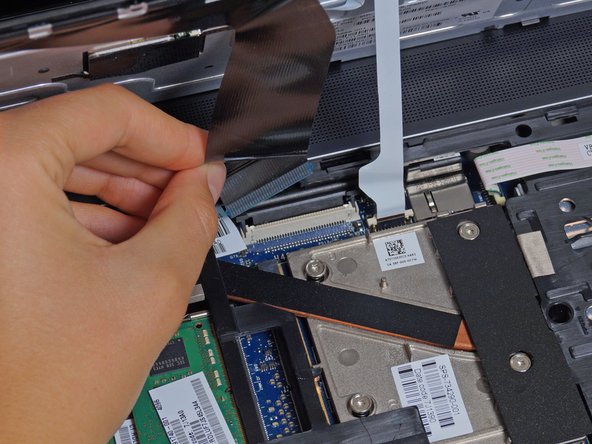
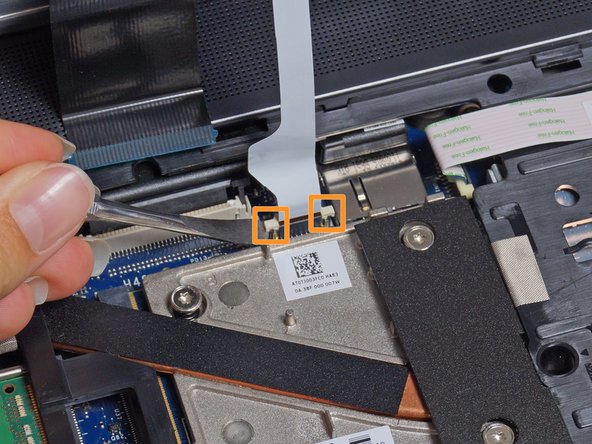
Gently lift the two tabs on either side of the black ribbon with a spudger until the ribbon comes loose.
-
Disconnect the black ribbon by pulling the blue tab hanging off of it.
-
Repeat with the white ribbon.
-


To reassemble your device, follow these instructions in reverse order.
To reassemble your device, follow these instructions in reverse order.
Отменить: Я не выполнил это руководство.
33 участников успешно повторили данное руководство.
Команда

Cal Poly, Team 8-43, Amido Winter 2015 Участник Cal Poly, Team 8-43, Amido Winter 2015
CPSU-AMIDO-W15S8G43
4 членов
Автор 15 руководств
13 Комментариев
I found that if you remove the optical drive, you have access to push the keyboard form the back to disengage the side with the number pad.
In addition to the comments about pushing the keyboard out after removing the optical drive (which is actually the documented way of removing the keyboard) I'd add that the bit about "There are two sets of threads to get past. Once unscrewed from the first thread, lift the screw up until it hits the next set and begin unscrewing again." is incorrect. The screws are deliberately designed to be self retaining. You only need to unscrew it until the screw turns freely (i.e. not fully).
please, will they have the part number of this keyboard ?, it hurt me and I saw the steps that are followed to extract it, and replace it, but I can not find the part number of the keyboard replacement, if someone could have it tell me which is please?
Go to partsurfer.hp.com with the p/n of the machine and you'll get the exact part number of the keyboard you need
Thanks for this! Back in the day, I didn’t know about the PartSurfer. It’s a great resource, for sure!
Also, it’s great to see many people sharing solid advice in the comments. Thanks, everyone!
Great set of instructions! Two things I would add:
1. There are two “layers,” if you will, to the keyboard (that you can see from the edge as you begin to pry up your first edge/corner). The top, plastic layer (that fills in around the keys) and the bottom sub-platform. It’s this bottom, metal layer that you want to get under to pry up.
2. You have to put some strength into prying. I was being too gentle and careful and the dang thing just would NOT release. Once I decided that I didn’t care if I broke the keyboard or its clips (I'm putting in a new one), I got a little more aggressive and it popped right out. It required way more force then I thought necessary, but it worked - and nothing broke.
Thanks!
I found that the keyboard clips on this removable were very sturdy and to be extra careful when removing the keyboard. I had to give it some force to get the keyboard out of its clips.
It has clips at the following areas:
- Tip of the ‘Enter’ key on the Num-Pad
- The the ‘-’ symbol on the Num-Pad
- Under the ‘Page-Up’ button
- Under the ‘Insert’ button
- Between the ‘F9’ and ‘F10’ keys
- Under the ‘F5’ key
- Under the ‘F1’ key
- Just above the ‘Tab’ key
- Under the ‘Shift’ key on the left
Hopefully this helps someone else looking to replace it and allows them to put pulling force on the right areas.
Hi Team, I have bought a zbook 15 g2 and the keyboard is not backlit. is it possible to straight swap this existing keyboard with a keyboard fit for this laptop frame that has backlit capability? Guess my question is, IS the slot for black-lit illumination on my frame that is simply not used? would appreciate your help. cheers.
Well Backlit feature depends on a different flex ribbon from the one for the keyboard communication, if the keyboard was replaced and the backlight ribbon was still attached to the keyboard, then you’re out of luck, because HP won’t give you another flex ribbon,
when replacing the keyboard, the backlight flex ribbon needs to stay attached to the motherboard, replace the keyboard and put reconnect the KB ribbon and the backlight ribbon on their places…
I tell you that because this happened to me with my zBook 15 G3 :(
This procedure also applies to the ZBook 17 G1/G2, which uses the exact same keyboard.
Thanks for this guide! It helped me replace my faulty keyboard on which the keys became too stiff to type comfortably.