Перейти к основному содержанию

HP dv5-1125nr Disk Drive Replacement

Выберете то, что вам нужно

  1. HP dv5-1125nr Disk Drive Replacement, Battery: шаг 1, изображение 1 из 1
    • Ensure your computer is shut down. Removing the battery while the laptop is still on may corrupt your files. Remove any power adapters and cords connected to the laptop body.

    • Slide the switch to the left until the release clicks.

  2. HP dv5-1125nr Disk Drive Replacement: шаг 2, изображение 1 из 1
    • Remove the battery.

    • The release switch may need to be held down while removing the battery.

  3. HP dv5-1125nr Disk Drive Replacement, Disk Drive: шаг 3, изображение 1 из 2 HP dv5-1125nr Disk Drive Replacement, Disk Drive: шаг 3, изображение 2 из 2
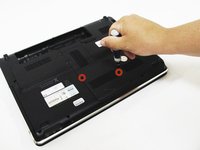
    • Locate two 3mm Phillips screws on the CMOS panel cover and remove them with a Phillips #00 screwdriver.

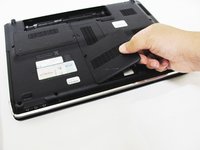
    • Remove the CMOS panel cover.

  4. HP dv5-1125nr Disk Drive Replacement: шаг 4, изображение 1 из 3 HP dv5-1125nr Disk Drive Replacement: шаг 4, изображение 2 из 3 HP dv5-1125nr Disk Drive Replacement: шаг 4, изображение 3 из 3
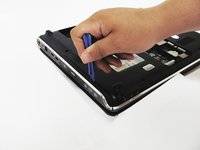
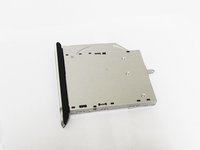
    • The optical drive is now ready for removal. Using a plastic removal tool, lift the optical drive away from your computer.

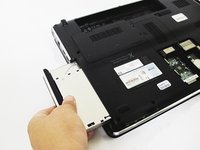
    • Using your hands, slide the remainder of the drive out of the computer.

Заключение

To reassemble your device, follow these instructions in reverse order.

Nick Loey

Участник с: 04/01/14

1 676 Репутация

Автор 8 руководств

Команда

Cal Poly, Team 9-15, Regan Spring 2014 Участник Cal Poly, Team 9-15, Regan Spring 2014

CPSU-REGAN-S14S9G15

4 членов

Автор 10 руководств

0 Комментариев

Добавить комментарий

Просмотр статистики:

За последние 24часов: 0

За последние 7 дней: 0

За последние 30 дней: 1

За всё время: 702