Перейти к основному содержанию

Этот документ имеет более свежие изменения. Перейти к последней непроверенной версии.

HP iPAQ H2200 motherbaord replacement

Выберете то, что вам нужно

  1. HP iPAQ H2200 motherbaord replacement, Battery: шаг 1, изображение 1 из 1
    • Press and slide the battery cover tab to remove battery cover.

  2. HP iPAQ H2200 motherbaord replacement: шаг 2, изображение 1 из 2 HP iPAQ H2200 motherbaord replacement: шаг 2, изображение 2 из 2
    • Pull on the black tab to lift the battery out of the battery compartment.

  3. HP iPAQ H2200 motherbaord replacement, Main Board: шаг 3, изображение 1 из 1
    • Remove the stylus by sliding it out of the slot.

  4. HP iPAQ H2200 motherbaord replacement: шаг 4, изображение 1 из 1
    • Remove the CF card by sliding it out of the slot at the top of the device.

  5. HP iPAQ H2200 motherbaord replacement: шаг 5, изображение 1 из 1
    • Press down and push the black side strips toward the top of the device to remove them.

  6. HP iPAQ H2200 motherbaord replacement: шаг 6, изображение 1 из 3 HP iPAQ H2200 motherbaord replacement: шаг 6, изображение 2 из 3 HP iPAQ H2200 motherbaord replacement: шаг 6, изображение 3 из 3
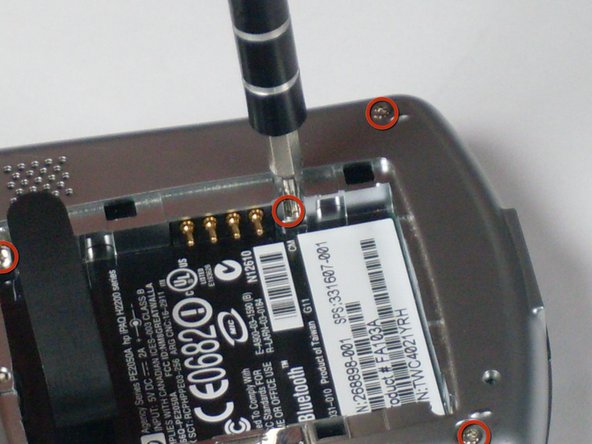
    • Using the T5 Torx screwdriver, remove all six screws on the back and all screws on each side of the device.

  7. HP iPAQ H2200 motherbaord replacement: шаг 7, изображение 1 из 2 HP iPAQ H2200 motherbaord replacement: шаг 7, изображение 2 из 2
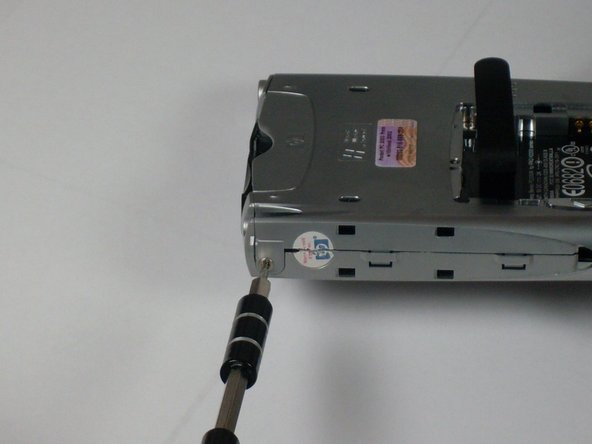
    • Remove the back faceplate by pushing and loosening the 4 side slots (2 on each side).

  8. HP iPAQ H2200 motherbaord replacement: шаг 8, изображение 1 из 1
    • Open the LCD connector, where the orange strip attaches to the main board.

  9. HP iPAQ H2200 motherbaord replacement: шаг 9, изображение 1 из 1
    • Carefully remove the orange LCD strip from the connector.

  10. HP iPAQ H2200 motherbaord replacement: шаг 10, изображение 1 из 1
    • Unscrew the 2 screws located at each top corner of the main board.

  11. HP iPAQ H2200 motherbaord replacement: шаг 11, изображение 1 из 1
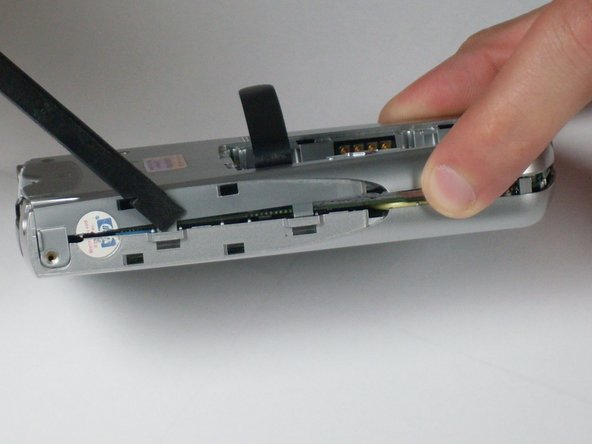
    • Remove the main board by pushing outward on the two tabs located on each side near the bottom of the device.

Заключение

To reassemble your device, follow these instructions in reverse order.

4 участников успешно повторили данное руководство.

Tyler Andrews

Участник с: 01/13/10

209 Репутация

Автор 5 руководств

Команда

Cal Poly, Team 4-12, Forte Winter 2010 Участник Cal Poly, Team 4-12, Forte Winter 2010

CPSU-FORTE-W10S4G12

3 членов

Автор 5 руководств

0 Комментариев

Добавить комментарий

Просмотр статистики:

За последние 24часов: 1

За последние 7 дней: 3

За последние 30 дней: 9

За всё время: 4,615