Перейти к основному содержанию

HTC One X Top Speaker Replacement

Выберете то, что вам нужно

  1. HTC One X Top Speaker Replacement, Remove SIM card slot: шаг 1, изображение 1 из 1
    • Insert a safety pin, or other small object in the small opening next to the Sim card slot to remove the SIM card.

    • The Sim Card Slot is located at the top of the rear panel.

  2. HTC One X Top Speaker Replacement, Remove front panel: шаг 2, изображение 1 из 2 HTC One X Top Speaker Replacement, Remove front panel: шаг 2, изображение 2 из 2
    • Using a plastic opening tool, carefully separate the display screen from the rear panel.

    • The display assembly is a tight fit therefore the removal must be carried out carefully with firm, constant force being applied around the bottom corners and sides of the panel. Note that the top of the phone is underneath the panel, and will not come out.

    • If your display is cracked, take extra caution when separating the display from the rear panel to prevent further breakage.

    • Set aside the rear panel.

  3. HTC One X Top Speaker Replacement, Remove the top plastic panel: шаг 3, изображение 1 из 2 HTC One X Top Speaker Replacement, Remove the top plastic panel: шаг 3, изображение 2 из 2
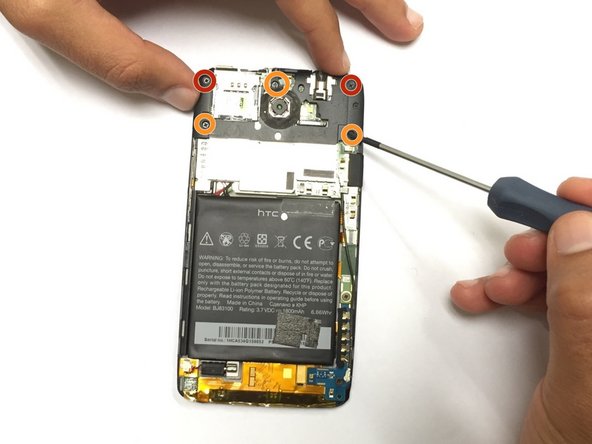
    • Remove the five screws at the top of the panel using a Phillips head screwdriver.

    • Two 2.05mm Philips head screws

    • Three 2.44mm Philips head screws

    • Also remove the screws with the warranty stickers.

    • Once the screws are removed, gently remove the plastic cover using a plastic opening tool to detach the edges from the front panel.

    • Once you have disassembled your device, your warranty will no longer be valid.

  4. HTC One X Top Speaker Replacement, Remove antenna and disconnect the PCB board: шаг 4, изображение 1 из 2 HTC One X Top Speaker Replacement, Remove antenna and disconnect the PCB board: шаг 4, изображение 2 из 2
    • Remove the two screws at the bottom right corner of the front panel using a Phillips head screwdriver, as shown in the image.

    • Two 3.35mm Philips head screws

    • Use tweezers to disconnect the antenna from the logic board to the PCB board.

    • Remove the tape connected to the motherboard.

  5. HTC One X Top Speaker Replacement, Disconnect the battery and remove PCB board: шаг 5, изображение 1 из 3 HTC One X Top Speaker Replacement, Disconnect the battery and remove PCB board: шаг 5, изображение 2 из 3 HTC One X Top Speaker Replacement, Disconnect the battery and remove PCB board: шаг 5, изображение 3 из 3
    • Remove the tape holding the battery in place.

    • Gently lift the battery from the bottom using a plastic opening tool.

    • You may have to apply heat to melt the glue holding the battery in place.

    • Do not completely remove the battery yet

    • You can now disconnect the flex cable holding the PCB board place. Gently open the gates using tweezers or a plastic opening tool and use tweezers to slide the flex cable out.

    • Now that it's separated, remove and set aside the PCB board.

  6. HTC One X Top Speaker Replacement, Disconnect flex cables: шаг 6, изображение 1 из 3 HTC One X Top Speaker Replacement, Disconnect flex cables: шаг 6, изображение 2 из 3 HTC One X Top Speaker Replacement, Disconnect flex cables: шаг 6, изображение 3 из 3
    • Place the battery back into its original position once the PCB board has been removed

    • Use tweezers to disconnect the power button flex cables.

    • Disconnect the volume flex cable by opening the gate and then sliding the cable out using tweezers.

    • Disconnect the touchscreen flex cable

    • If repairing hard buttons, skip step 7.

  7. HTC One X Top Speaker Replacement, Remove logic board: шаг 7, изображение 1 из 1
    • Disconnect the remaining two flex cables in a similar manner before completely removing the logic board.

    • You may now remove the board safely

  8. HTC One X Top Speaker Replacement, Replace speaker: шаг 8, изображение 1 из 1
    • Carefully remove speaker at the top of your phone and replace it with the new speaker.

Заключение

To reassemble your device, follow these instructions in reverse order.

5 участников успешно повторили данное руководство.

Nyles Peterson

Участник с: 09/22/14

1 885 Репутация

Автор 3 руководств

Команда

USF Tampa, Team 4-3, Brown Fall 2014 Участник USF Tampa, Team 4-3, Brown Fall 2014

USFT-BROWN-F14S4G3

3 членов

Автор 12 руководств

Один комментарий

Добавить комментарий

Просмотр статистики:

За последние 24часов: 0

За последние 7 дней: 1

За последние 30 дней: 1

За всё время: 3,288