Перейти к основному содержанию

Hannspree Hannspad SN1AT71 Front and Rear Camera Replacement

Выберете то, что вам нужно

  1. Hannspree Hannspad SN1AT71 Front and Rear Camera Replacement, Back Panel: шаг 1, изображение 1 из 1
    • Place the tablet screen side up.

    • Make sure the device is turned off to avoid damage.

  2. Hannspree Hannspad SN1AT71 Front and Rear Camera Replacement: шаг 2, изображение 1 из 2 Hannspree Hannspad SN1AT71 Front and Rear Camera Replacement: шаг 2, изображение 2 из 2
    • Use the metal spudger to press an opening between the screen and back cover.

    • The plastic tabs are located on each corner of the back cover.

    • Be careful, as the plastic tabs are delicate.

  3. Hannspree Hannspad SN1AT71 Front and Rear Camera Replacement: шаг 3, изображение 1 из 1
    • Wedge the plastic opening tool between the screen and the back panel to prevent re-engagement

  4. Hannspree Hannspad SN1AT71 Front and Rear Camera Replacement: шаг 4, изображение 1 из 2 Hannspree Hannspad SN1AT71 Front and Rear Camera Replacement: шаг 4, изображение 2 из 2
    • Slide the metal spudger around the casing to separate it from the inside of the tablet.

  5. Hannspree Hannspad SN1AT71 Front and Rear Camera Replacement: шаг 5, изображение 1 из 2 Hannspree Hannspad SN1AT71 Front and Rear Camera Replacement: шаг 5, изображение 2 из 2
    • Flip the tablet over so the screen side is down after all the tabs are separated.

    • Remove the back panel by delicately lifting it straight up.

  6. Hannspree Hannspad SN1AT71 Front and Rear Camera Replacement, Battery: шаг 6, изображение 1 из 2 Hannspree Hannspad SN1AT71 Front and Rear Camera Replacement, Battery: шаг 6, изображение 2 из 2
    • Remove the adhesive tape from the power connection cables.

  7. Hannspree Hannspad SN1AT71 Front and Rear Camera Replacement: шаг 7, изображение 1 из 3 Hannspree Hannspad SN1AT71 Front and Rear Camera Replacement: шаг 7, изображение 2 из 3 Hannspree Hannspad SN1AT71 Front and Rear Camera Replacement: шаг 7, изображение 3 из 3
    • Instructions for desoldering can be found on the iFixit website.

    • The soldering iron is hot. It can burn you and it can cause damage to the wires and motherboard.

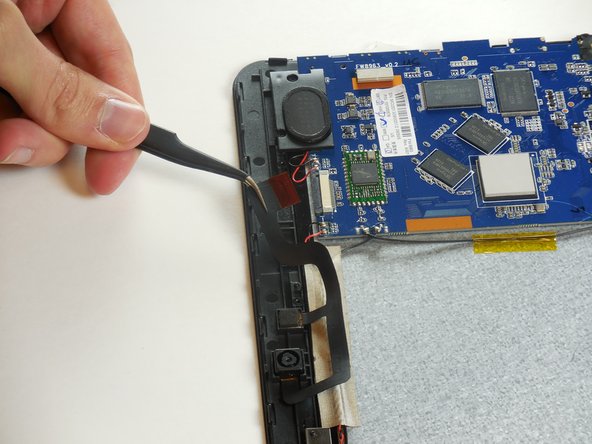
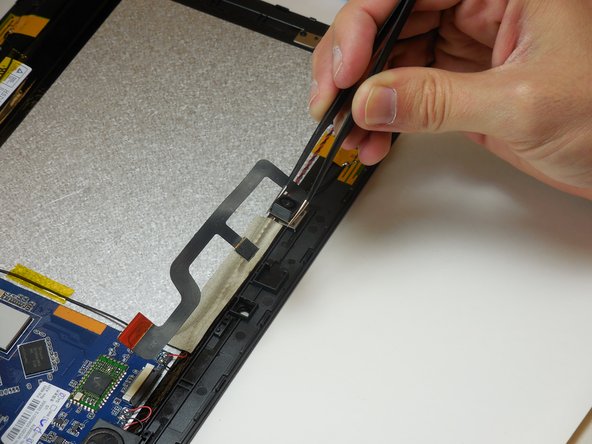
    • Grab hold of the red wire using the tweezers.

    • Desolder the red wire connection from the motherboard using the tip of the soldering iron.

    • Move the wire connection away from the motherboard.

    • Do not let the red wire connection touch other wires or the motherboard.

  8. Hannspree Hannspad SN1AT71 Front and Rear Camera Replacement: шаг 8, изображение 1 из 3 Hannspree Hannspad SN1AT71 Front and Rear Camera Replacement: шаг 8, изображение 2 из 3 Hannspree Hannspad SN1AT71 Front and Rear Camera Replacement: шаг 8, изображение 3 из 3
    • Desolder the black and yellow wire connection from the motherboard by following the previous step.

    • When moving the wire connections, do not let the red wire connection touch other wires or the motherboard.

  9. Hannspree Hannspad SN1AT71 Front and Rear Camera Replacement: шаг 9, изображение 1 из 3 Hannspree Hannspad SN1AT71 Front and Rear Camera Replacement: шаг 9, изображение 2 из 3 Hannspree Hannspad SN1AT71 Front and Rear Camera Replacement: шаг 9, изображение 3 из 3
    • Insert the flat end of the nylon spudger between the battery and the case.

    • The battery is connected to the tablet with an adhesive tape and will come free slowly.

    • Do not puncture or bend the battery while removing. If your battery is swollen, take appropriate precautions.

  10. Hannspree Hannspad SN1AT71 Front and Rear Camera Replacement, Front and Rear Camera Replacement: шаг 10, изображение 1 из 2 Hannspree Hannspad SN1AT71 Front and Rear Camera Replacement, Front and Rear Camera Replacement: шаг 10, изображение 2 из 2
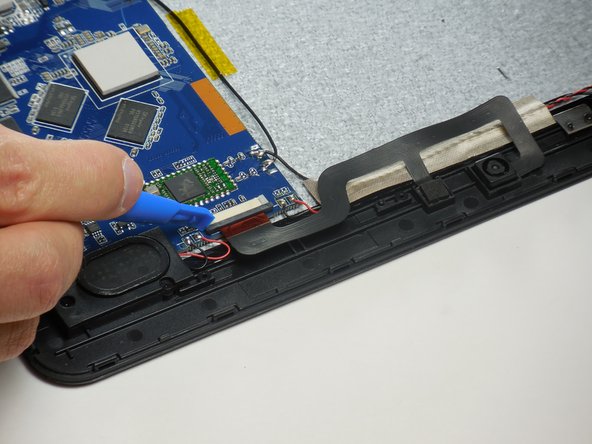
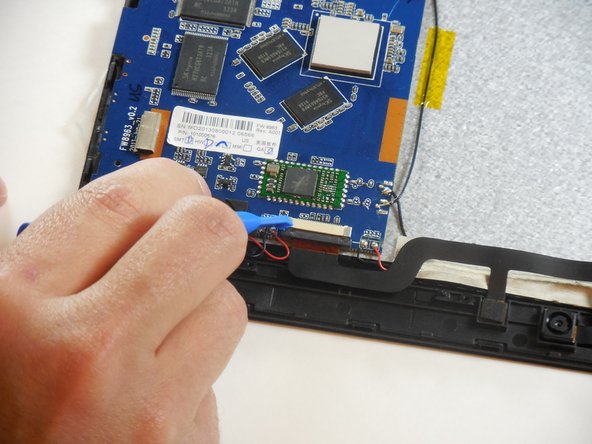
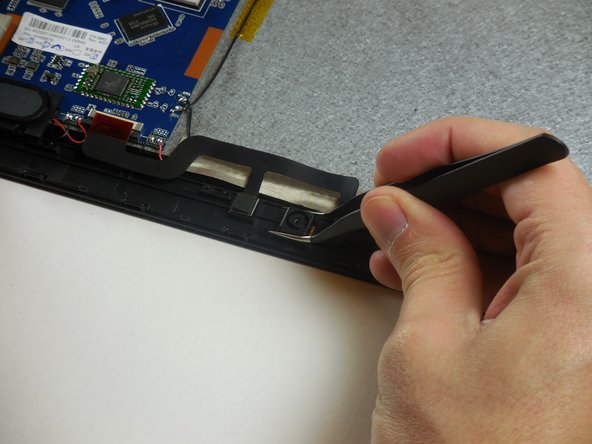
    • Identify the ribbon connecter attached to the camera and where it connects to the circuit board.

    • The two cameras are connected with one ribbon cable.

    • Zero insertion force connector.

  11. Hannspree Hannspad SN1AT71 Front and Rear Camera Replacement: шаг 11, изображение 1 из 3 Hannspree Hannspad SN1AT71 Front and Rear Camera Replacement: шаг 11, изображение 2 из 3 Hannspree Hannspad SN1AT71 Front and Rear Camera Replacement: шаг 11, изображение 3 из 3
    • Disconnect the sliding zero insertion force (ZIF). Use the plastic opening tool or a fingernail to slide the tab out, then pull the cable out.

  12. Hannspree Hannspad SN1AT71 Front and Rear Camera Replacement: шаг 12, изображение 1 из 3 Hannspree Hannspad SN1AT71 Front and Rear Camera Replacement: шаг 12, изображение 2 из 3 Hannspree Hannspad SN1AT71 Front and Rear Camera Replacement: шаг 12, изображение 3 из 3
    • Pull the cameras out of their resting places in a straight upward motion.

Заключение

To reassemble your device, follow these instructions in reverse order.

Еще один человек закончил это руководство.

matthew vandeventer

Участник с: 03/11/15

950 Репутация

Автор 5 руководств

Команда

Colorado Springs, Team 9-4, Panko Spring 2015 Участник Colorado Springs, Team 9-4, Panko Spring 2015

UCCS-PANKO-S15S9G4

3 членов

Автор 10 руководств

0 Комментариев

Добавить комментарий

Просмотр статистики:

За последние 24часов: 0

За последние 7 дней: 0

За последние 30 дней: 1

За всё время: 586