Эта версия возможно содержит некорректные исправления. Переключить на последнюю проверенную версию.
Выберете то, что вам нужно
-
Этот шаг не переведен. Помогите перевести
-
For the best access to the transmission drain plug, optimal draining, and accurate re-filling, we recommend working with the bike secured in an upright position.
-
-
Этот шаг не переведен. Помогите перевести
-
Using a 5/32 Hex or Allen screwdriver, unscrew the two screws from the primary chain inspection cover.
-
Your inspection cover may not be round, depending on the year. However, it will be in the same location and secured by similar screws.
-
Remove the primary chain inspection cover from the transmission housing.
-
-
Этот шаг не переведен. Помогите перевести
-
The transmission drain plug is located on the underside of the transmission on the left side of the bike, near the kickstand bumper.
-
Place a drain pan underneath the drain plug.
-
Using a wrench, unscrew the transmission drain plug and remove it.
-
Allow all the oil to drain out of the transmission. It should take about five minutes.
-
-
Этот шаг не переведен. Помогите перевести
-
While the oil is draining from the transmission, clean the transmission drain plug.
-
Using a spare rag or paper towel, clean the drain plug, removing excess oil and metal shavings.
-
-
-
Этот шаг не переведен. Помогите перевести
-
Using a T27 screwdriver bit, remove the four screws holding the clutch inspection cover in place.
-
-
Этот шаг не переведен. Помогите перевести
-
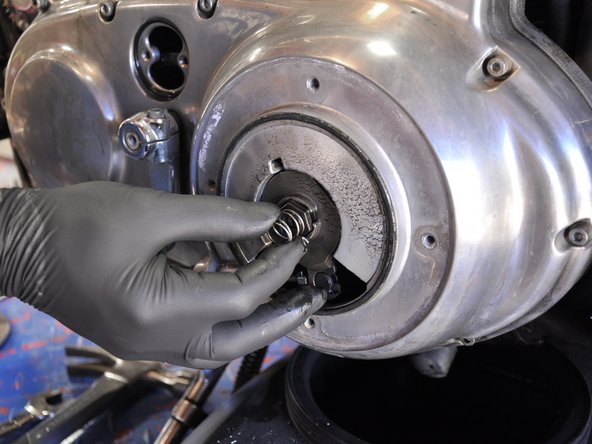
Insert a heavy duty spudger or similar prying tool into the gap between the clutch inspection cover and the transmission housing near where clutch cable enters the housing.
-
Gently pry the clutch inspection cover away from the transmission housing.
-
-
Этот шаг не переведен. Помогите перевести
-
Re-insert the transmission drain plug into the transmission housing and hand tighten.
-
Using a 3/4" wrench, tighten down the transmission drain plug.
-
-
Этот шаг не переведен. Помогите перевести
-
Insert the nozzle of a funnel into the primary chain inspection hole.
-
Pouring slowly, pour approximately 1 qt of oil into the transmission.
-
As you pour, watch the clutch inspection hole. Make sure that the oil level stays below the edge of the clutch inspection hole.
-
-
Этот шаг не переведен. Помогите перевести
-
Using a 5/32" Hex or Allen screw head, re-install the primary chain inspection cover.
-
-
Этот шаг не переведен. Помогите перевести
-
Using a T27 Screwdriver head, reinstall the clutch inspection cover. Install the screws in the following order:
-
Top
-
Bottom
-
Left
-
Right
-


Отменить: Я не выполнил это руководство.
80 участников успешно повторили данное руководство.


32 Комментариев
but you CANT use gear oil for cluthc!!!
car motor oil CANT be used for bike cluthc!!! Motorcycle motoroil CAN!
Is synthetic 20w50 ok to use?
Jordan -
What the !&&* is a cluthc?
redin575 -
You can use Amsoil 20w50 Synthetic V-Twin Motorcycle Oil. It is certified for engine, transmission, and primary chaincase lubricant. Manuals will specify gear oil as well (75w90), which is also appropriate to use. Note as Eric Essen wrote that these oils are defined differently. Link to the Amsoil 20w50: https://www.amsoil.com/p/20w-50-syntheti...
Sir_Nerd -
I change my my transmission oil exactly how it showed and yes the spring with the nut on the end came off and I put it right back. Now I have no tension at all in my clutch basically I have no clutch anymore. This is the first time I've taken the inspection plate off during a transmission fluid change. I usually drain it and automatically just put one quart in. What could I have done wrong?