Введение
This guide is to help replace and install an older thermostat with Honeywell Pro 3000 Non-Programmable Thermostat. This guide is important because a thermostat controls your heat and cooling systems and if these processes are being distributed correctly they can cost you more money in utilities. Before doing anything make sure the power to your thermostat is off to avoid any electrical hazard. When completing this process if you do not want to use batteries for your thermostat, connecting the blue wire to the blue terminal works as an alternative.
Выберете то, что вам нужно
-
-
Find which switch on your circuit breaker is associated with your heating system. The number will match the number next to the breaker.
-
Turn the switch from on to off. Disconnecting the electricity to the thermostat.
-
-
-
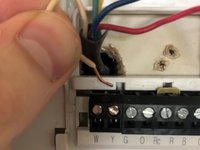
On the thermostat being replaced. Unscrew each terminal with a Phillips #0 screwdriver until there is enough room for you to pull out each wire. Pull each wire until it is completely removed from terminal.
-
-
-
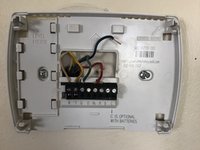
Once all wires are disconnected start to remove the base and wall mount from the wall. Remove each screw using a Phillips #0 screwdriver on both sides of the base and gently pull the base and mount from the wall.
-
-
-
-
To make sure the new thermostat is not crooked along the wall use a level on top of the plate. While holding the plate straight, screw in both 15.24mm X 25.4mm screws using a Phillips #0 screwdriver on the left and right side of the base place until it is fastened against the wall.
-
-
-
Place each colored wire gently into the corresponding terminal port until you can feel it hit the bottom of each port. All of the terminal ports are assigned by the first letter of each color coated wire.
-
-
-
Once all the wires are placed into the corresponding ports continue to secure the connection by using a flat head screwdriver to tighten the wires into the ports.
-
Once completed place the actual thermostat on the base plate.
-
-
-
Go to the circuit breaker and turn the electricity back onto the furnace and thermostat.
-
Mount the thermostat onto the wall plate and give the thermostat a test run to see if it functioning correctly.
-


If the thermostat is not functioning as intended, take apart and reinstall making sure wire connections are secure.
Команда

Purdue University Northwest, Team S1-G10, Hingst Spring 2020 Участник Purdue University Northwest, Team S1-G10, Hingst Spring 2020
PNW-HINGST-S20S1G10
1 член
Автор 1 руководств