Перейти к основному содержанию

Hover-1 Coast Controller Battery Replacement

Выберете то, что вам нужно

  1. Hover-1 Coast Controller Battery Replacement, Controller Battery: шаг 1, изображение 1 из 3 Hover-1 Coast Controller Battery Replacement, Controller Battery: шаг 1, изображение 2 из 3 Hover-1 Coast Controller Battery Replacement, Controller Battery: шаг 1, изображение 3 из 3
    • Identify the three screws and using a Phillips #1 screwdriver loosen the the screws.

    • Remove the three screws.

  2. Hover-1 Coast Controller Battery Replacement: шаг 2, изображение 1 из 3 Hover-1 Coast Controller Battery Replacement: шаг 2, изображение 2 из 3 Hover-1 Coast Controller Battery Replacement: шаг 2, изображение 3 из 3
    • Pull the backside of the controller off.

    • The inside of the controller should look like this.

    • The marked area is the battery.

  3. Hover-1 Coast Controller Battery Replacement: шаг 3, изображение 1 из 1
    • Remove the black foam piece covering the battery.

  4. Hover-1 Coast Controller Battery Replacement: шаг 4, изображение 1 из 2 Hover-1 Coast Controller Battery Replacement: шаг 4, изображение 2 из 2
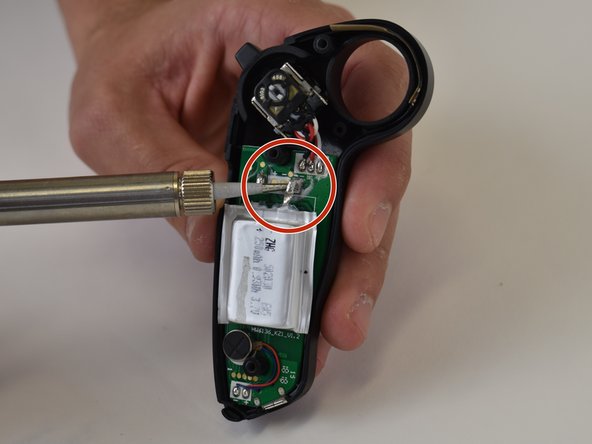
    • Desolder the battery connections from the motherboard.

  5. Hover-1 Coast Controller Battery Replacement: шаг 5, изображение 1 из 2 Hover-1 Coast Controller Battery Replacement: шаг 5, изображение 2 из 2
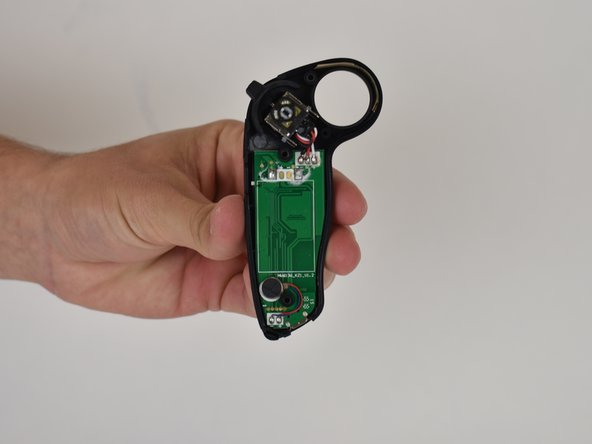
    • Using a plastic opening tool, pry the battery off the motherboard.

    • The inside of the controller should look like this.

Заключение

To reassemble your device, follow these instructions in reverse order.

Jace Oppenlander

Участник с: 10/04/18

545 Репутация

Автор 4 руководств

Команда

Linn Benton Community College, Team S2-G2, Karnes Fall 2018 Участник Linn Benton Community College, Team S2-G2, Karnes Fall 2018

LBCC-KARNES-F18S2G2

3 членов

Автор 5 руководств

0 Комментариев

Добавить комментарий

Просмотр статистики:

За последние 24часов: 0

За последние 7 дней: 1

За последние 30 дней: 2

За всё время: 384