Перейти к основному содержанию

How to Rebuild and Replace the Coils in a Mutation X V4 Atomizer

Выберете то, что вам нужно

  1. How to Rebuild and Replace the Coils in a Mutation X V4 Atomizer, How to Rebuild and Replace the Coils in a Mutation X V4 Atomizer: шаг 1, изображение 1 из 1
    • WARNING: Failure to completely turn off the system can result in harm to the user or the product.

    • Turn Vape off by pressing the largest button 5 times in row quickly.

  2. How to Rebuild and Replace the Coils in a Mutation X V4 Atomizer: шаг 2, изображение 1 из 1
    • Cut two, 8 inch pieces of 24 gauge kanthal wire with the wire cutters.

    • Note: Approximate the 8 inches; longer is better because you can always trim the wires after the coils are built.

  3. How to Rebuild and Replace the Coils in a Mutation X V4 Atomizer: шаг 3, изображение 1 из 1
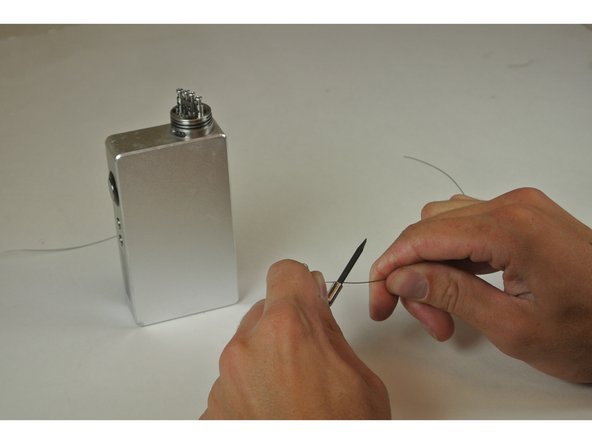
    • Hold the screwdriver and the wire end in one hand (non dominant) and the loose end of the wire in the other hand (dominant).

  4. How to Rebuild and Replace the Coils in a Mutation X V4 Atomizer: шаг 4, изображение 1 из 1
    • Using the loose end of the wire, wrap 4-8 times (depending on desired ohms) around the screwdriver.

    • Note: More loops is more ohms of resistance, experiment until you find the proper amount of loops for you.

  5. How to Rebuild and Replace the Coils in a Mutation X V4 Atomizer: шаг 5, изображение 1 из 1
    • Leave wire wrapped around screwdriver and use fingernails to push the coil down towards base of screwdriver.

  6. How to Rebuild and Replace the Coils in a Mutation X V4 Atomizer: шаг 6, изображение 1 из 1
    • Carefully slide the coil off of the screwdriver.

    • Note: Try not to warp the coil.

  7. How to Rebuild and Replace the Coils in a Mutation X V4 Atomizer: шаг 7, изображение 1 из 3 How to Rebuild and Replace the Coils in a Mutation X V4 Atomizer: шаг 7, изображение 2 из 3 How to Rebuild and Replace the Coils in a Mutation X V4 Atomizer: шаг 7, изображение 3 из 3
    • Repeat steps 3-6 with the other piece of wire, making sure to have the same amount of loops in both coils.

    • CAUTION: If the coils do not have the same amount of loops, the system may short.

  8. How to Rebuild and Replace the Coils in a Mutation X V4 Atomizer: шаг 8, изображение 1 из 1
    • Remove the cap to your atomizer.

  9. How to Rebuild and Replace the Coils in a Mutation X V4 Atomizer: шаг 9, изображение 1 из 1
    • Unscrew the top four screws on atomizer without removing them.

    • Note: You should be able to see through the hole drilled horizontally into the screws.

  10. How to Rebuild and Replace the Coils in a Mutation X V4 Atomizer: шаг 10, изображение 1 из 2 How to Rebuild and Replace the Coils in a Mutation X V4 Atomizer: шаг 10, изображение 2 из 2
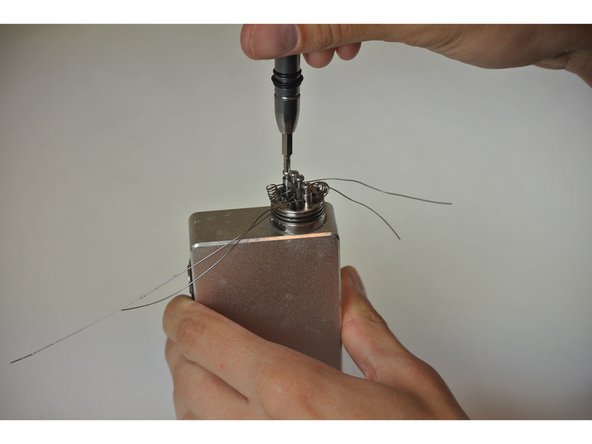
    • Put one end of the coil in an outermost hole on side of screw and other end in one of the inner holes.

    • CAUTION: Alternate holes when placing wire inside of screws to avoid shorting the product. EX: holes 1 & 3 and holes 2 & 4 on the above picture

  11. How to Rebuild and Replace the Coils in a Mutation X V4 Atomizer: шаг 11, изображение 1 из 2 How to Rebuild and Replace the Coils in a Mutation X V4 Atomizer: шаг 11, изображение 2 из 2
    • Repeat step 10 on other side with other coil.

  12. How to Rebuild and Replace the Coils in a Mutation X V4 Atomizer: шаг 12, изображение 1 из 1
    • Tighten the screws completely once coils are in desired position.

  13. How to Rebuild and Replace the Coils in a Mutation X V4 Atomizer: шаг 13, изображение 1 из 2 How to Rebuild and Replace the Coils in a Mutation X V4 Atomizer: шаг 13, изображение 2 из 2
    • Cut wires as close to the posts as possible.

    • CAUTION: Cutting the wires may send the end pieces flying, be careful when cutting.

  14. How to Rebuild and Replace the Coils in a Mutation X V4 Atomizer: шаг 14, изображение 1 из 1
    • Put the screwdriver through the coil to place the coil in desired position.

    • Note: A desired position would be almost parallel to the screws, and perfectly level; just get close.

  15. How to Rebuild and Replace the Coils in a Mutation X V4 Atomizer: шаг 15, изображение 1 из 1
    • Re-insert the batteries and press the large button 5 times quickly to turn the vape on.

  16. How to Rebuild and Replace the Coils in a Mutation X V4 Atomizer: шаг 16, изображение 1 из 1
    • Press the biggest button on vape to heat up coils until red hot.

  17. How to Rebuild and Replace the Coils in a Mutation X V4 Atomizer: шаг 17, изображение 1 из 2 How to Rebuild and Replace the Coils in a Mutation X V4 Atomizer: шаг 17, изображение 2 из 2
    • Use tweezers to compress the coils, being careful not to touch the tweezers to the coils while the button is being pressed.

    • CAUTION: If the tweezers are placed on the coils while the button is being pressed, the user may sustain small burns.

  18. How to Rebuild and Replace the Coils in a Mutation X V4 Atomizer: шаг 18, изображение 1 из 1
    • Repeat on other side. Coils are ready when both sides glow red hot at the same time.

  19. How to Rebuild and Replace the Coils in a Mutation X V4 Atomizer: шаг 19, изображение 1 из 2 How to Rebuild and Replace the Coils in a Mutation X V4 Atomizer: шаг 19, изображение 2 из 2
    • Once coils are cooled, tear a cotton strip from the large square and roll it with your hands until you have a tight but long strand.

  20. How to Rebuild and Replace the Coils in a Mutation X V4 Atomizer: шаг 20, изображение 1 из 1
    • Take cotton strand and thread through one coil.

  21. How to Rebuild and Replace the Coils in a Mutation X V4 Atomizer: шаг 21, изображение 1 из 1
    • Repeat steps 19 & 20 for other coil.

  22. How to Rebuild and Replace the Coils in a Mutation X V4 Atomizer: шаг 22, изображение 1 из 1
    • Using the wire cutters, cut cotton approximately ¼ of an inch away from outside of atomizer on each strand.

  23. How to Rebuild and Replace the Coils in a Mutation X V4 Atomizer: шаг 23, изображение 1 из 1
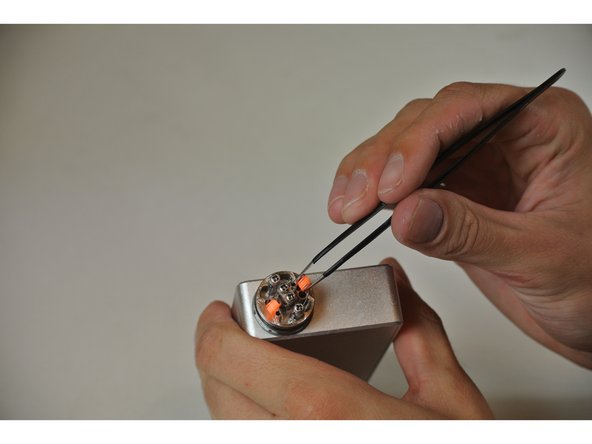
    • Tuck cotton underneath coils and into the well of the atomizer using the tweezers.

  24. How to Rebuild and Replace the Coils in a Mutation X V4 Atomizer: шаг 24, изображение 1 из 1
    • Juice the cotton and coils completely with your favorite vape juice.

  25. How to Rebuild and Replace the Coils in a Mutation X V4 Atomizer: шаг 25, изображение 1 из 1
    • Replace atomizer top and enjoy!

Заключение

With vapes becoming very popular, this tutorial is very beneficial to those using them. By using this guide, it will save you a drive to your local vape store as well as five to ten dollars every week by building it yourself. As this is practiced more and more, the steps will become easier and more natural. We hope you find this tutorial as helpful to you as it has to us. In the event that the coils do not light up, or no vapor is produced, make sure the wires are properly connected to the screws and that the batteries are charged.

16 участников успешно повторили данное руководство.

Justin Reynolds

Участник с: 09/21/15

101 Репутация

1 руководство автора

Команда

Colorado Springs, Team 6-3, Mcmichael Fall 2015 Участник Colorado Springs, Team 6-3, Mcmichael Fall 2015

UCCS-MCMICHAEL-F15S6G3

4 членов

Автор 1 руководств

0 Комментариев

Добавить комментарий

Просмотр статистики:

За последние 24часов: 1

За последние 7 дней: 4

За последние 30 дней: 14

За всё время: 8,435