Введение
Apple charging cables, such as the Lightning to USB Cable, are easily prone to fraying. Most commonly, this fraying occurs from device usage while charging. Cables may be subject to extreme angles while charging which causes the outer coating to loosen, tear, and ultimately expose its wiring. Exposed cable wiring is hazardous to both the device and its user, and may cause electrical shorting or even shocking. Repairing a frayed cable with heat shrink is an easy and inexpensive alternative that allows the user to safely charge their device.
Выберете то, что вам нужно
-
-
Locate the frayed or exposed area of the Lightning cable.
-
-
-
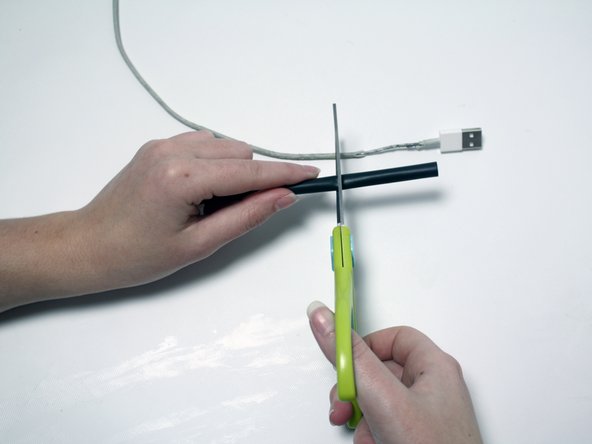
Measure the approximate length of heat shrink needed to cover the frayed or exposed area.
-
-
-
-
Slide the heat shrink over the wire so that it covers the frayed or exposed area.
-
-
-
Test the fit by flexing the cable in different directions.
One problem is the heat shrink wraparound bandage used isn’t equivalent to the original.
Original lightning cables are wrapped with an insulator, a metallic shield and finally the outer white plastic jacket. And possibly a drain wire for grounding of the insulator.
So the simple heat shrink plastic jacket applied totally lacks the electromagnetic interference shielding capability.
This doesn’t address fraying of the wire itself. The title would be more accurate if it said “How To Repair Exposed Charger Wires”
-


To reassemble your device, follow these instructions in reverse order.
To reassemble your device, follow these instructions in reverse order.
Отменить: Я не выполнил это руководство.
6 участников успешно повторили данное руководство.
Команда

Missouri Western, Team 1-3, Adkins Fall 2016 Участник Missouri Western, Team 1-3, Adkins Fall 2016
MWSU-ADKINS-F16S1G3
2 членов
Автор 4 руководств
7 Комментариев
Thank you for taking the time to post your pictures and the steps to repair a lightening cord. I plan to do this repair, and also, apply heat shrink to the other end BEFORE that one frays. Thanks!!
I have cables that do not work anymore due to the fraying at the lightning port end. Are there instructions on how to fix this?
The wiring is too intricate, Christine. It’s not worth the time it would take, IMO.
Dave -
Kills me as I recently fixed 3 separate lighting cables at the power converter end, but took no pictures! You have to razor the seam around the outside of the case, split the case apart by pulling out with pliers in the cord-wrap flap area (careful don’t split it) and then attach a new cord to the solder spots on the circuit board, or just to the wire stubs. Best to just order a replacement cord as these include the little stopper that fits into the case between the halves. If you’re good at solder-joining cables you can just do this and shrink-wrap ‘em, but I prefer to use a little crimp joiner, and then fill the crimp with solder before sliding the shrink-wrap down over it. It’s tricky because the join has to fit a small space inside the case. You can get replacement cords at AliExpress. I use duct-tape to tightly close the case in case of more repairs.
Does this work with plastic straws instead of heat shrink?
Plastic straws cause several issues: it will be difficult to push the Lightning connector through, they won’t shrink as easily or uniformly compared to shrink tubing, and they’re rigid so there will be a hard edge at the end, likely creating a strain point where the cable will fray. Heat shrink tubing is readily available at hardware stores and it’s not expensive.