Введение
This is a guide on how to replace the MSI P65 fan and requires only a few common tools. If your MSI P65 fan is making loud or abnormal sounds, it's time for a replacement! This is most likely due to a motor failure, therefore it is important to address the problem by replacing the entire fan.
Before beginning, make sure to back up any important files in case of accidents and allow yourself at least an hour to disassemble your device.
Выберете то, что вам нужно
-
-
Power down the laptop and unplug the power adapter.
-
Flip the laptop upside down.
-
-
-
Using the Philips #1 screwdriver, remove the twelve 3.0 mm screws that hold the bottom panel to the laptop.
-
Firmly grasp and lift the bottom panel to remove it completely.
-
-
-
Unplug the battery cable connector from the motherboard with tweezers.
-
Unscrew the five Phillips #1 4.0 mm screws holding down the battery.
-
Remove the battery.
-
-
-
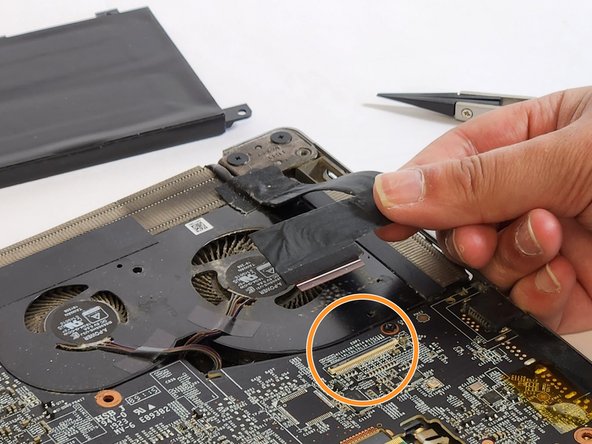
Gently unplug all the connected ribbon cables from the motherboard. Four are blue-tipped and one is black tipped.
-
Flip up the ZIF (zero insertion force) lockbar on the display cable. Then disconnect the display cable.
-
-
-
-
Unscrew the single 4.0 mm screw holding the wireless card with a Phillips #1 screwdriver.
-
Unplug the two connected antenna cables.
-
Remove the wireless card.
-
-
-
Remove all of the 6.0 mm screws on the motherboard.
-
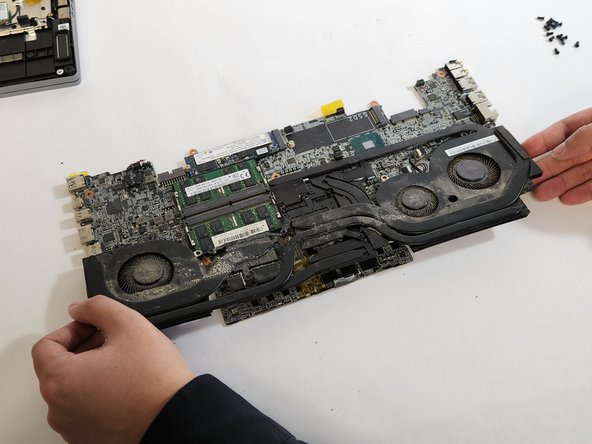
Lift the motherboard off the laptop frame.
-
-
-
Remove the four silver 4.0 mm screws from the motherboard.
-
Remove the four all black 6.0 mm screws from the motherboard.
-
-
-
Disconnect the PSU cables connected to the fans. Each fan has one connecting cable.
-
Lift the fan assembly off the motherboard.
-


Congrats! Your laptop should no longer make any strange or alarming noises due to fan malfunction.
Congrats! Your laptop should no longer make any strange or alarming noises due to fan malfunction.

Команда

UC Davis, Team 4-6, Andersen Winter 2023 Участник UC Davis, Team 4-6, Andersen Winter 2023
UCD-ANDERSEN-W23S4G6
4 членов
Автор 1 руководств
Один комментарий
there are several flaws with this steps.
screws that aren’t being mentioned, it doesn’t mention the thermal compound on the fan assembly and it also fails to mention a ribbon cable at the top and a small conector close to the wifi antena.
there is a lot of tape that need to be removed and should ideally be replaced