Перейти к основному содержанию

Huawei Ascend G610 Replacement proximity brightness sensor

  1. Huawei Ascend G610 Replacement proximity brightness sensor, Proximity brightness sensor: шаг 1, изображение 1 из 1
    • Remove back cover

  2. Huawei Ascend G610 Replacement proximity brightness sensor: шаг 2, изображение 1 из 1
    • Remove battery

  3. Huawei Ascend G610 Replacement proximity brightness sensor: шаг 3, изображение 1 из 1
    • With the help of a Phillips screwdriver, remove the 9 side screws, one is located under the adhesive

  4. Huawei Ascend G610 Replacement proximity brightness sensor: шаг 4, изображение 1 из 2 Huawei Ascend G610 Replacement proximity brightness sensor: шаг 4, изображение 2 из 2
    • With the help of a thin tool, pry up the side joints to remove the central body

  5. Huawei Ascend G610 Replacement proximity brightness sensor: шаг 5, изображение 1 из 1
    • Unhook the display connector

  6. Huawei Ascend G610 Replacement proximity brightness sensor: шаг 6, изображение 1 из 1
    • Unclip the touchscreen connector

  7. Huawei Ascend G610 Replacement proximity brightness sensor: шаг 7, изображение 1 из 1
    • Unclip the brightness sensor connector

  8. Huawei Ascend G610 Replacement proximity brightness sensor: шаг 8, изображение 1 из 1
    • Unhook the connector that connects the motherboard to the dock

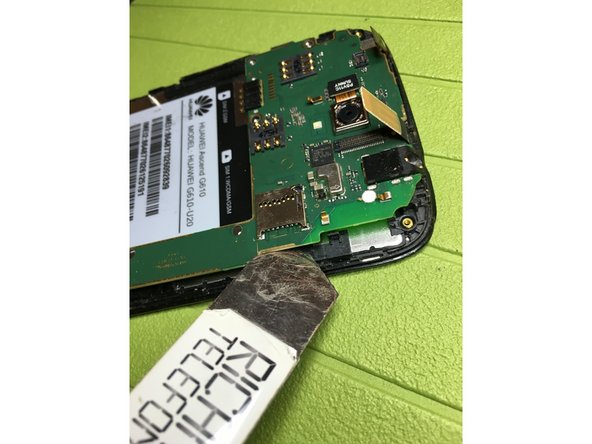
  9. Huawei Ascend G610 Replacement proximity brightness sensor: шаг 9, изображение 1 из 3 Huawei Ascend G610 Replacement proximity brightness sensor: шаг 9, изображение 2 из 3 Huawei Ascend G610 Replacement proximity brightness sensor: шаг 9, изображение 3 из 3
    • With the help of a thin tool, uncouple the mother board interlocked on the plastic hooks

  10. Huawei Ascend G610 Replacement proximity brightness sensor: шаг 10, изображение 1 из 1
    • Remove motherboard

  11. Huawei Ascend G610 Replacement proximity brightness sensor: шаг 11, изображение 1 из 1
    • With the help of a heat source of the tweezers remove proximity and brightness sensor by replacing it with a new one

Заключение

To reassemble the device, follow these instructions in reverse order.

Еще один человек закончил это руководство.

Особая благодарность этим переводчикам:

it en

100%

irlandaпомогает нам починить мир! Хотите внести свой вклад?
Начните переводить ›

Smilzo

Участник с: 11/09/13

11 267 Репутация

Автор 39 руководств

0 Комментариев

Добавить комментарий

Просмотр статистики:

За последние 24часов: 0

За последние 7 дней: 0

За последние 30 дней: 1

За всё время: 244