Перейти к основному содержанию

Husqvarna Trimmer Carburetor Replacement

Выберете то, что вам нужно

  1. Husqvarna Trimmer Carburetor Replacement, Husqvarna Trimmer Carburetor: шаг 1, изображение 1 из 1
    • Allow time for the engine to cool before beginning this procedure.

    • Using your fingers, unscrew the air filter bolt and remove it from the filter cover.

  2. Husqvarna Trimmer Carburetor Replacement: шаг 2, изображение 1 из 3 Husqvarna Trimmer Carburetor Replacement: шаг 2, изображение 2 из 3 Husqvarna Trimmer Carburetor Replacement: шаг 2, изображение 3 из 3
    • Pull off the filter cover to reveal the air filter.

    • Remove the air filter from the filter housing.

  3. Husqvarna Trimmer Carburetor Replacement: шаг 3, изображение 1 из 2 Husqvarna Trimmer Carburetor Replacement: шаг 3, изображение 2 из 2
    • Remove two 8mm nuts with an 8mm socket attached to a 1/4" ratchet turning the nuts counterclockwise.

  4. Husqvarna Trimmer Carburetor Replacement: шаг 4, изображение 1 из 2 Husqvarna Trimmer Carburetor Replacement: шаг 4, изображение 2 из 2
    • Slide the choke lever to the full choke position.

  5. Husqvarna Trimmer Carburetor Replacement: шаг 5, изображение 1 из 3 Husqvarna Trimmer Carburetor Replacement: шаг 5, изображение 2 из 3 Husqvarna Trimmer Carburetor Replacement: шаг 5, изображение 3 из 3
    • Remove the plastic housing by pulling it away from the device.

  6. Husqvarna Trimmer Carburetor Replacement: шаг 6, изображение 1 из 2 Husqvarna Trimmer Carburetor Replacement: шаг 6, изображение 2 из 2
    • Pull the carburetor off of the bolts.

  7. Husqvarna Trimmer Carburetor Replacement: шаг 7, изображение 1 из 3 Husqvarna Trimmer Carburetor Replacement: шаг 7, изображение 2 из 3 Husqvarna Trimmer Carburetor Replacement: шаг 7, изображение 3 из 3
    • Detach the throttle cable from the carburetor by tilting it 90 degrees and pulling up.

  8. Husqvarna Trimmer Carburetor Replacement: шаг 8, изображение 1 из 2 Husqvarna Trimmer Carburetor Replacement: шаг 8, изображение 2 из 2
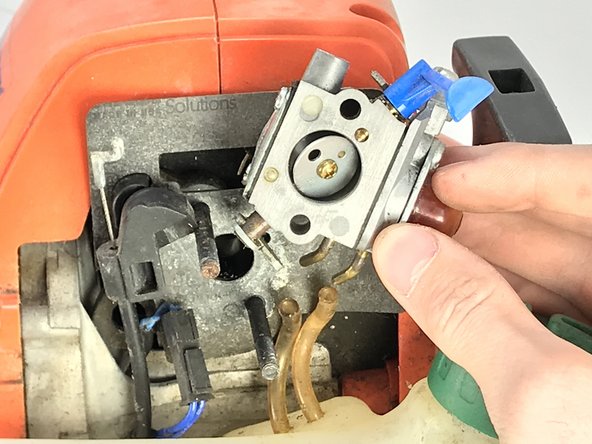
    • Remove the two fuel lines attached to the bottom of the carburetor using a set of needle nose pliers.

    • Gas may splash when removing fuel lines.

Заключение

To reassemble your device, follow these instructions in reverse order.

2 участников успешно повторили данное руководство.

Antonio Lopez

Участник с: 02/20/19

175 Репутация

1 руководство автора

Команда

University of Memphis, Team S2-G1, Baddour Spring 2019 Участник University of Memphis, Team S2-G1, Baddour Spring 2019

UM-BADDOUR-S19S2G1

2 членов

Автор 1 руководств

0 Комментариев

Добавить комментарий

Просмотр статистики:

За последние 24часов: 0

За последние 7 дней: 20

За последние 30 дней: 88

За всё время: 1,970