Перейти к основному содержанию

Ibanez 5 String Bass Model SR405QM Potentiometer Replacement

Выберете то, что вам нужно

  1. Ibanez 5 String Bass Model SR405QM Potentiometer Replacement, Battery: шаг 1, изображение 1 из 1
    • Gently place the instrument upside-down on a soft surface.

    • Locate the battery cavity cap and screws.

  2. Ibanez 5 String Bass Model SR405QM Potentiometer Replacement: шаг 2, изображение 1 из 1
    • Use a Phillips #2 head screwdriver to unscrew both screws. Two #1 1mm long screws.

  3. Ibanez 5 String Bass Model SR405QM Potentiometer Replacement: шаг 3, изображение 1 из 2 Ibanez 5 String Bass Model SR405QM Potentiometer Replacement: шаг 3, изображение 2 из 2
    • Remove the cap by lifting upwards to reveal the battery.

  4. Ibanez 5 String Bass Model SR405QM Potentiometer Replacement: шаг 4, изображение 1 из 3 Ibanez 5 String Bass Model SR405QM Potentiometer Replacement: шаг 4, изображение 2 из 3 Ibanez 5 String Bass Model SR405QM Potentiometer Replacement: шаг 4, изображение 3 из 3
    • Gently lift the battery from the cavity.

    • Detach the battery completely by firmly pulling the fabric connector from the conducting end of the battery.

  5. Ibanez 5 String Bass Model SR405QM Potentiometer Replacement, Backplate: шаг 5, изображение 1 из 2 Ibanez 5 String Bass Model SR405QM Potentiometer Replacement, Backplate: шаг 5, изображение 2 из 2
    • Use a Phillips #2 screwdriver to remove the four screws on the backplate.

  6. Ibanez 5 String Bass Model SR405QM Potentiometer Replacement: шаг 6, изображение 1 из 2 Ibanez 5 String Bass Model SR405QM Potentiometer Replacement: шаг 6, изображение 2 из 2
    • Remove the cap by lifting upwards, revealing the circuitry of the instrument.

  7. Ibanez 5 String Bass Model SR405QM Potentiometer Replacement, Potentiometer: шаг 7, изображение 1 из 2 Ibanez 5 String Bass Model SR405QM Potentiometer Replacement, Potentiometer: шаг 7, изображение 2 из 2
    • Turn the instrument over.

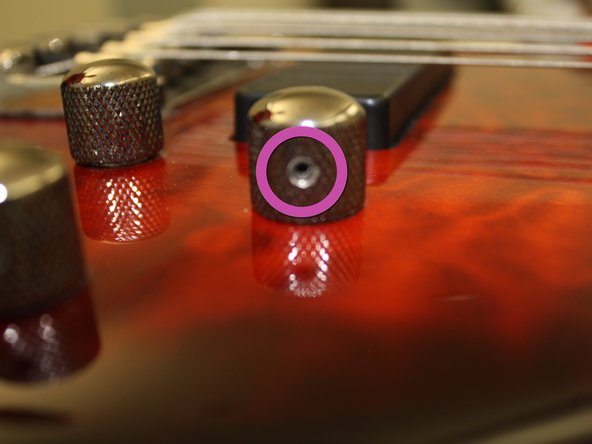
    • Locate the potentiometer knob.

    • Locate the allen screw socket on the knob.

  8. Ibanez 5 String Bass Model SR405QM Potentiometer Replacement: шаг 8, изображение 1 из 2 Ibanez 5 String Bass Model SR405QM Potentiometer Replacement: шаг 8, изображение 2 из 2
    • Use a 1/16" allen wrench to loosen the allen screw.

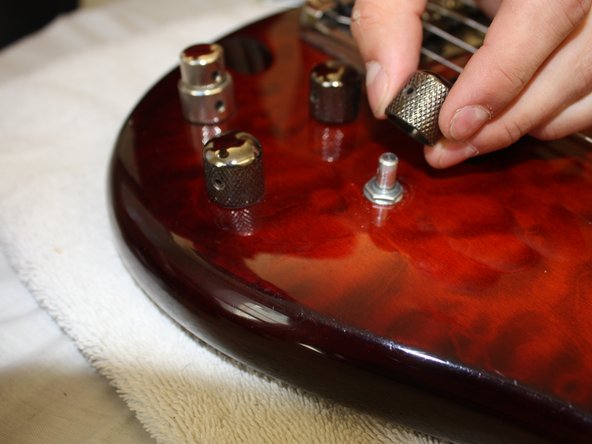
    • After the screw is loosened, lift the knob off of the instrument.

  9. Ibanez 5 String Bass Model SR405QM Potentiometer Replacement: шаг 9, изображение 1 из 2 Ibanez 5 String Bass Model SR405QM Potentiometer Replacement: шаг 9, изображение 2 из 2
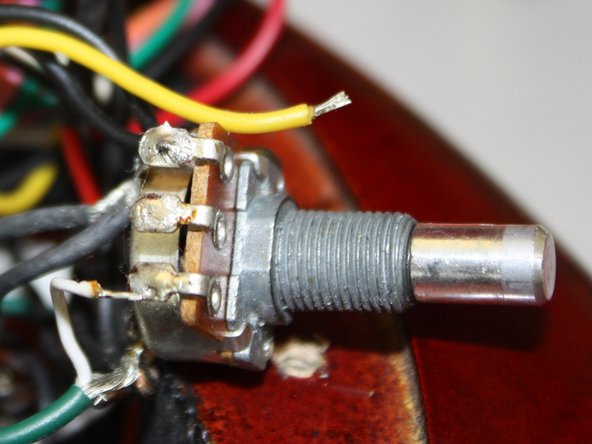
    • Locate the potentiometer nut, at the base of the potentiometer piston.

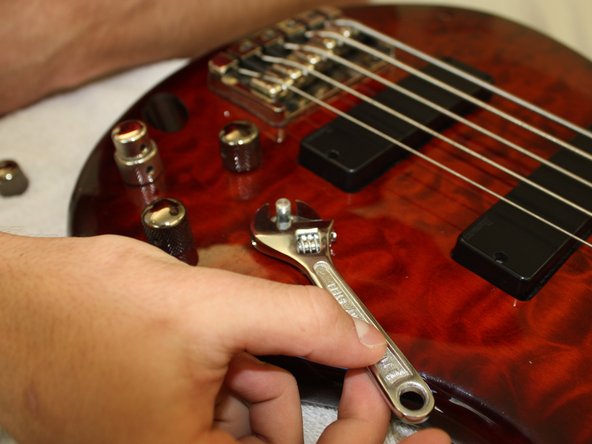
    • Use the adjustable wrench to remove the nut from the potentiometer.

  10. Ibanez 5 String Bass Model SR405QM Potentiometer Replacement: шаг 10, изображение 1 из 2 Ibanez 5 String Bass Model SR405QM Potentiometer Replacement: шаг 10, изображение 2 из 2
    • Carefully turn the instrument over.

    • Remove the potentiometer from the instrument by gently pulling it upward.

  11. Ibanez 5 String Bass Model SR405QM Potentiometer Replacement: шаг 11, изображение 1 из 3 Ibanez 5 String Bass Model SR405QM Potentiometer Replacement: шаг 11, изображение 2 из 3 Ibanez 5 String Bass Model SR405QM Potentiometer Replacement: шаг 11, изображение 3 из 3
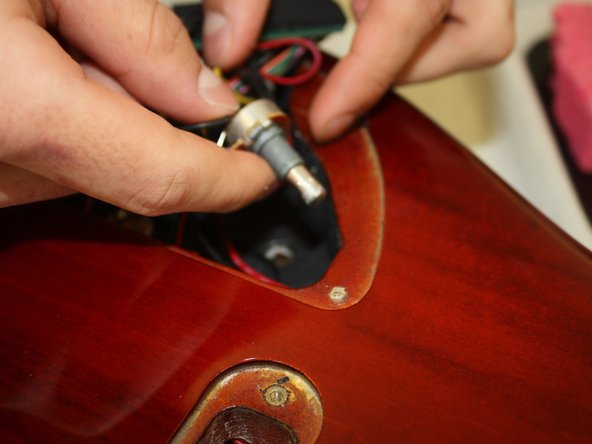
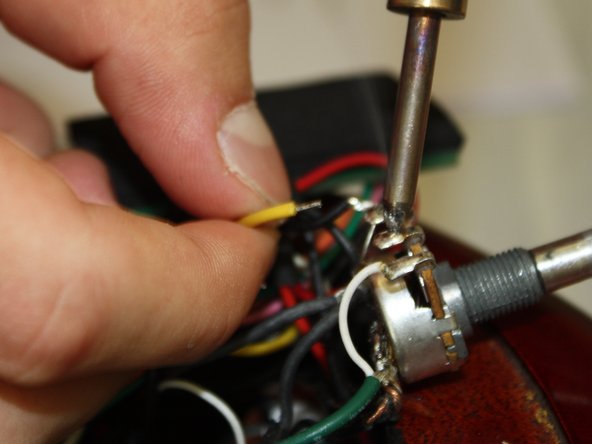
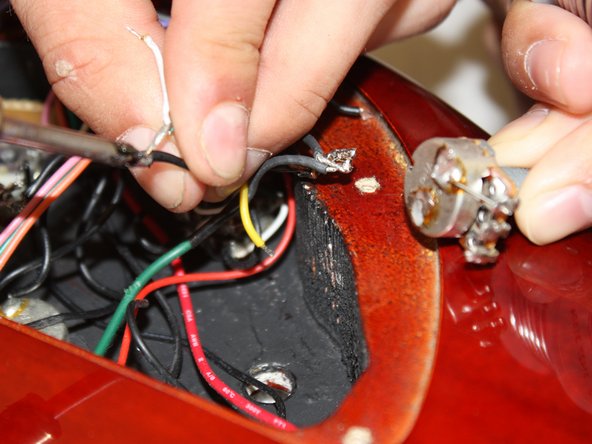
    • Use the soldering iron to release the black, yellow, and white wires from the side of the potentiometer.

    • The soldering iron is extremely hot. Avoid contact with skin, fabric or the body of the instrument. When soldering iron is not in use, rest it on the soldering iron stand.

  12. Ibanez 5 String Bass Model SR405QM Potentiometer Replacement: шаг 12, изображение 1 из 3 Ibanez 5 String Bass Model SR405QM Potentiometer Replacement: шаг 12, изображение 2 из 3 Ibanez 5 String Bass Model SR405QM Potentiometer Replacement: шаг 12, изображение 3 из 3
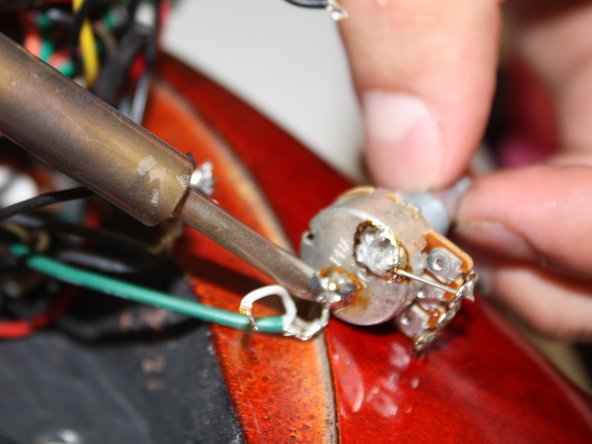
    • Use the soldering iron to release the black and green wires from the bottom of the potentiometer.

    • The soldering iron is extremely hot. Avoid contact with skin, fabric or the body of the instrument. When soldering iron is not in use, rest it on the soldering iron stand.

Заключение

To reassemble your device, follow these instructions in reverse order with a new potentiometer.

Еще один человек закончил это руководство.

Chris Pittner

Участник с: 01/11/13

220 Репутация

Автор 7 руководств

Команда

Cal Poly, Team 5-18, Forte Winter 2013 Участник Cal Poly, Team 5-18, Forte Winter 2013

CPSU-FORTE-W13S5G18

4 членов

Автор 9 руководств

0 Комментариев

Добавить комментарий

Просмотр статистики:

За последние 24часов: 0

За последние 7 дней: 0

За последние 30 дней: 8

За всё время: 3,633