Введение
This shows the steps to disassemble and reassemble the radio, as well as a suggested method for cleaning the speaker to restore good audio.
Выберете то, что вам нужно
-
-
Remove the battery. Unscrew the antenna. Gently remove the rubber cover from the antenna stud. The channel knob simply pulls off - but be careful to pull it straight off, otherwise you may loosen it.
-
-
-
At the base of the SMA antenna connection there is a nut. Use a small straight-blade screwdriver or similar tool to loosen and unscrew the nut. Be careful not to damage the connector's threads.
-
-
-
-
Near the bottom of the unit (under where the battery rests) there are two small Phillips screws holding the front cover to the main unit. Use the small screwdriver (and needle nose, if needed) to remove them.
-
-
-
With a gentle pull on the bottom of the inside of the radio, the main unit should come out (with a little resistance). Take care not to damage the O-ring gasket that surrounds this opening and protects the main unit.
-
Pivot and move the main unit out of the front cover at the bottom until the antenna connector and tuning knob stud are clear of the housing.
-
-
-
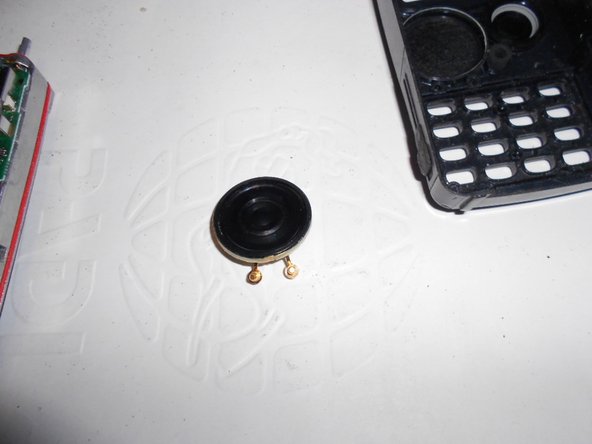
With a needle nose, gently remove the gold plated contacts by pulling on the flange with an upward rocking motion.
-
Once the contacts are loose, grip the magnet on the back of the the speaker. A pair of good pliers may be helpful. Do not squeeze the speaker too forcefully.
-
The speaker is held in place with double-sided sticky tape. Use a slow rocking motion to pull free from the adhesive. Try not to damage this gasket.
-
Use this opportunity to clean any dust from the case, speaker grill and internals. The keyboard and power button will come out easily.
-
-
-
Use a combination of a brush, a vacuum and/or some compressed air and a cloth to clean the speaker cone. Make sure the metal fillings don't get into anything else on your work surface. Make sure no loose particles remain on the side that interfaces with the gasket.
-
When re-installing the speaker, align the contacts with their respective holes but don't press them in yet.
-
Place the speaker into its front panel location and press it in using a rocking downward pressure till seated. Gently apply pressure around the edges to ensure a good seal.
-
Use your needle nose to press the contacts into their respective holes.
-


To reassemble your device, follow these instructions in reverse order.
To reassemble your device, follow these instructions in reverse order.
Отменить: Я не выполнил это руководство.
2 участников успешно повторили данное руководство.