Перейти к основному содержанию

InFocus LP435Z Secondary Fan Replacement

Выберете то, что вам нужно

  1. InFocus LP435Z Secondary Fan Replacement, External Shell: шаг 1, изображение 1 из 2 InFocus LP435Z Secondary Fan Replacement, External Shell: шаг 1, изображение 2 из 2
    • Place the projector on its back (buttons down) with the lens facing away from you.

    • Remove the two 84mm screws in the upper left and right corners of the projector using the Phillips #2 screwdriver.

    • Remove the remaining three 8.5mm screws using the Phillips #1 screwdriver.

  2. InFocus LP435Z Secondary Fan Replacement: шаг 2, изображение 1 из 2 InFocus LP435Z Secondary Fan Replacement: шаг 2, изображение 2 из 2
    • Use the plastic opening tools to push down the clips holding the lamp cover in place, and remove it.

    • There is no lamp assembly in the projector used in this guide, yours may appear different.

  3. InFocus LP435Z Secondary Fan Replacement: шаг 3, изображение 1 из 2 InFocus LP435Z Secondary Fan Replacement: шаг 3, изображение 2 из 2
    • Remove the two 8.5mm rear screws holding the rear case plate to the projector using the Phillips #1 screwdriver.

    • Pull the rear plate straight off and set it aside.

  4. InFocus LP435Z Secondary Fan Replacement: шаг 4, изображение 1 из 3 InFocus LP435Z Secondary Fan Replacement: шаг 4, изображение 2 из 3 InFocus LP435Z Secondary Fan Replacement: шаг 4, изображение 3 из 3
    • Flip the projector over and turn around so that the lens faces you.

    • Twist the gray zoom adjustment ring clockwise and extend the lens all the way out, and then slide the zoom adjustment ring all the way towards the end of the lens as far as it will go.

    • Slide the front case plate towards the loosened zoom adjustment ring, until the top plate of the projector is freed from underneath the lip of the front case plate.

    • The front case plate will not come all the way off due to the zoom adjustment ring obstructing it. It will merely slide forward a bit.

  5. InFocus LP435Z Secondary Fan Replacement: шаг 5, изображение 1 из 2 InFocus LP435Z Secondary Fan Replacement: шаг 5, изображение 2 из 2
    • Lift away the top case plate and set it aside.

  6. InFocus LP435Z Secondary Fan Replacement, Secondary Fan: шаг 6, изображение 1 из 2 InFocus LP435Z Secondary Fan Replacement, Secondary Fan: шаг 6, изображение 2 из 2
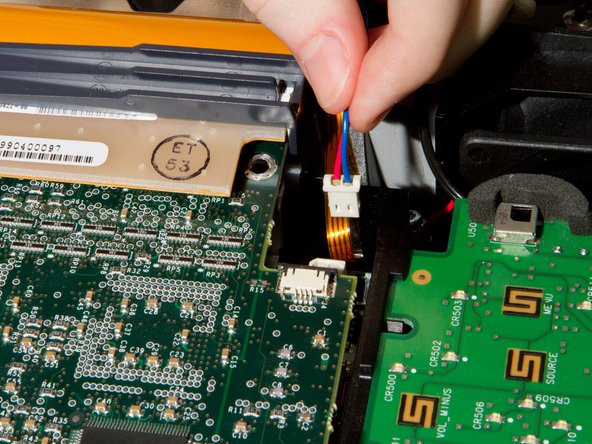
    • Unplug the small ribbon cable connecting the DLP board to the motherboard. It is obstructing the secondary fan power cable.

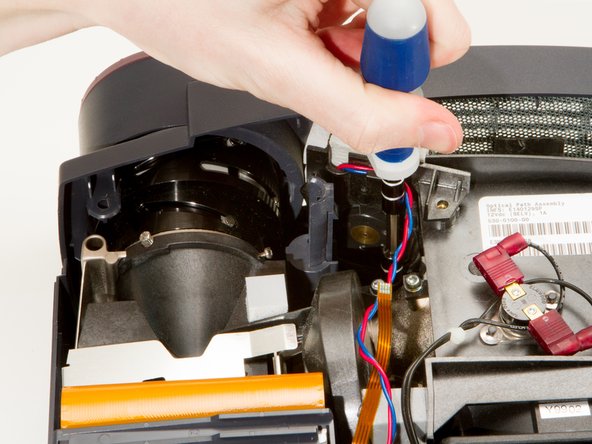
    • Unplug the secondary fan's power cable from the motherboard.

  7. InFocus LP435Z Secondary Fan Replacement: шаг 7, изображение 1 из 2 InFocus LP435Z Secondary Fan Replacement: шаг 7, изображение 2 из 2
    • Remove the two Phillips #1 8.5mm screws holding the secondary fan in place.

    • The second screw is close to the bottom of the projector and may be difficult to see.

  8. InFocus LP435Z Secondary Fan Replacement: шаг 8, изображение 1 из 1
    • Remove the secondary fan, by pulling straight up and out of projector.

Заключение

To reassemble your device, follow these instructions in reverse order.

2 участников успешно повторили данное руководство.

Andrew Kennedy

Участник с: 01/29/13

186 Репутация

Автор 6 руководств

Команда

Cal Poly, Team 20-3, Maness Winter 2013 Участник Cal Poly, Team 20-3, Maness Winter 2013

CPSU-MANESS-W13S20G3

4 членов

Автор 6 руководств

0 Комментариев

Добавить комментарий

Просмотр статистики:

За последние 24часов: 0

За последние 7 дней: 0

За последние 30 дней: 1

За всё время: 459