Перейти к основному содержанию

Эта версия возможно содержит некорректные исправления. Переключить на последнюю проверенную версию.

Выберете то, что вам нужно

  1. Этот шаг не переведен. Помогите перевести

    : шаг 1, изображение 1 из 2 : шаг 1, изображение 2 из 2
    • Before performing any repairs, perform a water test on the pump by raising and lowering the handle a full 40 strokes. A properly performing pump will yield greater than 10 liters.

    • Remove the hex head bolt from the top of the access door on the pump head.

    • On reassembly, this bolt should be hand-tight.

  2. Этот шаг не переведен. Помогите перевести

    : шаг 2, изображение 1 из 3 : шаг 2, изображение 2 из 3 : шаг 2, изображение 3 из 3
    • Pull the access door straight up off the pump head.

    • Store the access door in a sanitary place to prevent contamination.

  3. Этот шаг не переведен. Помогите перевести

    : шаг 3, изображение 1 из 2 : шаг 3, изображение 2 из 2
    • The access door has a tongue that fits into the base of the pump head.

    • The access door makes a convenient tray to hold nuts and bolts during the disassembly.

  4. Этот шаг не переведен. Помогите перевести

    : шаг 4, изображение 1 из 3 : шаг 4, изображение 2 из 3 : шаг 4, изображение 3 из 3
    • Place the spacer collar around the pump rod below the raised chain, with the beveled side down, and the flat side facing up.

  5. Этот шаг не переведен. Помогите перевести

    : шаг 5, изображение 1 из 3 : шаг 5, изображение 2 из 3 : шаг 5, изображение 3 из 3
    • The following procedure requires two people. If you attempt to do this alone, you risk injuring yourself and damaging the pump.

    • Lift the pump handle until the base of the chain comes to rest on the spacer collar, and the chain is slack. Hold the handle in this position while the chain is being detached.

  6. Этот шаг не переведен. Помогите перевести

    : шаг 6, изображение 1 из 3 : шаг 6, изображение 2 из 3 : шаг 6, изображение 3 из 3
    • Using the two access holes, place an angled socket wrench on the bolt and nut attaching the chain to the pump handle.

  7. Этот шаг не переведен. Помогите перевести

    : шаг 7, изображение 1 из 3 : шаг 7, изображение 2 из 3 : шаг 7, изображение 3 из 3
    • Hold the wrench on the bolt stationary.

    • Loosen the nut.

  8. Этот шаг не переведен. Помогите перевести

    : шаг 8, изображение 1 из 3 : шаг 8, изображение 2 из 3 : шаг 8, изображение 3 из 3
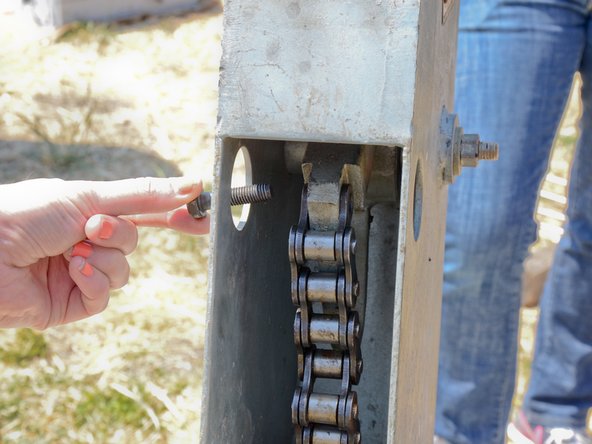
    • Remove the nut from the chain bolt.

  9. Этот шаг не переведен. Помогите перевести

    : шаг 9, изображение 1 из 2 : шаг 9, изображение 2 из 2
    • Remove the washer from the chain bolt.

  10. Этот шаг не переведен. Помогите перевести

    : шаг 10, изображение 1 из 2 : шаг 10, изображение 2 из 2
    • Remove the chain bolt.

  11. Этот шаг не переведен. Помогите перевести

    : шаг 11, изображение 1 из 3 : шаг 11, изображение 2 из 3 : шаг 11, изображение 3 из 3
    • Pull the top of the chain straight off of the pump handle.

  12. Этот шаг не переведен. Помогите перевести

    : шаг 12, изображение 1 из 3 : шаг 12, изображение 2 из 3 : шаг 12, изображение 3 из 3
    • Remove the two bolts from the handle side of the pump head.

    • Use one wrench on the bolt and another on the nut beneath. Hold the bolt stationary and loosen the nut.

  13. Этот шаг не переведен. Помогите перевести

    : шаг 13, изображение 1 из 3 : шаг 13, изображение 2 из 3 : шаг 13, изображение 3 из 3
    • Remove the two bolts and nuts from the handle side.

  14. Этот шаг не переведен. Помогите перевести

    : шаг 14, изображение 1 из 2 : шаг 14, изображение 2 из 2
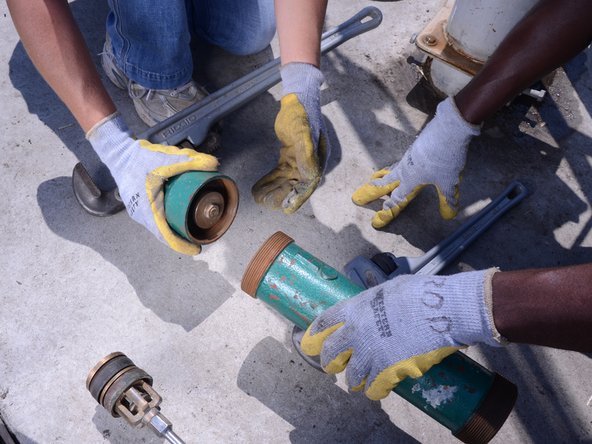
    • After removing the two handle side bolts, have your partner support the weight of the handle.

    • Remove the two remaining bolts in the same fashion.

  15. Этот шаг не переведен. Помогите перевести

    : шаг 15, изображение 1 из 3 : шаг 15, изображение 2 из 3 : шаг 15, изображение 3 из 3
    • Lift and remove the pump head from the pump.

    • Store the pump head in a sanitary place, preferably above ground, to prevent contamination.

  16. Этот шаг не переведен. Помогите перевести

    : шаг 16, изображение 1 из 2 : шаг 16, изображение 2 из 2
    • Slightly twist the head flange, until the corners overhang the top of the tank far enough to grab.

  17. Этот шаг не переведен. Помогите перевести

    : шаг 17, изображение 1 из 3 : шаг 17, изображение 2 из 3 : шаг 17, изображение 3 из 3
    • Lift the head flange up about one foot above the tank.

  18. Этот шаг не переведен. Помогите перевести

    : шаг 18, изображение 1 из 3 : шаг 18, изображение 2 из 3 : шаг 18, изображение 3 из 3
    • Slide the rod clamp around the pump rod, and support it on the tank base.

    • Make sure the pegs in the base of the rod clamp fit into the appropriate holes in the top of the tank.

  19. Этот шаг не переведен. Помогите перевести

    : шаг 19, изображение 1 из 2 : шаг 19, изображение 2 из 2
    • Tighten the rod clamp against the pump rod.

    • Be sure the pump rod is centered within the jaws of the clamp and held securely.

  20. Этот шаг не переведен. Помогите перевести

    : шаг 20, изображение 1 из 2 : шаг 20, изображение 2 из 2
    • Lower the head flange.

  21. Этот шаг не переведен. Помогите перевести

    : шаг 21, изображение 1 из 3 : шаг 21, изображение 2 из 3 : шаг 21, изображение 3 из 3
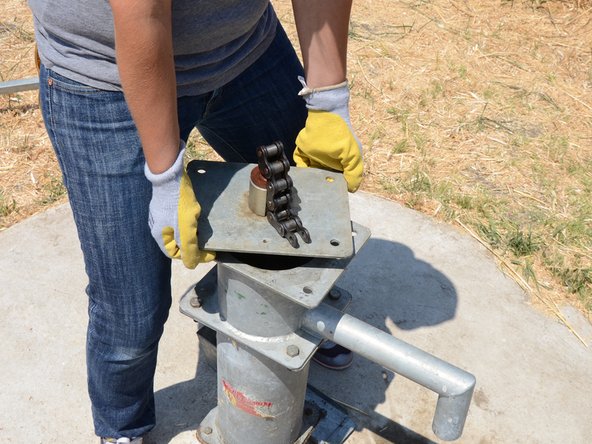
    • Unscrew the chain from the top of the pump rod.

    • Remove the chain.

    • Check the chain for signs of wear or damage.

    • Set the chain in a sanitary place, such as the access door that was previously removed.

  22. Этот шаг не переведен. Помогите перевести

    : шаг 22, изображение 1 из 3 : шаг 22, изображение 2 из 3 : шаг 22, изображение 3 из 3
    • Remove the chain support from around the pump rod.

  23. Этот шаг не переведен. Помогите перевести

    : шаг 23, изображение 1 из 1
    • Remove the jam nut from the top of the pump rod.

  24. Этот шаг не переведен. Помогите перевести

    : шаг 24, изображение 1 из 3 : шаг 24, изображение 2 из 3 : шаг 24, изображение 3 из 3
    • Remove the head flange.

  25. Этот шаг не переведен. Помогите перевести

    : шаг 25, изображение 1 из 1
    • Screw the jam nut back onto the top of the pump rod.

  26. Этот шаг не переведен. Помогите перевести

    : шаг 26, изображение 1 из 2 : шаг 26, изображение 2 из 2
    • Place a coupling over the pump rod, on top of the rod vise.

  27. Этот шаг не переведен. Помогите перевести

    : шаг 27, изображение 1 из 3 : шаг 27, изображение 2 из 3 : шаг 27, изображение 3 из 3
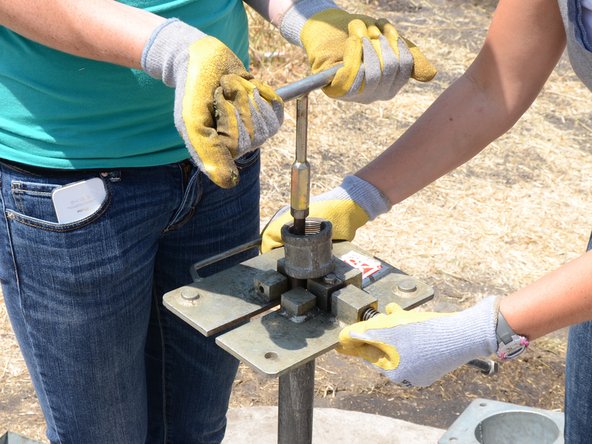
    • Reattach the T-handle to the top of the pump rod.

  28. Этот шаг не переведен. Помогите перевести

    : шаг 28, изображение 1 из 3 : шаг 28, изображение 2 из 3 : шаг 28, изображение 3 из 3
    • Loosen and remove the rod vise from the pump rod.

    • The coupling will drop down onto the riser main.

  29. Этот шаг не переведен. Помогите перевести

    : шаг 29, изображение 1 из 2 : шаг 29, изображение 2 из 2
    • Screw the coupling onto the end of the riser main.

    • Use a pipe wrench to tighten the coupling onto the riser main.

  30. Этот шаг не переведен. Помогите перевести

    : шаг 30, изображение 1 из 1
    • When using the lifting arms, it is essential that each arm have a gap above and below it, and that the openings alternate direction up the pipe.

    • Set the first lifting arm just above (but not touching) the pipe vise.

  31. Этот шаг не переведен. Помогите перевести

    : шаг 31, изображение 1 из 3 : шаг 31, изображение 2 из 3 : шаг 31, изображение 3 из 3
    • Add the other two lifting arms.

    • Ensure three things about the arms:

    • They must be equally spaced around the riser main (120° apart).

    • The arms must not touch each other, the coupling at the top, or the pipe vise at the bottom.

    • The openings should alternate, to keep the riser main secure.

  32. Этот шаг не переведен. Помогите перевести

    : шаг 32, изображение 1 из 2 : шаг 32, изображение 2 из 2
    • Communication is very important throughout this procedure.

    • As each person lifts up on their lifting spanner, they announce "got it" to let everyone else know they're holding.

    • Once all three lifters have announced that they've "got it," loosen the vise.

  33. Этот шаг не переведен. Помогите перевести

    : шаг 33, изображение 1 из 2 : шаг 33, изображение 2 из 2
    • With the vise loosened, lift up the riser main 1-2 feet.

    • Lift only as high as everyone is comfortable.

  34. Этот шаг не переведен. Помогите перевести

    : шаг 34, изображение 1 из 2 : шаг 34, изображение 2 из 2
    • Tighten the pipe vise, with the following procedure:

    • Announce "tightening."

    • Tighten the vise.

    • Announce "Tight."

  35. Этот шаг не переведен. Помогите перевести

    : шаг 35, изображение 1 из 3 : шаг 35, изображение 2 из 3 : шаг 35, изображение 3 из 3
    • Slide the three lifting spanners down on the riser main, into new lifting positions.

    • Again, make sure he lifting spanners don't touch anything above or below, and that they are evenly spaced about the pipe.

  36. Этот шаг не переведен. Помогите перевести

    : шаг 36, изображение 1 из 2 : шаг 36, изображение 2 из 2
    • Once all of the lifters have said "got it," loosen the pipe vise.

  37. Этот шаг не переведен. Помогите перевести

    : шаг 37, изображение 1 из 3 : шаг 37, изображение 2 из 3 : шаг 37, изображение 3 из 3
    • Lift the riser main another 1-2 feet.

  38. Этот шаг не переведен. Помогите перевести

    : шаг 38, изображение 1 из 2 : шаг 38, изображение 2 из 2
    • Tighten the pipe vise, following the same verbal procedure.

    • Repeat the procedure several times:

    • Once everyone is securely holding the pipe, loosen the pipe vise.

    • Lift the pipe.

    • Tighten the pipe vise.

    • Slide the lifting spanners down to a new position.

  39. Этот шаг не переведен. Помогите перевести

    : шаг 39, изображение 1 из 2 : шаг 39, изображение 2 из 2
    • At ten feet, you will reach the first coupling in the riser main.

    • While the three lifters are holding the riser main, the vise operator must open the vise wide enough to let the coupling pass through the jaws.

  40. Этот шаг не переведен. Помогите перевести

    : шаг 40, изображение 1 из 3 : шаг 40, изображение 2 из 3 : шаг 40, изображение 3 из 3
    • Lift the riser main up through the pipe vise, until the coupling clears the jaws.

    • Tighten the pipe vise and move the lifting spanners down to a new position.

  41. Этот шаг не переведен. Помогите перевести

    : шаг 41, изображение 1 из 3 : шаг 41, изображение 2 из 3 : шаг 41, изображение 3 из 3
    • Lift the riser main high enough that there is room beneath the coupling for the three lifting spanners.

    • Tighten the pipe vise.

  42. Этот шаг не переведен. Помогите перевести

    : шаг 42, изображение 1 из 2 : шаг 42, изображение 2 из 2
    • Use a pipe vise to unscrew the first section of riser main from the coupling.

    • Be careful not to remove the coupling from the lower section of riser main. You may need to use two pipe wrenches to hold the coupling still while you loosen the top section of riser main.

  43. Этот шаг не переведен. Помогите перевести

    : шаг 43, изображение 1 из 2 : шаг 43, изображение 2 из 2
    • Unscrew the upper section of riser main from the coupling.

    • Be careful—the pipe will likely be full of water, that will leak out above the coupling as you unscrew the pipe.

  44. Этот шаг не переведен. Помогите перевести

    : шаг 44, изображение 1 из 2 : шаг 44, изображение 2 из 2
    • Lift the section of pipe straight up from the coupling.

    • Be very careful to hold the pipe as straight up as possible. If it bends or falls over, it may damage the pump rod, or injure someone. Always have at least two people holding the pipe.

  45. Этот шаг не переведен. Помогите перевести

    : шаг 45, изображение 1 из 3 : шаг 45, изображение 2 из 3 : шаг 45, изображение 3 из 3
    • Place the rod vise on the pump rod between the section of riser main.

    • Tighten the rod vise on the pump rod.

  46. Этот шаг не переведен. Помогите перевести

    : шаг 46, изображение 1 из 3 : шаг 46, изображение 2 из 3 : шаг 46, изображение 3 из 3
    • Use two wrenches to disconnect the upper section of pump rod from the lower section.

    • Hold the lower section stationary and rotate the upper section.

    • Once detached, lift and remove the upper sections of riser main and pump rod together, and set them down.

  47. Этот шаг не переведен. Помогите перевести

    : шаг 47, изображение 1 из 3 : шаг 47, изображение 2 из 3 : шаг 47, изображение 3 из 3
    • Remove the T-handle from the top of the pump rod.

  48. Этот шаг не переведен. Помогите перевести

    : шаг 48, изображение 1 из 2 : шаг 48, изображение 2 из 2
    • Screw the T-handle onto the newly exposed top of the pump rod.

  49. Этот шаг не переведен. Помогите перевести

    : шаг 49, изображение 1 из 3 : шаг 49, изображение 2 из 3 : шаг 49, изображение 3 из 3
    • Loosen and remove the rod vise.

    • Repeat the lifting procedure for the remaining sections of riser main and pump rod.

  50. Этот шаг не переведен. Помогите перевести

    : шаг 50, изображение 1 из 1
    • The last section of riser main pipe will have the pump cylinder attached to the bottom.

    • Pull the assembly of riser main pipe and cylinder out of the well and set the assembly on a block of wood to keep the cylinder off the ground.

  51. Этот шаг не переведен. Помогите перевести

    : шаг 51, изображение 1 из 3 : шаг 51, изображение 2 из 3 : шаг 51, изображение 3 из 3
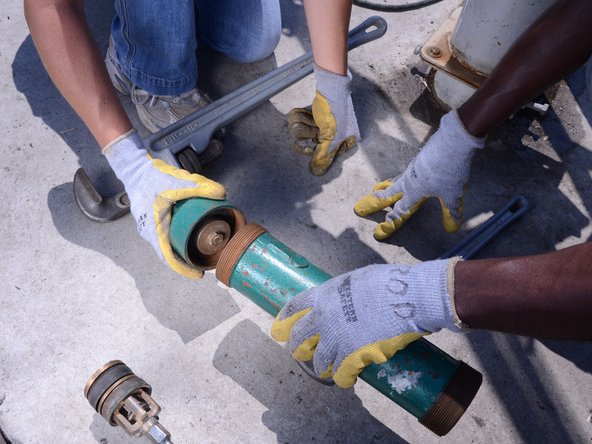
    • Using two pipe wrenches, unscrew the cylinder from the riser main.

  52. Этот шаг не переведен. Помогите перевести

    : шаг 52, изображение 1 из 2 : шаг 52, изображение 2 из 2
    • Slowly pull the cylinder off of the pump rod, exposing the traveling valve and foot valve.

  53. Этот шаг не переведен. Помогите перевести

    : шаг 53, изображение 1 из 3 : шаг 53, изображение 2 из 3 : шаг 53, изображение 3 из 3
    • Using two pipe wrenches, remove the end cap from the cylinder.

  54. Этот шаг не переведен. Помогите перевести

    : шаг 54, изображение 1 из 2 : шаг 54, изображение 2 из 2
    • Remove the foot valve from the end cap.

    • Take note of the direction of the foot valve in the end cap. This is extremely important for reassembly, as the pump will not work if the valve is facing the wrong direction.

  55. Этот шаг не переведен. Помогите перевести

    : шаг 55, изображение 1 из 2 : шаг 55, изображение 2 из 2
    • Check the foot valve components for signs of wear.

Финишная черта

Еще один человек закончил это руководство.

Andrew Optimus Goldheart

Участник с: 10/17/09

503 024 Репутация

Автор 407 руководств

Команда

iFixit Участник iFixit

Staff

135 членов

Автор 17 199 руководств

0 Комментариев

Добавить комментарий

Просмотр статистики:

За последние 24часов: 3

За последние 7 дней: 20

За последние 30 дней: 60

За всё время: 774