Перейти к основному содержанию

Insignia Flex 10.1 NS-P10A6100 Screen Replacement

Выберете то, что вам нужно

  1. Insignia Flex 10.1 NS-P10A6100 Screen Replacement, Back Case: шаг 1, изображение 1 из 1
    • Make sure your tablet is turned off and not connected to a power source to prevent personal injury.

    • The volume rocker and power button located on the top edge by the camera are not connected pieces and will become free from the device once the front panel is removed from the back case. They are easily put back in place when reassembling the tablet.

    • Position the tablet with the top edge by the camera facing down.

    • Insert the plastic opening tool between the front panel and back case at the upper left hand corner of the tablet.

  2. Insignia Flex 10.1 NS-P10A6100 Screen Replacement: шаг 2, изображение 1 из 2 Insignia Flex 10.1 NS-P10A6100 Screen Replacement: шаг 2, изображение 2 из 2
    • Slide the plastic opening tool along the edge of the tablet between the front panel and back case.

    • Repeat this process for the two shorter edges of the tablet leaving the top edge by the camera still snapped in place.

  3. Insignia Flex 10.1 NS-P10A6100 Screen Replacement: шаг 3, изображение 1 из 1
    • Using an unfolding motion along the top edge of the tablet, carefully separate the front panel from the back case.

  4. Insignia Flex 10.1 NS-P10A6100 Screen Replacement, Camera: шаг 4, изображение 1 из 2 Insignia Flex 10.1 NS-P10A6100 Screen Replacement, Camera: шаг 4, изображение 2 из 2
    • Using the Phillips #000 screw driver, unscrew the two 4 mm screws securing the camera to the front panel in a counterclockwise direction.

    • The two screws are very small, so be careful not to lose them after unscrewing them.

  5. Insignia Flex 10.1 NS-P10A6100 Screen Replacement: шаг 5, изображение 1 из 1
    • Using the plastic opening tool, lift up the black retaining flap that secures the camera ZIF (zero insertion force) ribbon connector to the motherboard.

  6. Insignia Flex 10.1 NS-P10A6100 Screen Replacement: шаг 6, изображение 1 из 1
    • Pull the camera ZIF (zero insertion force) ribbon connector out from underneath the black retaining flap.

    • Remove the camera.

  7. Insignia Flex 10.1 NS-P10A6100 Screen Replacement, Screen: шаг 7, изображение 1 из 2 Insignia Flex 10.1 NS-P10A6100 Screen Replacement, Screen: шаг 7, изображение 2 из 2
    • Using the Phillips #000 screw driver, unscrew the four 4 mm screws securing the four gray clasps to the front panel in a counterclockwise direction.

    • The four screws are very small, so be careful not to lose them after unscrewing them.

  8. Insignia Flex 10.1 NS-P10A6100 Screen Replacement: шаг 8, изображение 1 из 1
    • Using the plastic opening tool, pry the four gray clips from the front panel.

    • The gray clips rest lightly in place on the front panel, so minimal force is required to remove and place them.

  9. Insignia Flex 10.1 NS-P10A6100 Screen Replacement: шаг 9, изображение 1 из 3 Insignia Flex 10.1 NS-P10A6100 Screen Replacement: шаг 9, изображение 2 из 3 Insignia Flex 10.1 NS-P10A6100 Screen Replacement: шаг 9, изображение 3 из 3
    • Using the Phillips #000 screw driver, unscrew the four 4 mm screws securing the speakers to the front panel in a counterclockwise direction.

    • The four screws are very small, so be careful not to lose them after unscrewing them.

  10. Insignia Flex 10.1 NS-P10A6100 Screen Replacement: шаг 10, изображение 1 из 2 Insignia Flex 10.1 NS-P10A6100 Screen Replacement: шаг 10, изображение 2 из 2
    • Using the Phillips #000 screw driver, unscrew the three 4 mm screws securing the motherboard to the front panel in a counterclockwise direction.

    • The three screws are very small, so be careful not to lose them after unscrewing them.

  11. Insignia Flex 10.1 NS-P10A6100 Screen Replacement: шаг 11, изображение 1 из 1
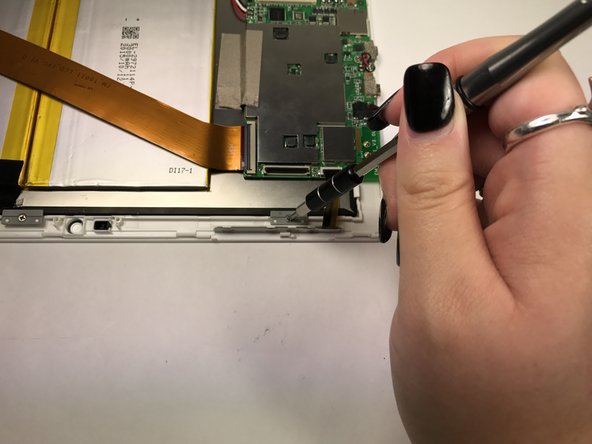
    • Using the plastic opening tool, lift up the black retaining flap that secures the volume and power button ZIF (zero insertion force) ribbon connector to the motherboard.

  12. Insignia Flex 10.1 NS-P10A6100 Screen Replacement: шаг 12, изображение 1 из 1
    • Pull the ZIF (zero insertion force) ribbon connector out from underneath the black retaining flap.

  13. Insignia Flex 10.1 NS-P10A6100 Screen Replacement: шаг 13, изображение 1 из 2 Insignia Flex 10.1 NS-P10A6100 Screen Replacement: шаг 13, изображение 2 из 2
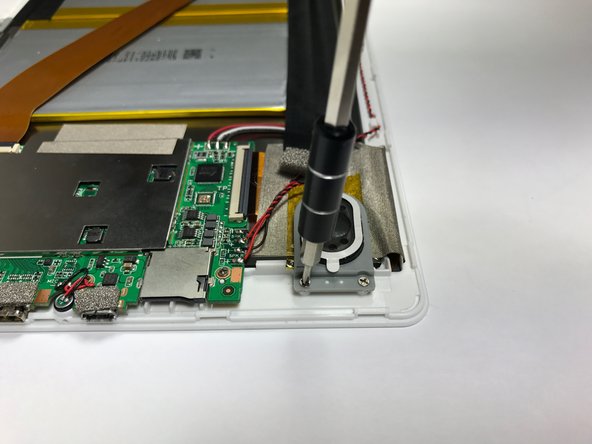
    • Using the plastic opening tool, remove the silver tape covering the display ZIF (zero insertion force) ribbon connector.

  14. Insignia Flex 10.1 NS-P10A6100 Screen Replacement: шаг 14, изображение 1 из 1
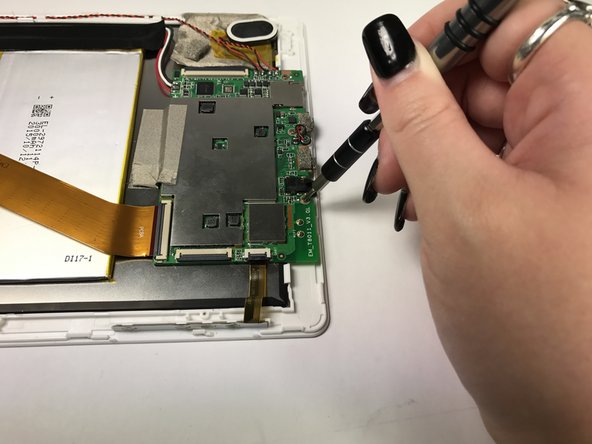
    • Using the plastic opening tool, lift up the black retaining flap that secures the display ZIF (zero insertion force) ribbon connector to the motherboard.

  15. Insignia Flex 10.1 NS-P10A6100 Screen Replacement: шаг 15, изображение 1 из 1
    • Pull the ZIF (zero insertion force) ribbon connector out from underneath the black retaining flap.

  16. Insignia Flex 10.1 NS-P10A6100 Screen Replacement: шаг 16, изображение 1 из 1
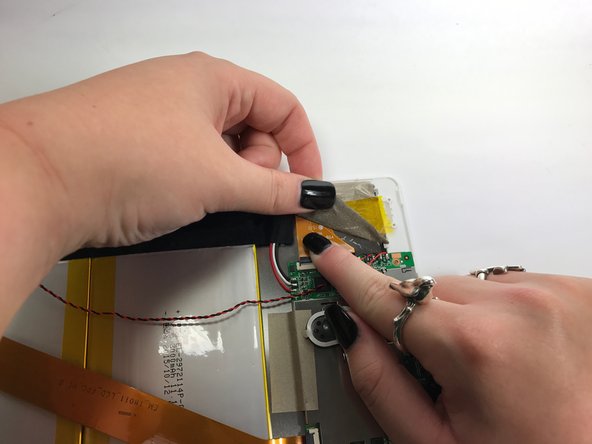
    • Position the tablet with the top edge by the cameras facing up.

    • Insert the heavy-duty spudger at the top right corner.

  17. Insignia Flex 10.1 NS-P10A6100 Screen Replacement: шаг 17, изображение 1 из 1
    • Lift the screen from the front panel with a prying motion to detach it from the clips holding it in place.

  18. Insignia Flex 10.1 NS-P10A6100 Screen Replacement: шаг 18, изображение 1 из 1
    • Pop the screen out from the front panel.

    • Be careful not to bend the front panel too much as it might break.

  19. Insignia Flex 10.1 NS-P10A6100 Screen Replacement: шаг 19, изображение 1 из 1
    • Lift the screen from the front panel to remove.

Заключение

The screen is now free from the device and can be replaced. To reassemble your device, follow these instructions in reverse order.

3 участников успешно повторили данное руководство.

Samantha Damewood

Участник с: 10/29/16

961 Репутация

Автор 5 руководств

Команда

Baylor, Team 5-8, Williams Fall 2016 Участник Baylor, Team 5-8, Williams Fall 2016

BU-WILLIAMS-F16S5G8

3 членов

Автор 12 руководств

2 Комментариев

Do you have a guide for replacing the lcd screen?

dcutler01 - Ответить

Whic screen models works wirt this tablet?

Gerardo Lerma - Ответить

Добавить комментарий

Просмотр статистики:

За последние 24часов: 0

За последние 7 дней: 0

За последние 30 дней: 3

За всё время: 3,307