Перейти к основному содержанию

Insignia Flex 8 NS-P08A7100 Battery Replacement

Выберете то, что вам нужно

  1. Insignia Flex 8 NS-P08A7100 Battery Replacement, Battery: шаг 1, изображение 1 из 2 Insignia Flex 8 NS-P08A7100 Battery Replacement, Battery: шаг 1, изображение 2 из 2
    • Begin by using the opening tool to pry open the back cover. Continue around the edge until the back cover pops off.

  2. Insignia Flex 8 NS-P08A7100 Battery Replacement: шаг 2, изображение 1 из 2 Insignia Flex 8 NS-P08A7100 Battery Replacement: шаг 2, изображение 2 из 2
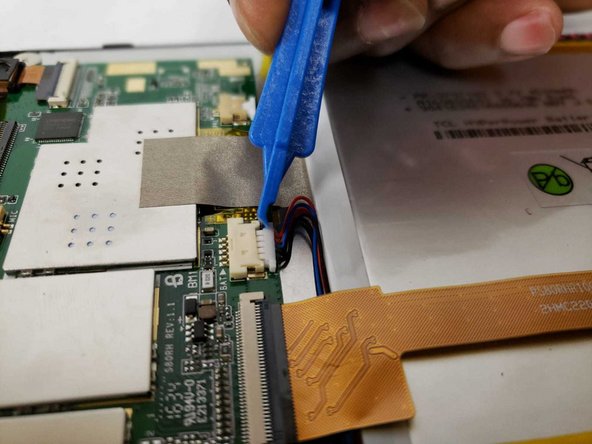
    • Use the opening tool to flip the LCD flex circuit plug upwards. The flex circuit should now be loose. Remove flex circuit by pulling outwards.

  3. Insignia Flex 8 NS-P08A7100 Battery Replacement: шаг 3, изображение 1 из 2 Insignia Flex 8 NS-P08A7100 Battery Replacement: шаг 3, изображение 2 из 2
    • Use the opening tool to remove the battery cable from the circuit board.

  4. Insignia Flex 8 NS-P08A7100 Battery Replacement: шаг 4, изображение 1 из 1
    • Remove the adhesive tape from the bottom of the battery.

  5. Insignia Flex 8 NS-P08A7100 Battery Replacement: шаг 5, изображение 1 из 1
    • Remove plastic adhesive tape from the side of the battery.

  6. Insignia Flex 8 NS-P08A7100 Battery Replacement: шаг 6, изображение 1 из 2 Insignia Flex 8 NS-P08A7100 Battery Replacement: шаг 6, изображение 2 из 2
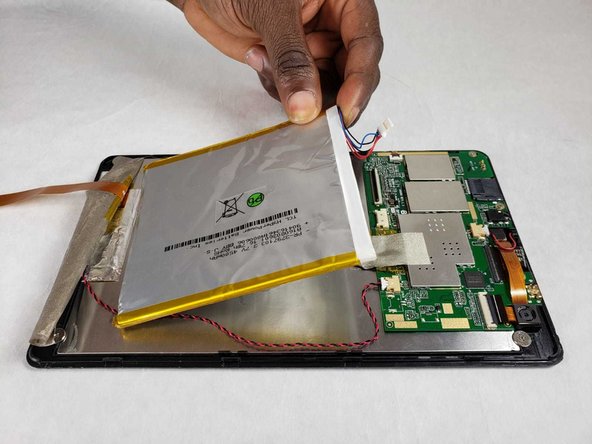
    • Pry the battery from the back of the LCD screen using the opening tool. Due to the strong adhesive between the battery and screen, this may take some time.

Заключение

To reassemble your device, follow these instructions in reverse order.

Lavina Pillai

Участник с: 07/08/19

133 Репутация

1 руководство автора

Команда

IUPUI, Team S1-G1, Renguette Summer 2019 Участник IUPUI, Team S1-G1, Renguette Summer 2019

IUPUI-RENGUETTE-SU19S1G1

3 членов

Автор 2 руководств

0 Комментариев

Добавить комментарий

Просмотр статистики:

За последние 24часов: 0

За последние 7 дней: 0

За последние 30 дней: 1

За всё время: 227