Перейти к основному содержанию

Insignia NS-24ER310NA17 Speaker Replacement

Выберете то, что вам нужно

  1. Insignia NS-24ER310NA17 Speaker Replacement, Remove the base: шаг 1, изображение 1 из 3 Insignia NS-24ER310NA17 Speaker Replacement, Remove the base: шаг 1, изображение 2 из 3 Insignia NS-24ER310NA17 Speaker Replacement, Remove the base: шаг 1, изображение 3 из 3
    • Rest the TV on its top edge so you have access to the base.

    • Use a Phillips #2 screwdriver to take out the four screws on the bottom of the base.

    • Remove the base from the frame.

  2. Insignia NS-24ER310NA17 Speaker Replacement: шаг 2, изображение 1 из 3 Insignia NS-24ER310NA17 Speaker Replacement: шаг 2, изображение 2 из 3 Insignia NS-24ER310NA17 Speaker Replacement: шаг 2, изображение 3 из 3
    • Lay the TV face down.

    • Use the Phillips #00 screwdriver to remove all of the Phillips Head Screws from the the back of the TV.

  3. Insignia NS-24ER310NA17 Speaker Replacement, Pry the TV open: шаг 3, изображение 1 из 1
    • Stand the TV on its top edge.

    • Gently pry apart the front and back of the TV.

    • The two halves should pull apart easily since there are no longer any screws holding it together.

    • The two halves will still be connected by wires and cables that are taped to each side. Do not pull on these. We will remove them in the next step.

  4. Insignia NS-24ER310NA17 Speaker Replacement, Disconnect wires: шаг 4, изображение 1 из 3 Insignia NS-24ER310NA17 Speaker Replacement, Disconnect wires: шаг 4, изображение 2 из 3 Insignia NS-24ER310NA17 Speaker Replacement, Disconnect wires: шаг 4, изображение 3 из 3
    • As mentioned in the previous step, there are wires still connecting the two halves.

    • Remove all the pieces of tape to detach the wires from both sides.

    • You want to gently peel the tape off, without pulling on the wires.

  5. Insignia NS-24ER310NA17 Speaker Replacement: шаг 5, изображение 1 из 1
    • Spread apart your TV the rest of the way, but do not disconnect any of the wires.

    • You should have a clear view of the inside on both sides.

  6. Insignia NS-24ER310NA17 Speaker Replacement, Speaker: шаг 6, изображение 1 из 2 Insignia NS-24ER310NA17 Speaker Replacement, Speaker: шаг 6, изображение 2 из 2
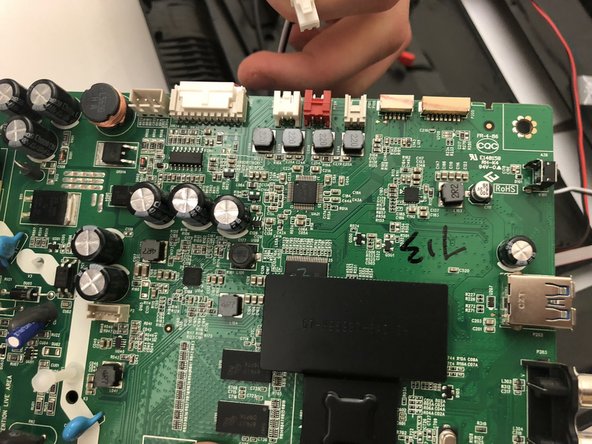
    • Unplug the red (right speaker) cord from the motherboard.

    • Unplug the white (left speaker) cord from the motherboard.

  7. Insignia NS-24ER310NA17 Speaker Replacement: шаг 7, изображение 1 из 1
    • Start by locating speaker in bottom of back panel.

  8. Insignia NS-24ER310NA17 Speaker Replacement: шаг 8, изображение 1 из 1
    • Remove screws on both sides holding the speaker in place.

  9. Insignia NS-24ER310NA17 Speaker Replacement: шаг 9, изображение 1 из 1
    • Pull the speaker out of its casing, and repeat for the process for the other speaker.

Заключение

To reassemble your device, follow these instructions in reverse order.

Hannah Berenjfoorosh

Участник с: 01/22/18

533 Репутация

Автор 3 руководств

Команда

Cal Poly, Team S16-G2, Banghart Winter 2018 Участник Cal Poly, Team S16-G2, Banghart Winter 2018

CPSU-BANGHART-W18S16G2

4 членов

Автор 6 руководств

0 Комментариев

Добавить комментарий

Просмотр статистики:

За последние 24часов: 0

За последние 7 дней: 4

За последние 30 дней: 17

За всё время: 984