Введение
This guide will walk you through the process of installing a zipper in your Patagonia down jacket. This is a tough repair and we recommend you have some sewing experience. For replacement parts or further assistance, contact Patagonia Customer Service.
Выберете то, что вам нужно
-
-
Unzip the jacket and fold back the bottom corner.
-
Identify the start of the seam that is holding the zipper in place.
-
-
-
Bend the zipper teeth away from the zipper webbing to make it easier to reach the stitches that hold the zipper and webbing together.
-
Using the seam ripper, gently rip the seam between the zipper and zipper webbing.
-
-
-
Continue ripping the seam holding the zipper to the webbing until you come to the top of the seam.
-
-
-
When you come to the fold in the zipper webbing, insert the seam ripper between the two layers of webbing, and gently pull the stitches out.
-
-
-
Identify where the zipper flap is still sewn into the jacket. Use the seam ripper to free the zipper flap from the jacket. The yellow rectangle in the photos above will help you identify the zipper flap.
-
-
-
Lay the jacket flat and measure from the base of the zipper to the collar, along the seam you just removed. In our case we measured 27 inches.
-
-
-
Lay out your new zipper on a flat surface and use the measurement you recorded in the step above, starting from the zipper box, or the bottom of the zipper.
-
Mark the measurement with tailor's chalk.
-
Pull the zipper slider back behind the mark you just made.
-
-
-
-
Measure one inch beyond where you just marked and make a second mark with tailor’s chalk.
-
-
-
Use end nipper pliers to remove the teeth of the zipper between the two marks.
-
Use needle-nose pliers to remove all the leftover bits of the teeth from the zipper.
-
-
-
Take a zipper stop and align it, posts down, just beyond the last remaining zipper tooth.
-
Crimp the zipper stop onto the zipper using pliers.
-
-
-
Fold the excess zipper tape away from the teeth at a slight angle.
-
Sew the toothless end of the zipper down, backstitching to hold it in place.
-
-
-
Align the toothless edge of the zipper with the inside serged edge of the zipper webbing.
-
Fold the top of the webbing down over the sewn zipper tape.
-
-
-
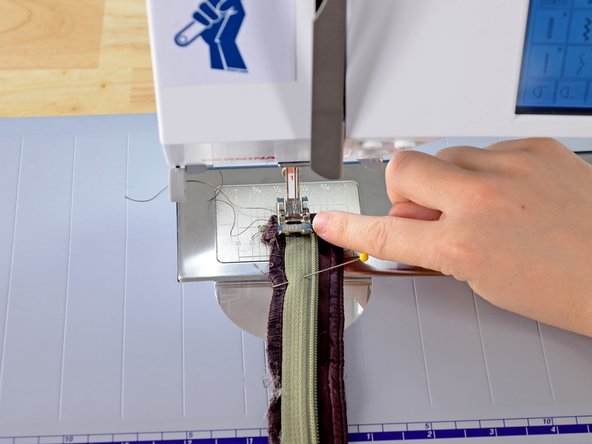
Align the zipper and webbing in the sewing machine so that the zipper teeth are along the edge of the presser foot.
-
Sew a few stitches, removing pins before you come to them.
-
-
-
Sew along the edge of the zipper teeth, making sure that the zipper and webbing stay aligned.
-
-
-
Reinsert the zipper and webbing into the jacket, aligning the edge of the jacket fabric with the zipper teeth.
-
-
-
While holding the zipper in place, move the fabric underneath the zipper out of the way so you’re only sewing the zipper to one layer of fabric.
-
-
-
Install the zipper foot into your sewing machine.
-
Align the jacket and zipper in the sewing machine.
-
-
-
Check your alignment and begin sewing, guiding the fabric along the zipper teeth.
-
Go slowly, re-aligning the fabric as you go.
-
-
-
Continue sewing and re-aligning the zipper as you proceed along the full length of the zipper.
-
-
-
When you reach the end of the zipper, backstitch to hold your stitches in place and remove the jacket from the sewing machine.
-
-
-
Align the inside jacket fabric along the backside of the webbing.
-
Try to align the stitch holes directly over the stitches you just sewed.
-
-
-
Align the jacket in the sewing machine, with the zipper webbing facing up.
-
Holding the inside fabric of the jack in place, sew directly over the original stitching.
-
Go slowly, re-aligning the fabric as you go.
-
Clip the threads, and admire your work!
-


Отменить: Я не выполнил это руководство.
10 участников успешно повторили данное руководство.


3 Комментариев
Very well documented.
Have not yet completed my zipper repair very good tutorial. Thanks