Введение
There are many benefits to adding a second hard drive to your laptop such as improved speeds, greater storage space, and less heartache when installing new software. Use this guide to install one using our optical bay hard drive enclosure.
Выберете то, что вам нужно
-
-
Remove the following ten screws securing the lower case to the upper case:
-
Seven 3 mm Phillips screws.
-
Three 13.5 mm Phillips screws.
-
-
-
Using both hands, lift the lower case near the vent to pop it off two clips securing it to the upper case.
-
Remove the lower case and set it aside.
-
-
Инструмент, используемый на этом этапе:P6 Pentalobe Screwdriver 2009 15" MacBook Pro Battery$5.49
-
Three Pentalobe screws secure the battery to the upper case. They can be removed with this special driver.
-
-
-
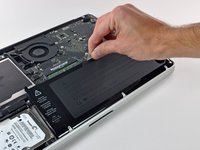
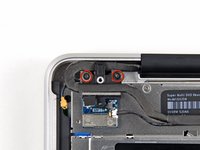
Remove the two exposed five-point Pentalobe screws along the top edge of the battery.
-
-
-
Use the tip of a spudger to bend back the finger of the "Warning: Do not remove the battery" sticker while you remove the five-point Pentalobe screw hidden underneath.
-
-
-
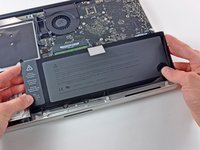
Lift the battery by its plastic pull tab and slide it away from the long edge of the upper case.
-
-
-
Tilt the battery back enough to access the battery cable connector.
-
Pull the battery cable connector away from its socket on the logic board and remove the battery from the upper case.
-
-
-
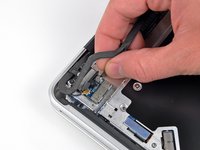
Hold the end of the cable retainer down with one finger while you use the tip of a spudger to slightly lift the other end and rotate it away from the camera cable connector.
-
-
-
-
Disconnect the camera cable by pulling the male end straight away from its socket.
-
-
-
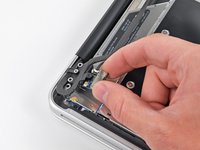
Disconnect the Bluetooth cable by pulling the male end straight away from its socket.
-
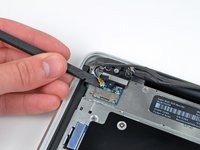
Use the flat end of a spudger to pry the Bluetooth antenna cable from its socket on the board.
-
-
-
Remove the two 8 mm Phillips screws securing the Bluetooth/camera cable retainer to the upper case.
-
Lift the Bluetooth board/cable retainer assembly out of the upper case.
-
-
-
Use a spudger to pry the optical drive connector straight up off the logic board.
-
-
-
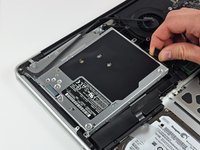
Remove three 3.5 mm Phillips screws securing the optical drive to the upper case.
-
-
-
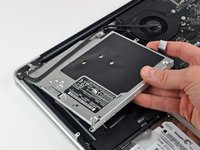
Remove the optical drive cable by pulling it straight away from the optical drive.
-
-
-
Remove the two black Phillips #0 screws securing the small metal mounting bracket. Transfer this bracket to your new optical drive or hard drive enclosure.
-
-
-
Remove the plastic spacer from the optical bay hard drive enclosure by pressing in on one of the clips on either side and lifting it up and out of the enclosure.
-
-
-
Make sure that the hard drive connectors are facing down before placing it into the enclosure.
-
Gently place the hard drive into the enclosure's hard drive slot.
-
While firmly holding the enclosure in place with one hand, use your other hand to press the hard drive into the enclosure connectors.
-
-
-
Once the hard drive is snug, reinsert the plastic spacer while holding the hard drive against the bottom of the enclosure.
-
-
-
Attach the optical drive bracket to the new enclosure with two Phillips #0 screws.
-
Reconnect any cables you have removed from the original optical drive onto the optical bay enclosure.
-
-
-
Align the cable's SATA connector with the drive's port and plug in securely.
-
Plug the USB connector into your laptop and your optical drive is ready for use.
-


To reassemble your device, follow these instructions in reverse order.
To reassemble your device, follow these instructions in reverse order.
Отменить: Я не выполнил это руководство.
51 человек успешно провели ремонт по этому руководству.

