Перейти к основному содержанию

Installing iMac Intel 27" EMC 2429 Dual Drive Kit (HDD or SSD)

Выберете то, что вам нужно

  1. Installing iMac Intel 27" EMC 2429 Dual Drive Kit (HDD or SSD), Access Door: шаг 1, изображение 1 из 2 Installing iMac Intel 27" EMC 2429 Dual Drive Kit (HDD or SSD), Access Door: шаг 1, изображение 2 из 2
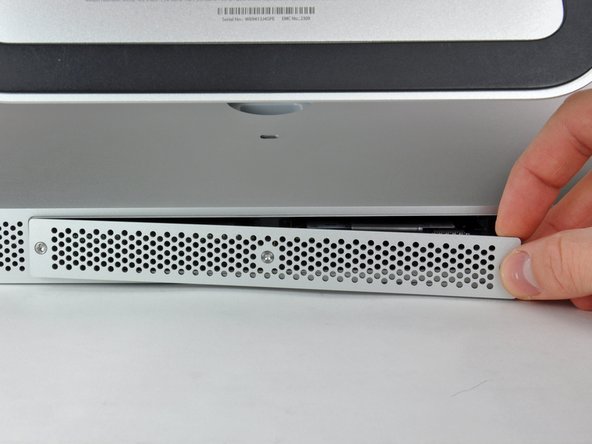
    • Loosen the three Phillips screws securing the access door to the bottom edge of your iMac.

    • These screws will remain captive in the access door.

    • Remove the access door from your iMac.

    • During reassembly, fasten the access door loosely and align it with the pocket cut into the outer case of the iMac before fully tightening the screws.

  2. Installing iMac Intel 27" EMC 2429 Dual Drive Kit (HDD or SSD), RAM: шаг 2, изображение 1 из 1
    • Use your fingers or the tip of a spudger to slide the black plastic RAM tray pull tab out of the RAM slot.

  3. Installing iMac Intel 27" EMC 2429 Dual Drive Kit (HDD or SSD): шаг 3, изображение 1 из 2 Installing iMac Intel 27" EMC 2429 Dual Drive Kit (HDD or SSD): шаг 3, изображение 2 из 2
    • Pull the black plastic tab away from the iMac to eject the RAM chip from its socket.

    • The RAM modules are firmly seated and may require a fair amount of force to remove.

    • Use your fingers to slide the RAM chip out of its socket.

    • If necessary, repeat this process for the other RAM module(s).

  4. Installing iMac Intel 27" EMC 2429 Dual Drive Kit (HDD or SSD), Glass Panel: шаг 4, изображение 1 из 3 Installing iMac Intel 27" EMC 2429 Dual Drive Kit (HDD or SSD), Glass Panel: шаг 4, изображение 2 из 3 Installing iMac Intel 27" EMC 2429 Dual Drive Kit (HDD or SSD), Glass Panel: шаг 4, изображение 3 из 3
    Инструмент, используемый на этом этапе:
    Heavy-Duty Suction Cups (Pair)
    $14.95
    Купить
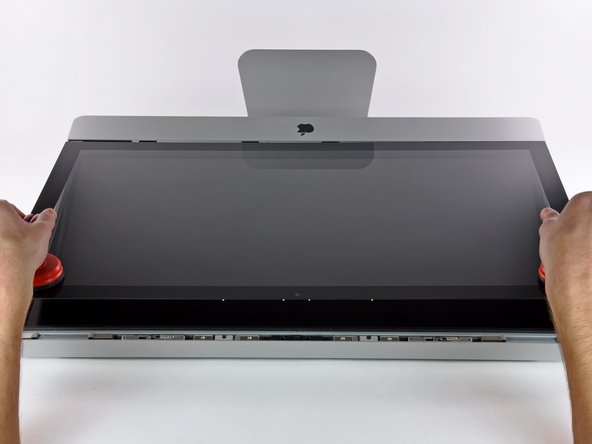
    • Stick a heavy-duty suction cup near each of the two top corners of the glass panel.

    • To attach the suction cups, first position the suction cup with the movable handle parallel to the face of the glass panel (as indicated in the second picture).

    • While lightly holding the suction cup against the glass, raise the movable handle until it is parallel with the other handle (as indicated by the third picture).

    • If your suction cups refuse to stick, try cleaning both the glass panel and the suction cup with a damp soft, lint-free cloth. (Dampen with distilled water, and if needed, an equal ratio of distilled water and white vinegar for best results.)

    • Do not use the suction cups to carry the display glass because if one of them fails to stick, you could drop the screen and break it.

    • The original iMac box makes a good place to store the glass panel. Otherwise, a padded horizontal surface, like a towel on a desk, will do nicely.

  5. Installing iMac Intel 27" EMC 2429 Dual Drive Kit (HDD or SSD): шаг 5, изображение 1 из 3 Installing iMac Intel 27" EMC 2429 Dual Drive Kit (HDD or SSD): шаг 5, изображение 2 из 3 Installing iMac Intel 27" EMC 2429 Dual Drive Kit (HDD or SSD): шаг 5, изображение 3 из 3
    • Gently lift the glass panel perpendicular to the face of the LCD, enough to clear the steel mounting pins attached along the underside of the top edge of the glass panel.

    • Pull the glass panel away from the lower edge of the iMac and carefully set it aside.

    • Don't use the suction cups to carry the glass panel—if either one loses its grip, the panel could fall and break.

    • After setting the glass panel down safely, be sure to release the suction cups, as the suction force over time can crack the glass.

    • During reinstallation, be sure to meticulously clean the inside of the glass panel and the face of the LCD as any dust or fingerprints trapped inside will be annoyingly visible when the machine is turned on.

  6. Installing iMac Intel 27" EMC 2429 Dual Drive Kit (HDD or SSD), Display: шаг 6, изображение 1 из 1
    • Remove the eight T10 Torx screws securing the LCD to the outer case.

    • Be careful not to touch the display as the oil from your fingers may leave a residue that can be difficult to remove.

    • If necessary, peel the EMI gaskets located near the top center edge of the display assembly.

  7. Installing iMac Intel 27" EMC 2429 Dual Drive Kit (HDD or SSD), Display: шаг 7, изображение 1 из 3 Installing iMac Intel 27" EMC 2429 Dual Drive Kit (HDD or SSD), Display: шаг 7, изображение 2 из 3 Installing iMac Intel 27" EMC 2429 Dual Drive Kit (HDD or SSD), Display: шаг 7, изображение 3 из 3
    • Carefully lay the iMac stand-side down on a flat surface.

    • Due to tight tolerances, you will have to use a thin hooked tool to lift the display out of the outer case. As seen in the first picture, we made one out of a bent paperclip. A pair of angled tweezers can also work well.

    • Use a thin hooked tool to lift one side of the top edge of the display by its steel outer frame.

    • After lifting the top edge of the display on one side, hold it out of the outer case while you use a hooked tool to lift the other side.

    • Raise and hold the display high enough to access the cables.

    • Do not lift the top edge of the display out of the outer case too far, as several short ribbon cables still connect the two components.

  8. Installing iMac Intel 27" EMC 2429 Dual Drive Kit (HDD or SSD): шаг 8, изображение 1 из 1
    • Disconnect the vertical sync cable in the upper left corner of the screen. Use the tip of a spudger to push on the connector's side tabs and gently walk it out of its socket.

  9. Installing iMac Intel 27" EMC 2429 Dual Drive Kit (HDD or SSD): шаг 9, изображение 1 из 1
    • This step brings your hands close to the exposed rear of the power supply. To avoid a high-voltage shock from the many large capacitors attached to the board, do NOT touch the rear of the power supply.

    • Disconnect the LED backlight driver cable with your hand by pressing the tab down and sliding it towards the bottom of the display.

  10. Installing iMac Intel 27" EMC 2429 Dual Drive Kit (HDD or SSD): шаг 10, изображение 1 из 2 Installing iMac Intel 27" EMC 2429 Dual Drive Kit (HDD or SSD): шаг 10, изображение 2 из 2
    • Pull the black tab straight up to disconnect the latch on the display data cable ZIF connector.

    • Do not pull up too hard or you will damage the connector and socket.

    • Continue to pull the black tab up toward the top of the device, to detach the display data cable.

  11. Installing iMac Intel 27" EMC 2429 Dual Drive Kit (HDD or SSD): шаг 11, изображение 1 из 1
    • Use the tip of a spudger to disconnect the display power cable next to the display data cable.

  12. Installing iMac Intel 27" EMC 2429 Dual Drive Kit (HDD or SSD): шаг 12, изображение 1 из 1
    • Carefully pull the display toward the top edge of your iMac and lift it out of the iMac case.

  13. Installing iMac Intel 27" EMC 2429 Dual Drive Kit (HDD or SSD): шаг 13, изображение 1 из 1
    • Lay the display face down on a flat, soft surface.

    • If you are replacing the display panel, you will need to transfer additional components from the old panel to the new one. Compare the back of the old display with the replacement display. Note all cables, sensors, and foam cushioning that are missing from the new display.

    • If there is a wire or cable underneath adhesive tape, always pull the tape off first. Do not pull on the cable directly.

    • If the cable is glued to the chassis, use a heated iOpener or a hair dryer to soften the adhesive first. You can then slide an opening pick underneath the cable to loosen it. Never pull on the delicate connectors.

    • Slide an opening pick underneath the foam cushion pieces to separate them from the display, and gently pull them off. You may need some double sided tape to re-attach them to the new display.

  14. Installing iMac Intel 27" EMC 2429 Dual Drive Kit (HDD or SSD), Optical Drive: шаг 14, изображение 1 из 1
    • Use the flat end of a spudger to pull the optical drive data cable out of the optical drive.

  15. Installing iMac Intel 27" EMC 2429 Dual Drive Kit (HDD or SSD): шаг 15, изображение 1 из 1
    • Use the tip of a spudger to pull the optical drive thermal sensor connector out of its socket.

  16. Installing iMac Intel 27" EMC 2429 Dual Drive Kit (HDD or SSD): шаг 16, изображение 1 из 1
    • Remove the four T10 Torx screws securing the optical drive to the iMac case.

    • The bottom left screw has a slightly bigger head than the others.

  17. Installing iMac Intel 27" EMC 2429 Dual Drive Kit (HDD or SSD): шаг 17, изображение 1 из 2 Installing iMac Intel 27" EMC 2429 Dual Drive Kit (HDD or SSD): шаг 17, изображение 2 из 2
    • Slightly lift the left edge of the optical drive and then pull it to the side to release the centering pins.

    • Be careful not to rip the thermal sensor cable as you remove the optical drive.

  18. Installing iMac Intel 27" EMC 2429 Dual Drive Kit (HDD or SSD), Dual Drive Kit: шаг 18, изображение 1 из 1
    • Use the flat end of a spudger to pull the optical drive fan connector out of its socket.

  19. Installing iMac Intel 27" EMC 2429 Dual Drive Kit (HDD or SSD): шаг 19, изображение 1 из 1
    • Use the tip of a spudger to pull the SD board data cable connector out of its socket.

  20. Installing iMac Intel 27" EMC 2429 Dual Drive Kit (HDD or SSD): шаг 20, изображение 1 из 1
    • Use the flat end of a spudger to push the I/O cable connector out of its socket.

    • Alternate pushing on the tabs on the side of the connector to "walk" the connector out of its socket.

  21. Installing iMac Intel 27" EMC 2429 Dual Drive Kit (HDD or SSD): шаг 21, изображение 1 из 1
    • Use the flat end of the spudger to pull the microphone cable connector free of its socket.

  22. Installing iMac Intel 27" EMC 2429 Dual Drive Kit (HDD or SSD): шаг 22, изображение 1 из 2 Installing iMac Intel 27" EMC 2429 Dual Drive Kit (HDD or SSD): шаг 22, изображение 2 из 2
    • Release the right and left speaker connectors from their sockets using the flat end of a spudger.

  23. Installing iMac Intel 27" EMC 2429 Dual Drive Kit (HDD or SSD): шаг 23, изображение 1 из 2 Installing iMac Intel 27" EMC 2429 Dual Drive Kit (HDD or SSD): шаг 23, изображение 2 из 2
    • Locate the AirPort card at the top center of the logic board and just below the hard drive.

    • Use the flat end of a spudger to gently pry each of the antenna cables off their sockets.

    • Do not disconnect the antennas by pulling on the cables as this may damage the cables, connectors, or sockets.

    • The antennas have markings to help you identify their order. The antenna with no marks goes to "CH0", the antenna with one mark goes to "CH1", and the antenna with two marks goes to "CH2".

  24. Installing iMac Intel 27" EMC 2429 Dual Drive Kit (HDD or SSD): шаг 24, изображение 1 из 1
    • Use the flat edge of a spudger to push the camera/Bluetooth/ambient light sensor connector out of its socket.

  25. Installing iMac Intel 27" EMC 2429 Dual Drive Kit (HDD or SSD): шаг 25, изображение 1 из 1
    • Release the hard drive fan connector from its socket by pushing on its tabs using the flat end of a spudger.

  26. Installing iMac Intel 27" EMC 2429 Dual Drive Kit (HDD or SSD): шаг 26, изображение 1 из 1
    • Push the thermal sensor connector out of its socket with the flat end of a spudger.

  27. Installing iMac Intel 27" EMC 2429 Dual Drive Kit (HDD or SSD): шаг 27, изображение 1 из 1
    • Use the flat edge of a spudger to release the CPU fan cable

  28. Installing iMac Intel 27" EMC 2429 Dual Drive Kit (HDD or SSD): шаг 28, изображение 1 из 1
    • Use the flat end of the spudger to push the ambient temperature sensor connector out of its socket.

  29. Installing iMac Intel 27" EMC 2429 Dual Drive Kit (HDD or SSD): шаг 29, изображение 1 из 1
    • Use the flat edge of a spudger to pull the power button connector free of its socket.

  30. Installing iMac Intel 27" EMC 2429 Dual Drive Kit (HDD or SSD): шаг 30, изображение 1 из 2 Installing iMac Intel 27" EMC 2429 Dual Drive Kit (HDD or SSD): шаг 30, изображение 2 из 2
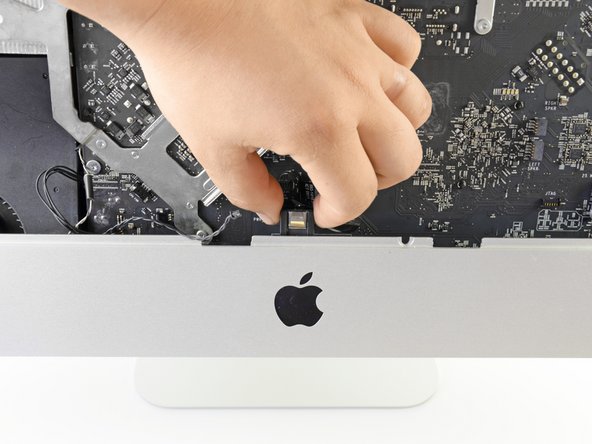
    • Locate the IR sensor located behind the black Apple logo.

    • If necessary, peel back the tape covering the IR sensor.

    • Detach the IR sensor by pulling it straight up and out from the case.

    • Do not attempt to completely remove the IR sensor from the iMac as it is still attached to the logic board.

  31. Installing iMac Intel 27" EMC 2429 Dual Drive Kit (HDD or SSD): шаг 31, изображение 1 из 1
    • Remove the eight T10 Torx screws securing the logic board and heat sink assembly to the iMac case.

  32. Installing iMac Intel 27" EMC 2429 Dual Drive Kit (HDD or SSD): шаг 32, изображение 1 из 2 Installing iMac Intel 27" EMC 2429 Dual Drive Kit (HDD or SSD): шаг 32, изображение 2 из 2
    • Simultaneously lift and rotate the logic board and heat sink assembly away from the iMac case until you can easily access the back side of the logic board.

  33. Installing iMac Intel 27" EMC 2429 Dual Drive Kit (HDD or SSD): шаг 33, изображение 1 из 2 Installing iMac Intel 27" EMC 2429 Dual Drive Kit (HDD or SSD): шаг 33, изображение 2 из 2
    • Locate the secondary SATA socket, next to the primary SATA socket.

    • Plug in the included SATA data/power cable.

    • The hard drive cable side with only one connector goes into the logic board connector.

  34. Installing iMac Intel 27" EMC 2429 Dual Drive Kit (HDD or SSD): шаг 34, изображение 1 из 2 Installing iMac Intel 27" EMC 2429 Dual Drive Kit (HDD or SSD): шаг 34, изображение 2 из 2
    • Route the new SATA cable through the indentation that the primary SATA cable goes through and into the optical drive bay.

    • Not all of the 27” iMacs (2011) have the channel in the optical drive wall to route SSD cabling. If you have one of these iMacs, you can simply route the cables under the optical drive.

    • Set the logic board back into place, being careful not to catch, cover, or pinch any cables.

    • Be sure that the SATA cable has as much slack as possible and that it is not tangled with any other cables.

    • Make sure the cables are not stacked on top of each other; they have to lay as flat as possible

  35. Installing iMac Intel 27" EMC 2429 Dual Drive Kit (HDD or SSD): шаг 35, изображение 1 из 3 Installing iMac Intel 27" EMC 2429 Dual Drive Kit (HDD or SSD): шаг 35, изображение 2 из 3 Installing iMac Intel 27" EMC 2429 Dual Drive Kit (HDD or SSD): шаг 35, изображение 3 из 3
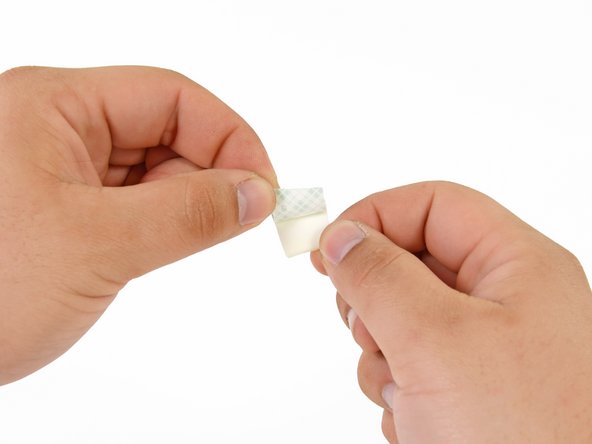
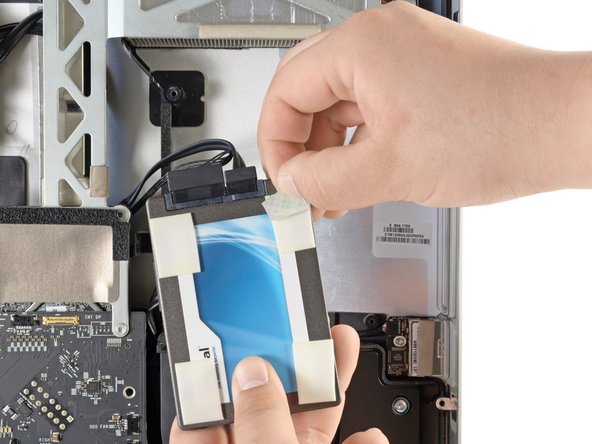
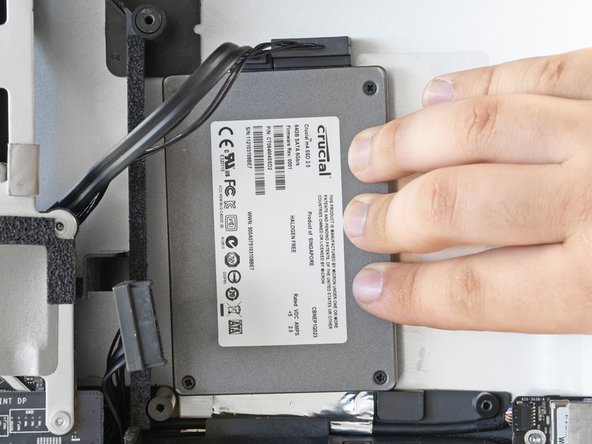
    • To secure your new drive in your iMac, you will need to place high strength double-sided tape at the four corners on the side of the drive with the SATA connectors.

    • Peel the backing off one side of the double sided tape.

    • Press the exposed adhesive side of the double sided tape to the corner of the SSD.

    • Be sure not to cover the SATA connectors with the double sided tape.

    • Repeat the above process for the remaining 3 corners.

  36. Installing iMac Intel 27" EMC 2429 Dual Drive Kit (HDD or SSD): шаг 36, изображение 1 из 3 Installing iMac Intel 27" EMC 2429 Dual Drive Kit (HDD or SSD): шаг 36, изображение 2 из 3 Installing iMac Intel 27" EMC 2429 Dual Drive Kit (HDD or SSD): шаг 36, изображение 3 из 3
    • Connect both the SATA data and SATA power connectors to their respective sockets on the SSD.

    • Peel the backing off of the double sided tape.

    • Carefully set the SSD into the iMac optical bay as close to the lower left corner as possible.

    • Do not repeatedly stick and un-stick the tape, as the adhesive will become weaker.

    • Once you are happy with the SSD's placement, firmly press down along its edges to ensure full adhesion.

    • When re-installing the optical drive, the SATA cable will be sandwiched between the foam padding and the optical drive.

Заключение

To reassemble your device, follow these instructions in reverse order from Step 27.

355 участников успешно повторили данное руководство.

Phillip Takahashi

Участник с: 08/22/11

86 617 Репутация

Автор 87 руководств

71 Комментариев

Don´t forget to take out the RAM first. Otherwise it is very difficult to replace the logic board back in it´s place.

B Riefel - Ответить

Excellent guide. Thank you!

I got through everything, turned on the iMac, got the start up gong, and ... nothing. Screen stayed black and the fans started blowing like crazy, indicating failure of Apple Hardware Test. All my attempts to remedy (zap PRAM, reset SMC) failed. Uh oh.

Opened the machine back up, took out the LCD, and re-seated all four connections from display panel to logic board. Crossed my fingers and put it back together. This time, the displayed turned on, the Apple logo appeared, system booted up, and the new SSD appeared on the desktop. Yay!

The connectors from the LCD are delicate. It's tricky to seat them properly without damaging them, but don't close it up without a positive click on each one.

The upgrade has been fantastic so far. SanDisk 120GB SSD. Dramatic speed improvement. Well worth all the surgery on the machine.

claytonhibbert - Ответить

in step 22 you can see the wifi cables are not connected anymore. but there is no step that shows you should disconnect them

R Sonnema - Ответить

+1 Unfortunately mine has been broken (CH1 cable is out from the UFL connector). Unfortunately I do not now how to repair it.

It would be important to add this step in order to protect others falling into the same issue.

PeterZ -

i followed this guide to the T. used a 240gig Corsair GS and after it gets far along the boot process the fans blow at max speed! i took the monitor off again to make sure i had all the connections in the right place. there was one i was missing... the ambient temp lol. but i plugged it back in and still fans blow full blast :( gonna keep messing with it to see if i can figure it out :)

paulhizo - Ответить

Добавить комментарий

Просмотр статистики:

За последние 24часов: 28

За последние 7 дней: 149

За последние 30 дней: 562

За всё время: 440,005