Введение
The charging port on the JBL Pulse 3 is located on the side of the base by the speakers. It is located among the push buttons on the side of the JBL Pulse 3.
Выберете то, что вам нужно
-
-
Lay the JBL Pulse 3 on its side as shown in the picture.
-
Use a plastic opening tool to lift the top right corner of the speaker grill. A small amount of force is necessary to remove the grill.
-
-
-
After pulling the right side of the grill off, place thumb underneath grill as shown in the picture.
-
Lift and pull straight out to pull grill off the posts.
-
-
-
Repeat steps 1-3 for the left side of the speaker grill on the JBL Pulse 3. The speaker grill should now be completely removed from the JBL Pulse 3.
-
-
-
Use a Phillips #00 screwdriver to remove the six black 6mm screws on the inside of the top of the bottom section.
-
-
-
Turn the JBL Pulse 3 right-side up and unscrew the top ring of the device. A small amount of force and/or a cotton cloth may be necessary to remove this piece.
Ca I Specifically buy the top ring
Opening is not as simple as demonstrated in Step 6. I have followed everything through, am I missing something?
-
-
-
Remove the six 5mm screws on top of the JBL Pulse 3 with a Phillips #0 screwdriver.
-
-
-
-
Remove the five 7mm screws on the inside of the JBL Pulse 3 with a Phillips #1 screwdriver.
This phase could be difficult. Try to “twist” the speaker to have a little gap between both parts and insert gently a screwdriver or opening toile to spread the gap.
-
-
-
Peel off black, taped-on electrical lead from the inside side of the JBL Pulse 3.
-
-
-
Pull the top section of the JBL Pulse 3 up. The outside casing to the JBL Pulse 3 should now be removed.
-
-
-
Use a Phillips #2 screwdriver to remove the six 11 mm screws that circle the bottom of the LED light display.
-
Pull the LED light display off of the JBL Pulse 3 base.
-
-
-
Use tweezers to pull the five connections off of the LED light display.
up to step 13, the battery replacement steps are the same.
From step 14 the steps change.
Very good instructions for changing the battery in the jbl pulse 3 can be found here:
https://www.youtube.com/watch?v=MpznDgxg... -
-
-
Using a Phillips #0 screwdriver, remove the two black 8mm screws on the bottom of the LED light display.
-
-
-
Pull out the motherboard slightly from the LED light display as shown. Using tweezers, unplug the three connections attached to the motherboard.
-
-
-
Pull the rest of the motherboard out from the LED light display.
-
Using wire cutters, snip the black wire connecting to the base of the JBL Pulse 3 at the base of the motherboard. The motherboard should now be removed from the JBL Pulse 3.
Hi Guys! Thanks a lot for the tutorial, but anyone knows where THIS BLACK WIRE IS CONNECTED at the base of the speaker? I accidentally remove it..
-
-
-
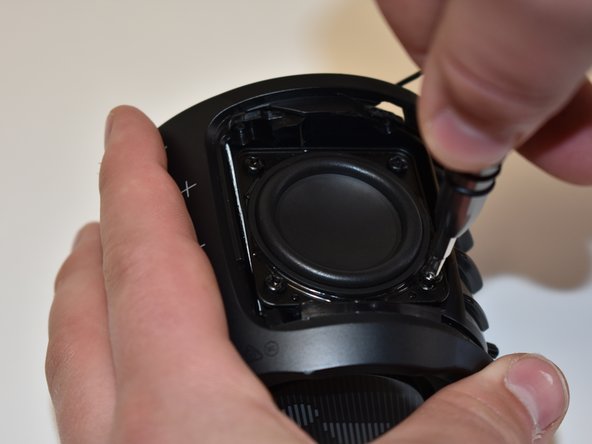
Using a Phillips #2 screwdriver, remove the four 10mm screws on the corner of the speaker on the side of the base of the JBL Pulse 3.
-
-
-
Pull out the speaker and cut the black and red wire with wire cutters. The speaker should now be removed from the JBL Pulse 3.
-
-
-
Repeat the steps to take out all three speakers on the base of the JBL Pulse 3.
-
Using a Phillips #0 screwdriver, remove the 6 mm screw under each of the three speakers around the base of the JBL Pulse 3.
-
-
-
Grab the outside of the JBL Pulse 3 at the bottom and pull outward until the outside button cover comes off.
-
-
-
Disconnect the two connections from the inside side of the base of the JBL Pulse 3 by pushing on the wire with your index finger in the opposite direction of the connection.
-
-
-
Using a Phillips #1 screwdriver, remove the four 10mm screws by the push buttons on the side of the base of the JBL Pulse 3.
how to buy spares
i want jbl pulse 3 charging port
-
-
-
Pull off the inside button cover with the attached charging port. The charging port should now be removed.
-


To reassemble your device, follow these instructions in reverse order.
To reassemble your device, follow these instructions in reverse order.
Отменить: Я не выполнил это руководство.
5 участников успешно повторили данное руководство.
Команда

Central Washington University, Team S1-G2, Pengilly Fall 2018 Участник Central Washington University, Team S1-G2, Pengilly Fall 2018
CWU-PENGILLY-F18S1G2
3 членов
Автор 12 руководств
3 Комментариев
And how to put it back with cut cable?
Good very good
I've done a teardown and was able to access the charging terminal without cutting any wires. I didn't have a replacement, so I just put it back together hoping that cleaning it would work. Didn't work.