Введение
Buttons can wear out over time due to wear and tear. This guide will show you how to remove the button panel on the bottom of the speaker.
Be CAREFUL when applying pressure to the button system, as to not damage or snap the system.
Выберете то, что вам нужно
-
-
Find the seam on the speaker and position it upwards.
-
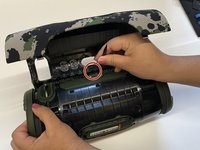
Begin by turning the device to where the bottom side with groves are facing towards you, using the (5) spudger carefully pry open the side of the outer shell where the red indicators are to unlatch outer shell. After they are unlatched you should be able to open the shell by hand.
-
-
-
To continue to remove the outer shell unscrew the two screws (size 1cm) shown in the picture with a size 0 (zero) Phillip's screwdriver.
-
-
-
-
To continue to remove the shell use a (5) spudger to slowly pop the shell off.
-
There is one nudge in the center below the power and bluetooth button that should pop off.
-
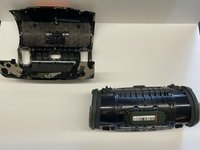
Once you have unlatched this piece correctly the shell will remove itself from the speaker itself. As it is shown in the following figure.
-
-
-
Wedge the spudger between the outer button cover and the speaker hardware.
-
Gently push down on the spudger, lifting the outer button cover away from the device.
-
-
-
Once the left and right sides of the outer button cover are released. Slightly move the spudger around the outer cover and push down on the spudger.
-
All you should see is the inner button panel.
-
-
-
With the inner button panel exposed place the spudger directly under the inner panel and gently push on the spudger.
-
Repeat the last steps all the way around the inner panel.
-


To reassemble your device, follow these instructions in reverse order.
To reassemble your device, follow these instructions in reverse order.
Отменить: Я не выполнил это руководство.
Еще один человек закончил это руководство.

Команду

IUPUI, Team 2-5, Harley Fall 2023 Участник IUPUI, Team 2-5, Harley Fall 2023
IUPUI-HARLEY-F23S2G5
3 членов
Автор 2 руководств