Введение
The two speakers in the Jawbone MINI JAMBOX are what provide the sound. Excessive use of the speakers can lead to them becoming damaged, and the device becoming unusable.
Выберете то, что вам нужно
-
-
Using the standard metal spudger, begin by prying at the bottom of the plain rubber end cap (the end without the USB or auxiliary input).
-
-
-
Continue prying around the end panel, prying at different points until the entire panel is out of its seating.
-
Carefully remove the end panel.
-
-
-
Using a T6 bit, remove the flat topped 5mm screw located on the bottom of the casing, underneath the rubber foot.
I didn’t have a T6 bit. My set only went down to T7. I was able to seat a jeweler’s flat-blade screwdriver into the head, press down firmly, and turn the screw head. Even after breaking the screw loose, there was significant drag to turn it, so be careful of the tool slipping out of the screw head.
-
-
-
-
Push against the side without end cap to slide the internal components out of the case.
-
While holding the metal outset casing with one hand, press on the black inner plastic casing with your thumb.
-
-
-
Remove all connecting ribbons from the motherboard.
-
One ZIF or "zero insertion force" ribbon connecting at the side.
-
One standard ribbon connector in the middle (Note: this ZIF ribbon is lightly glued to the surface).
I was able to skip steps 6, 7, 8, and 9 after disconnecting only the battery ribbon cable. The battery ZIF socket has a wide black lever that needs to be tilted up from the outside edge to release (and again tilted flat during reassembly to clamp) the cable connection. Skipping steps 6-9 meant that on step 10 I had to remove the battery clip from behind the motherboard that I didn’t remove.
-
-
-
Desolder the grounding plug from the motherboard.
-
Make sure your soldering iron is tinned and carefully touch the tip of your iron to the grounding lug. Allow the the solder to liquify. While liquified, lift the motherboard off the grounding lug.
-
-
-
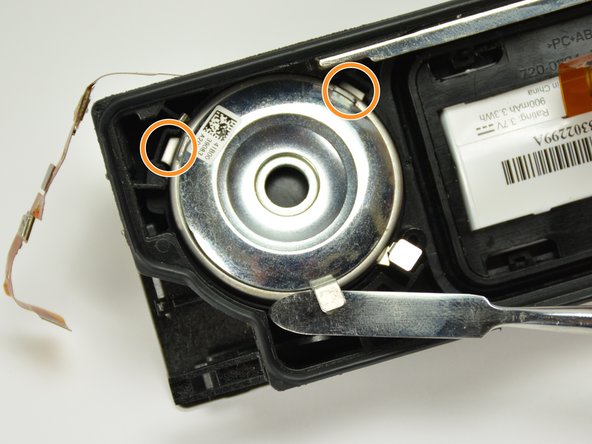
In order to remove the speakers, you must rotate them. Rotate the circled tabs away from their adjacent tabs.
-
Once the speakers are completely rotated, you should see new tabs rotate into sight (see the orange marks).
-
-
-
Carefully lift the speaker out of the plastic casing using the rotated metal tabs.
-


To reassemble your device, follow these instructions in reverse order.
To reassemble your device, follow these instructions in reverse order.
Отменить: Я не выполнил это руководство.
5 участников успешно повторили данное руководство.
Команда

Cal Poly, Team 12-1, Lancaster Spring 2015 Участник Cal Poly, Team 12-1, Lancaster Spring 2015
CPSU-LANCASTER-S15S12G1
5 членов
Автор 11 руководств
3 Комментариев
where can i buy replacement speakers
Thank you for the instructions. I was wondering where to start.
I was able to remove the cover without cosmetic damage. I used a 6” sharp knife blade, slid it into the crack and twisted. As Kevin states in Step 2, you are trying to lift up the center of the long edge. The top short end has two tabs and the bottom end has one big tab in the center.
Student4Life - Ответить
Yes I agree with Student4Life. Just insert the spudger into the top short edge (the edge without rubber foot) and you can remove the cover without noteble damage.
Leon - Ответить