Введение
This guide will demonstrate how to open the top unit of the Keurig K40. It will also demonstrate how to remove and replace the top water pump from a Keurig K40 device.
Выберете то, что вам нужно
-
-
Unscrew both 1.5mm screws located on the water pump.
-
-
-
-
Keeping one hand firmly placed on the device, tug upwards on the water pump until it is separated from the device.
-
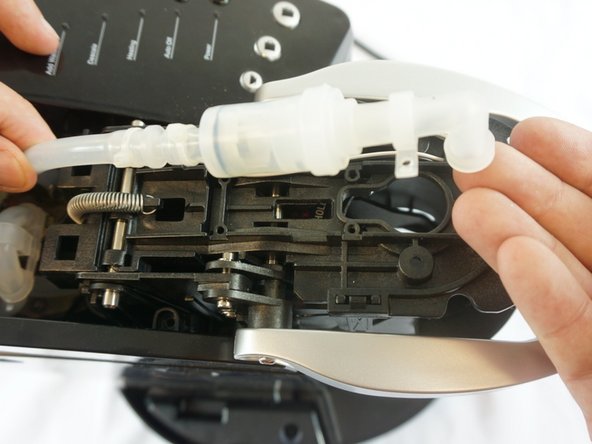
The water pump and pipe should now be loose and easy to move as shown.
-
-
-
Pull on the point where the pipe meets the water pump.
-
The pipe will come loose and the water filter will be free and ready to be replaced.
-


To reassemble your device, follow these instructions in reverse order.
To reassemble your device, follow these instructions in reverse order.
Отменить: Я не выполнил это руководство.
5 участников успешно повторили данное руководство.
Команда

USF Tampa, Team 6-1, Eyestone Spring 2016 Участник USF Tampa, Team 6-1, Eyestone Spring 2016
USFT-EYESTONE-S16S6G1
3 членов
Автор 5 руководств
4 Комментариев
I viewed this to replace the pump. But after the checkvalve was replaced through these instructions my K40 works like new. Thank you.
On our K50 Elite, the lid is held on with 2 screws, and two tabs (which I broke off) near the rear. I think to remove the lid, you first take out the 2 screws, under the cover on the front, and then slide the lid backwards to clear the tabs. I attached the rear of the lid by 2 spots of hot glue where the tabs used to go. I also removed the handle before removing the lid.
texboydmoore - Ответить
Thanks guys, this was super helpful
Caleb Baker -
Same with my k40, have to remove two small screws in top front than slide top back. Came right off. After I tried rocking for 1
Half hr .
jamesmurphy952 - Ответить
The K40 unit I was trying to fix was leaking from the top inside the unit. When I took it apart (rocking did not work, there were two screws under the front and it slid back easily when they were removed) the curved piece with the reinforcement housing was loose so that water was pumped into the housing whenever coffee was being made. That resulted in a flooded counter and a tripped circuit breaker!
I ran a zip tie from the crossbar of the reinforcement assembly to a brace on the tank and that made it much less likely to come loose and now the Keurig works as it was meant to do.
Betsy Knutson53 - Ответить
Clarification: The curved piece of tubing with the reinforcement housing was loose.
Betsy Knutson53 - Ответить