Перейти к основному содержанию

Keurig K70 Top Needle Replacement

Выберете то, что вам нужно

  1. Keurig K70 Top  Needle Replacement, Handle: шаг 1, изображение 1 из 2 Keurig K70 Top  Needle Replacement, Handle: шаг 1, изображение 2 из 2
    • Locate the handle on top of the unit

    • Locate the two Torx head screws on the underside of the handle. Remove them with a T15 screwdriver

  2. Keurig K70 Top  Needle Replacement: шаг 2, изображение 1 из 3 Keurig K70 Top  Needle Replacement: шаг 2, изображение 2 из 3 Keurig K70 Top  Needle Replacement: шаг 2, изображение 3 из 3
    • Bend the handle outward to remove

  3. Keurig K70 Top  Needle Replacement, Top  Needle: шаг 3, изображение 1 из 1
    • While looking upwards from underneath the Keurig, remove the two 8mm Phillips #2 screws from underneath the black plastic "shroud".

    • Remove the black plastic "shroud" by pushing inwards and then pulling upwards to disengage the plastic hooks that are not visible.

  4. Keurig K70 Top  Needle Replacement: шаг 4, изображение 1 из 3 Keurig K70 Top  Needle Replacement: шаг 4, изображение 2 из 3 Keurig K70 Top  Needle Replacement: шаг 4, изображение 3 из 3
    • Remove the two 8 mm screws with a PH #1 screwdrver

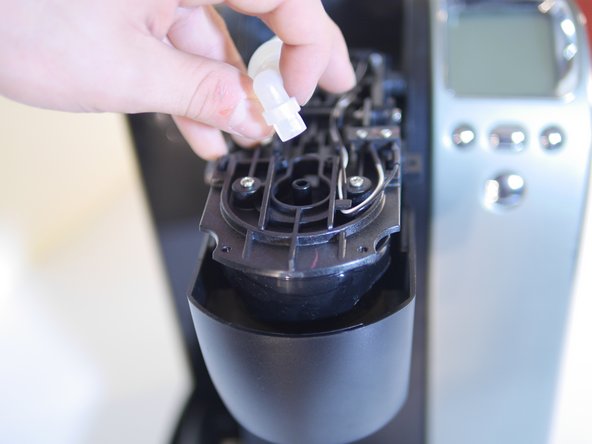
    • Pull on the plastic tube to remove it

    • This will require a generous amount of force

  5. Keurig K70 Top  Needle Replacement: шаг 5, изображение 1 из 1
    • Remove the two 8mm screws with a PH #2 screwdriver.

  6. Keurig K70 Top  Needle Replacement: шаг 6, изображение 1 из 1
    • Pull out on the top component perpendicular to the top face as shown. It will pop out without too much effort.

    • The needle is now exposed on the bottom of the part being handled in this photo. Be careful where you grab this component, we recommend doing as we have done here. Grab the front "lip" of the component (see photo).

  7. Keurig K70 Top  Needle Replacement: шаг 7, изображение 1 из 1
    • This is the component that should detach after pulling down.

    • Be careful of the needle!

  8. Keurig K70 Top  Needle Replacement: шаг 8, изображение 1 из 1
    • On the bottom of the component is the exposed needle, which is now accessible.

    • If you remove the needle be careful as it may be sharp.

Заключение

To reassemble your device, follow these instructions in reverse order.

2 участников успешно повторили данное руководство.

Alec Foster

Участник с: 10/06/16

161 Репутация

1 руководство автора

Команда

Cal Poly, Team 20-4, Livingston Fall 2016 Участник Cal Poly, Team 20-4, Livingston Fall 2016

CPSU-LIVINGSTON-F16S20G4

4 членов

Автор 5 руководств

2 Комментариев

If the needle were sharp this wouldn’t be necessary.

Can a replacement ‘needle’ be purchased somewhere? This must be almost universal and should be easily obtainable from Keurig.

krrjr49 - Ответить

Did you find a place to purchase a replacement top needle? All I can find is the bottom exit needle assembly.

Liz Mark - Ответить

Добавить комментарий

Просмотр статистики:

За последние 24часов: 1

За последние 7 дней: 15

За последние 30 дней: 32

За всё время: 3,953