Введение
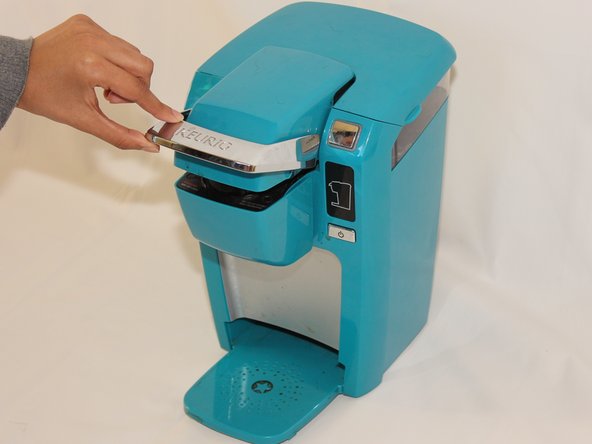
This guide will help walk you through the steps of replacing the needle of a Keurig Mini. To get into the device all you will need is a #1 Philips screw driver.
Выберете то, что вам нужно
-
-
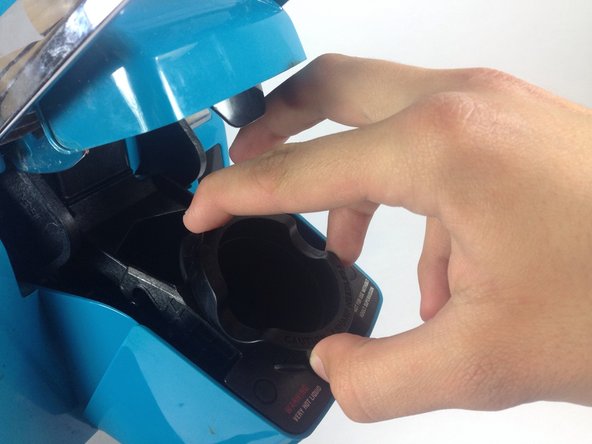
Firmly place a finger on each one of the three tabs that hold the K-cup holder into place, pushing in lightly. The tabs are difficult to see, but they are there and will make the removal easier. The top tab is located in the same location as the white triangle and the bottom two are located under the plastic bumps highlighted in the picture.
You may want to show a picture of the needles to show what exactly to avoid even though it might be blatantly obvious.
You should write "They" between "inside the K-cup because" and "may puncture your hand"
I did the needle up the 2 pin hole trick and it's working now!
What is a needle up the 2 pin hole trick?
Gina -
-
-
-
Firmly rock the K-cup holder from side to side, loosening the K-cup holder from its seat.
-
-
-
-
Open the top lid of the Keurig.
-
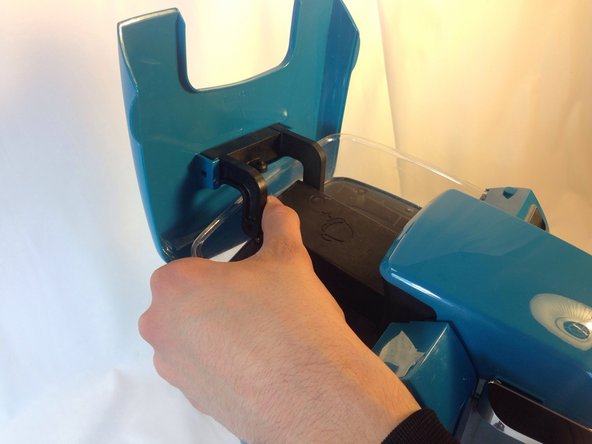
Pull directly outwards on one of the arms that holds the top lid in place. It will take some force to get the arm off the peg. Once one side is off, repeat the process on the second arm.
This step isn’t necessary.
Thank you!! Since I sure cldnt get both arms to come off!
I cannot get the arms to come off at all!
-
-
-
Set the Keurig in an upright position with the front side facing you.
-
Pull the cover off the top of the Keurig. It should come off easily with little force.
Not coming off easily. Pull toward front a little helps.
There are two plastic latching tabs that hold down the back of this cover, about 5/8 inch in from either side. It should be possible to locate them by probing along the back parting line with a thin-blade screwdriver and release them by pressing forward. Or apply excessive force like I did and break them off.
Thx for warning, Lytle!
The two tabs face forward so pushing on them won't help. Instead, push the cover BACK while wiggling its sideways. The cover may stick a little at first. You can pry it up SLIGHTLY but once a small gap opens, quit prying...just push back and wiggle sideways until the cover moves back about quarter inch and comes loose.
-
-
-
Firmly grasp the hose and pull it off of the plastic nozzle.
Before pulling, you can see if this portion of the tube is clogged. If clogged at the other end, you may be wasting time going further. See comments at the last step.
Maybe, but it’s unlikely to be the case. The transition from roomy hose to cramped needle outlets is where syphoned up coffee grounds get caked up. And you might not see it. I squeezed the hose at the union a few times and that made black crud come loose. A visual inspection only would not have shown that.
Our unit's hose end was secured with a plastic zip tie that had to be cut off. When replacing the hose, a new zip tie was required.
DO NOT cut it. Just slide the zip tie with your fingers. Then when reattaching the hose, put on hose first then shimmy zip tie back over union.
Thanks so much Sr Sr Jr for both comments here!
-
-
-
Push down lightly on the nozzle that the hose was attached to. The plastic housing along with the needle should pop off without much force.
Handle needs to be in upright position, then it pops out without force.
The screws for the top cover are hard to get back in because they are not attracted to magnets. But they are honestly unnecessary to put back, and most likely there to keep the cover in place during assembly and transport. It clips in nicely on its own and won’t come off during normal use.
-


To reassemble your device, follow these instructions in reverse order.
To reassemble your device, follow these instructions in reverse order.
Отменить: Я не выполнил это руководство.
Еще один человек закончил это руководство.
Команда

Cal Poly, Team 17-1, Forte Winter 2014 Участник Cal Poly, Team 17-1, Forte Winter 2014
CPSU-FORTE-W14S17G1
5 членов
Автор 17 руководств