Перейти к основному содержанию

Kids Digital Watch Battery Replacement

Выберете то, что вам нужно

  1. Kids Digital Watch Battery Replacement, Remove Watch Bands: шаг 1, изображение 1 из 2 Kids Digital Watch Battery Replacement, Remove Watch Bands: шаг 1, изображение 2 из 2
    • Using a twisting and pulling motion, remove the straps from the watch.

  2. Kids Digital Watch Battery Replacement, Unscrew Backplate: шаг 2, изображение 1 из 1
    • Remove the four (4) screws on the backside of the watch with the small Philips head screwdriver.

  3. Kids Digital Watch Battery Replacement, Remove Backplate: шаг 3, изображение 1 из 1
    • Remove the backplate carefully using your hands.

  4. Kids Digital Watch Battery Replacement, Remove Circuit Protector Plate: шаг 4, изображение 1 из 1
    Инструмент, используемый на этом этапе:
    Tweezers
    $4.99
    Купить
    • Remove using tweezers the circuit protector plate that is uncovered once the backplate is removed.

  5. Kids Digital Watch Battery Replacement, Removing Screw Near the Blue Component: шаг 5, изображение 1 из 2 Kids Digital Watch Battery Replacement, Removing Screw Near the Blue Component: шаг 5, изображение 2 из 2
    • With the tiny Philips head screwdriver, unscrew and remove the screw closest to the blue component.

  6. Kids Digital Watch Battery Replacement, Removing Screw Near the Yellow Component: шаг 6, изображение 1 из 1
    • Now remove the screw on the other side of the battery near the yellow circuit component.

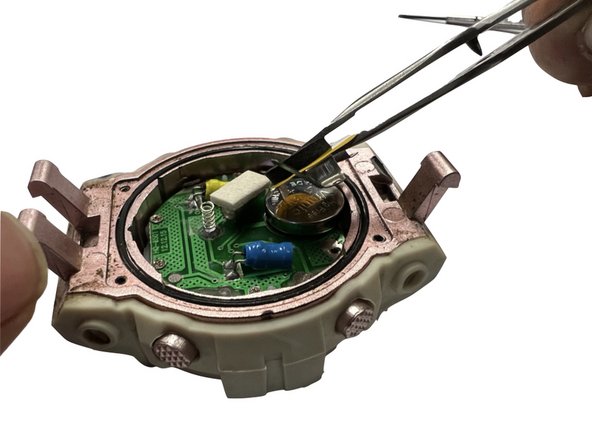
  7. Kids Digital Watch Battery Replacement, Remove the Battery Protector Plate: шаг 7, изображение 1 из 2 Kids Digital Watch Battery Replacement, Remove the Battery Protector Plate: шаг 7, изображение 2 из 2
    • Using tweezers carefully remove the battery protector plate.

  8. Kids Digital Watch Battery Replacement, Remove Battery: шаг 8, изображение 1 из 1
    • Remove the old battery from your watch.

  9. Kids Digital Watch Battery Replacement, Insert New Battery: шаг 9, изображение 1 из 1
    • Insert your new battery onto the circular component with your tweezers.

    • Ensure the positive and negative sides of your battery are oriented correctly.

Заключение

To reassemble your device, follow these instructions in reverse order.

Еще один человек закончил это руководство.

Amelia S

Участник с: 03/14/23

194 Репутация

1 руководство автора

Команда

ENGR_COMM_FIXERS Участник ENGR_COMM_FIXERS

Community

3 членов

Автор 1 руководств

0 Комментариев

Добавить комментарий

Просмотр статистики:

За последние 24часов: 1

За последние 7 дней: 13

За последние 30 дней: 68

За всё время: 702