Перейти к основному содержанию

Kindle 7th Generation Battery Replacement

Выберете то, что вам нужно

  1. Kindle 7th Generation Battery Replacement, Front Panel: шаг 1, изображение 1 из 2 Kindle 7th Generation Battery Replacement, Front Panel: шаг 1, изображение 2 из 2
    • Power off your Kindle before beginning disassembly.

    • At each corner, use the blue plastic opening tool to unhook and separate the front panel from the adhesive.

    • Run the tool along the seams to pry open the front panel.

  2. Kindle 7th Generation Battery Replacement: шаг 2, изображение 1 из 1
    • Peel the front panel off to remove it from the Kindle.

    • If this is the first time the front panel has been removed, the adhesive may require a significant amount of force to undo.

    • To prevent damaging the front panel, peel the panel from the corners towards the middle of the Kindle.

    • When reassembling your device, if you are replacing the front panel, additional adhesive may be required.

  3. Kindle 7th Generation Battery Replacement, Back Panel: шаг 3, изображение 1 из 2 Kindle 7th Generation Battery Replacement, Back Panel: шаг 3, изображение 2 из 2
    • Remove the ten 5.0 mm T5 Torx screws.

    • A magnetized screw mat can help you keep track of your screws.

  4. Kindle 7th Generation Battery Replacement: шаг 4, изображение 1 из 1
    • Working evenly along the corners and edges, separate the internal contents from the back panel.

    • There are many clips securing the screen to the back panel. Force will be required to remove the back, but you should never feel that the Kindle may break.

  5. Kindle 7th Generation Battery Replacement, Battery: шаг 5, изображение 1 из 1
    • Flip the Kindle over, exposing the battery and motherboard.

  6. Kindle 7th Generation Battery Replacement: шаг 6, изображение 1 из 2 Kindle 7th Generation Battery Replacement: шаг 6, изображение 2 из 2
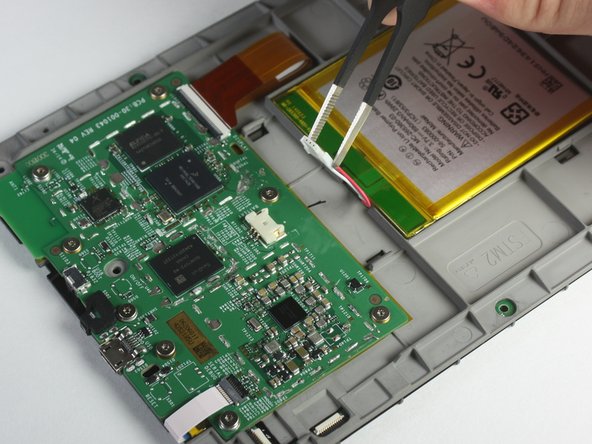
    • Use the blunted precision tweezers to pinch the ends of the clip securing the battery cord to the motherboard.

    • Gently slide the cord from the motherboard connection.

  7. Kindle 7th Generation Battery Replacement: шаг 7, изображение 1 из 2 Kindle 7th Generation Battery Replacement: шаг 7, изображение 2 из 2
    • Use the plastic opening tool to pry the battery from the backside of the screen.

    • Set the battery aside.

    • The battery has excessive adhesive so this may take some extra effort.

    • If replacing your battery, safely dispose of your damaged battery and use adhesive to insert the new battery.

Заключение

To reassemble your device, follow these instructions in reverse order.

23 участников успешно повторили данное руководство.

Abby Roulier

Участник с: 02/08/15

948 Репутация

Автор 3 руководств

Команда

Cal Poly, Team 6-28, Amido Winter 2015 Участник Cal Poly, Team 6-28, Amido Winter 2015

CPSU-AMIDO-W15S6G28

4 членов

Автор 18 руководств

16 Комментариев

Where can I purchase the battery?

Boon - Ответить

Fairly easy to do. Saves a lot of money compared to buying a whole new Kindle :) Thank you for this! A note: I've never seen batteries as...soft as these. Take care when using the removal tool. I could be easy to puncture the battery which could cause a big mess and possibly injury.

Joshua - Ответить

Where do I get a new battery from please?

Tracy Armstrong - Ответить

The link to buy a replacement battery on amazon is dead. Ideas on an alternate source?

Yagoth - Ответить

You can get the batteries on Ebay.

Mike Rayner - Ответить

Добавить комментарий

Просмотр статистики:

За последние 24часов: 26

За последние 7 дней: 207

За последние 30 дней: 972

За всё время: 37,599