Перейти к основному содержанию

Kindle Fire HD Display Assembly (Front Glass and LCD) Replacement

Выберете то, что вам нужно

  1. Kindle Fire HD Display Assembly (Front Glass and LCD) Replacement, Open the Kindle: шаг 1, изображение 1 из 3 Kindle Fire HD Display Assembly (Front Glass and LCD) Replacement, Open the Kindle: шаг 1, изображение 2 из 3 Kindle Fire HD Display Assembly (Front Glass and LCD) Replacement, Open the Kindle: шаг 1, изображение 3 из 3
    • Wedge a plastic opening tool into the lower right corner of the Kindle Fire.

    • Pry the case apart and run the plastic opening tool along the perimeter of the Kindle Fire to release the clips securing the case halves to each other.

    • If you are having difficulty inserting the plastic opening tool, carefully use a metal spudger (or a small flathead screwdriver) to undo the first clip, then switch back to the opening tool to avoid scratching your case.

    • The case is held on by clips along the perimeter of the bottom half of the Kindle. Zoom into the image to see where these clips are located.

  2. Kindle Fire HD Display Assembly (Front Glass and LCD) Replacement, Detach antenna wire from battery case: шаг 2, изображение 1 из 2 Kindle Fire HD Display Assembly (Front Glass and LCD) Replacement, Detach antenna wire from battery case: шаг 2, изображение 2 из 2
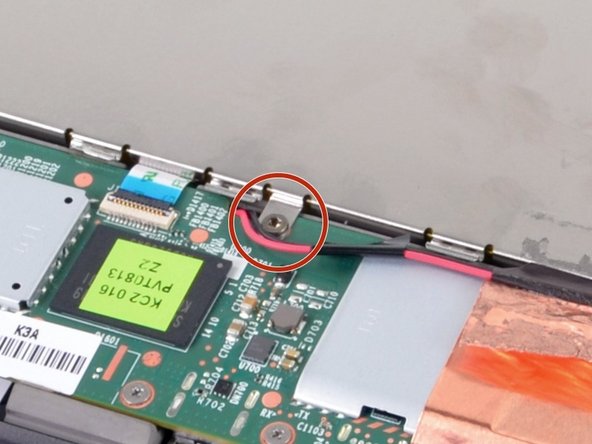
    • Carefully split/cut the copper tape (which protects parts of the motherboard from heat) with a razor blade to allow removal of the antenna wire.

    • Be careful not to cut too deep and damage the wire.

    • Unclip the antenna wire from the motherboard.

    • Unclip the antenna wire from each clip on the battery case (until the speaker).

    • Be careful not to rip the wire, however the wire should be strong enough and should come out with enough force.

  3. Kindle Fire HD Display Assembly (Front Glass and LCD) Replacement, Remove battery: шаг 3, изображение 1 из 3 Kindle Fire HD Display Assembly (Front Glass and LCD) Replacement, Remove battery: шаг 3, изображение 2 из 3 Kindle Fire HD Display Assembly (Front Glass and LCD) Replacement, Remove battery: шаг 3, изображение 3 из 3
    • Tip: keep track of all your screws so reassembly will be simple and easy. One easy method is to take a small piece of tape, stick the head of each screw (in that step) to the tape, and then attach a scrap of paper (with the name/location written on it) to the tape.

    • Remove four Phillips #00 screws and one T5 Torx screw which secure the battery in place.

    • The T5 Torx screw is located on the motherboard near the antenna clip. Remove it using a special T5 Torx screwdriver.

    • If you aren't equipped with the T5 Torx screwdriver, you could try using your fingers, but it will be very difficult to remove it.

    • To remove battery, lift battery up and away from Kindle, and pull cable out of motherboard.

  4. Kindle Fire HD Display Assembly (Front Glass and LCD) Replacement, Detach cables and remove headphone jack: шаг 4, изображение 1 из 3 Kindle Fire HD Display Assembly (Front Glass and LCD) Replacement, Detach cables and remove headphone jack: шаг 4, изображение 2 из 3 Kindle Fire HD Display Assembly (Front Glass and LCD) Replacement, Detach cables and remove headphone jack: шаг 4, изображение 3 из 3
    • For both cables attached to headphone jack, there is a small black or pink flap which secures the cable into the board.

    • Flip up the covering/flap with your finger, and detach cable. Repeat for second cable. Also repeat for the other end of the long cable (attached to motherboard).

    • Remove the two screws which secure the board in place.

    • Lift and remove the board.

  5. Kindle Fire HD Display Assembly (Front Glass and LCD) Replacement, Remove Camera: шаг 5, изображение 1 из 2 Kindle Fire HD Display Assembly (Front Glass and LCD) Replacement, Remove Camera: шаг 5, изображение 2 из 2
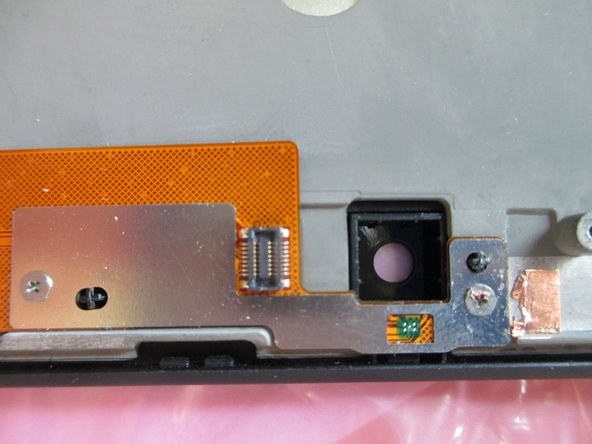
    • The camera pops out easily by lifting and gently pulling it up out of the connection.

    • Remove both screw which secure the flat metal to the gray casing.

    • If the screw near the camera is covered by a copper sheet, scrape away the copper using a razor blade or something similar.

  6. Kindle Fire HD Display Assembly (Front Glass and LCD) Replacement, Detach display cables from motherboard: шаг 6, изображение 1 из 1
    • Unscrew the clamp covering the small display cable.

    • Detach the three display/touch screen cables from the motherboard by pulling up the tabs until they snap off.

    • Cut the copper sheet between the motherboard and outer gray casing using a razor blade or something similar.

  7. Kindle Fire HD Display Assembly (Front Glass and LCD) Replacement, Remove Motherboard and Speakers: шаг 7, изображение 1 из 1
    • Remove all the screws from the motherboard and speakers.

    • Remove the motherboard and speakers from the gray casing.

    • You may keep the speakers attached to the motherboard.

  8. Kindle Fire HD Display Assembly (Front Glass and LCD) Replacement, Remove Gray Tray and Antenna: шаг 8, изображение 1 из 2 Kindle Fire HD Display Assembly (Front Glass and LCD) Replacement, Remove Gray Tray and Antenna: шаг 8, изображение 2 из 2
    • Lift the gray tray from the side shown in the picture.

    • Peel the antenna off the black outer casing.

    • The Wi-Fi antenna is held down by a minor adhesive.

  9. Kindle Fire HD Display Assembly (Front Glass and LCD) Replacement, Remove power/volume buttons strip: шаг 9, изображение 1 из 2 Kindle Fire HD Display Assembly (Front Glass and LCD) Replacement, Remove power/volume buttons strip: шаг 9, изображение 2 из 2
    • Remove the strip which touches the power and volume buttons.

    • When reassembling, make sure the buttons on the frame align with the small push-buttons on the strip.

    • The device is disassembled! Replace the Display/LCD.

Заключение

To reassemble your device, follow these instructions in reverse order.

17 участников успешно повторили данное руководство.

Yosef

Участник с: 05/27/15

735 Репутация

1 руководство автора

2 Комментариев

Good guide. Followed it and finally succeeded.

Some points

Step 5 - the camera need not be disturbed, though the screws holding the plate do need to be removed.There was a rubber surround to the camera hole which came loose and had to be put back before the grey plate went back.

Step 6 - the smaller of the display cables (lower left in the picture) is held by a clamp and the screw holding it, visible under the white wire, needs to be undone before the cable is popped off..

The replacement screen assembly I bought did not include the plastic surround. I had to use a spudger to split the 'main' plastic rim (with buttons) from the screen, and a sharp thin- bladed knife to separate the 'inner' rim from the glass part, to which it was firmly glued. The new screen came with adhesive strips, so I carefully cleaned the adhesive remnants off the inner rim, aligned it very carefully and let it stick together. The main rim then clicked back onto this, and I had the screen/rim assembly as shown in step 9.

Dave - Ответить

Just updated Step 6 in regards to the clamp.

Yosef -

Добавить комментарий

Просмотр статистики:

За последние 24часов: 0

За последние 7 дней: 0

За последние 30 дней: 24

За всё время: 18,464