Перейти к основному содержанию

Этот документ имеет более свежие изменения. Перейти к последней непроверенной версии.

Kindle Touch Motherboard Replacement

Выберете то, что вам нужно

  1. Kindle Touch Motherboard Replacement, Back Cover: шаг 1, изображение 1 из 3 Kindle Touch Motherboard Replacement, Back Cover: шаг 1, изображение 2 из 3 Kindle Touch Motherboard Replacement, Back Cover: шаг 1, изображение 3 из 3
    • Use the plastic opening tool to undo the ten plastic clips around the back panel of the Kindle.

  2. Kindle Touch Motherboard Replacement: шаг 2, изображение 1 из 2 Kindle Touch Motherboard Replacement: шаг 2, изображение 2 из 2
    • Gently lift the bottom and slide the panel off.

  3. Kindle Touch Motherboard Replacement, Battery: шаг 3, изображение 1 из 3 Kindle Touch Motherboard Replacement, Battery: шаг 3, изображение 2 из 3 Kindle Touch Motherboard Replacement, Battery: шаг 3, изображение 3 из 3
    • Use a Phillips #00 screwdriver to remove the five screws.

  4. Kindle Touch Motherboard Replacement: шаг 4, изображение 1 из 3 Kindle Touch Motherboard Replacement: шаг 4, изображение 2 из 3 Kindle Touch Motherboard Replacement: шаг 4, изображение 3 из 3
    • Using the flat end of your spudger, gently pry the battery up and remove it.

  5. Kindle Touch Motherboard Replacement, Remove the 3G Board: шаг 5, изображение 1 из 3 Kindle Touch Motherboard Replacement, Remove the 3G Board: шаг 5, изображение 2 из 3 Kindle Touch Motherboard Replacement, Remove the 3G Board: шаг 5, изображение 3 из 3
    • Remove the indicated four 2 mm screws with a Phillips #00 screwdriver. (Units with the 3G assembly have Phillips #000 screws.)

    • Next, gently lift the 3G assembly with a Spudger or your fingers.

    • This Kindle Touch is the WiFi only model and comes with a plastic placeholder instead of the 3G assembly.

    • Disconnect the antenna lead by carefully prying it off the 3G board with a plastic tool.

  6. Kindle Touch Motherboard Replacement, Bezel: шаг 6, изображение 1 из 2 Kindle Touch Motherboard Replacement, Bezel: шаг 6, изображение 2 из 2
    • Using a Phillips #00 screwdriver, remove the six 4 mm screws to access the front plate.

  7. Kindle Touch Motherboard Replacement: шаг 7, изображение 1 из 3 Kindle Touch Motherboard Replacement: шаг 7, изображение 2 из 3 Kindle Touch Motherboard Replacement: шаг 7, изображение 3 из 3
    • Use the plastic opening tool to pry the bezel from the top and sides

    • The bottom of the bezel will be glued, so be careful when sliding the clips out.

    • The clips can be easily bent, so do not try to force them out. If you do bend some, they can be bent back.

  8. Kindle Touch Motherboard Replacement, Rear Casing: шаг 8, изображение 1 из 1
    • Use your Phillips #00 srewdriver to remove the indicated screws.

    • There are three pairs of screws that are each different. The screws on the top corners are 4 mm #00 Phillips screws, the screws on the bottom corners are 2 mm #00 Phillips screws, and the black bottom center screws are 6 mm #00 Phillips screws.

  9. Kindle Touch Motherboard Replacement: шаг 9, изображение 1 из 2 Kindle Touch Motherboard Replacement: шаг 9, изображение 2 из 2
    • With the screws removed, gently remove the case from the internals.

  10. Kindle Touch Motherboard Replacement, Motherboard: шаг 10, изображение 1 из 3 Kindle Touch Motherboard Replacement, Motherboard: шаг 10, изображение 2 из 3 Kindle Touch Motherboard Replacement, Motherboard: шаг 10, изображение 3 из 3
    • With the screen facing you, use your heated iOpener or other heating element to loosen the glue holding the WiFi unit to the screen. After 30 seconds, remove the heating element.

    • After the glue is loosened, use a thin tool, like a Spudger or small plastic opening tool, to separate the WiFi unit from the screen.

  11. Kindle Touch Motherboard Replacement: шаг 11, изображение 1 из 2 Kindle Touch Motherboard Replacement: шаг 11, изображение 2 из 2
    • With the motherboard facing you, use the pointy end of your Spudger to gently separate the two speaker's connectors.

    • This connector type requires being lifted out of place, not pulled. Accidentally pulling may damage the wires.

    • During reassembly, make sure the speaker's connectors are not pushed behind the motherboard.

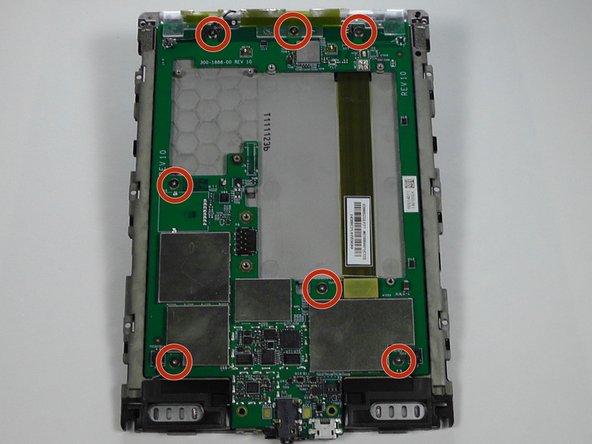
    • Use your #00 Phillips Screwdriver to remove the seven 2 mm screws.

  12. Kindle Touch Motherboard Replacement: шаг 12, изображение 1 из 3 Kindle Touch Motherboard Replacement: шаг 12, изображение 2 из 3 Kindle Touch Motherboard Replacement: шаг 12, изображение 3 из 3
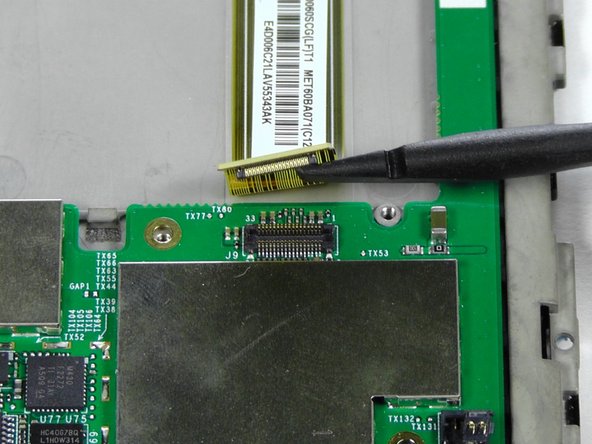
    • Use a Spudger to separate the display's connector from the motherboard.

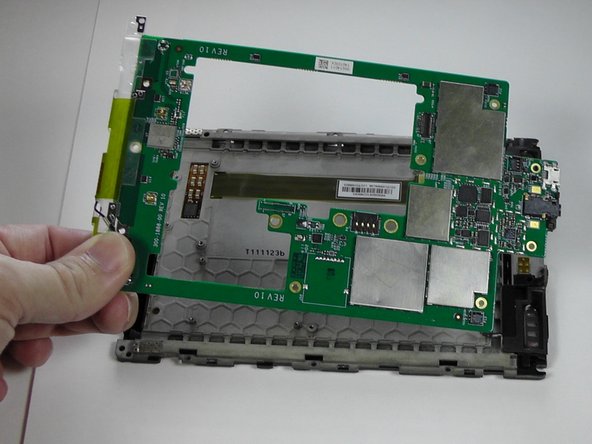
    • Gently remove the motherboard from the display support.

Заключение

To reassemble your device, follow these instructions in reverse order.

5 участников успешно повторили данное руководство.

Adam Yerly

Участник с: 01/20/15

1 933 Репутация

Автор 7 руководств

Команда

USF Tampa, Team 19-5, Blackwell Winter 2015 Участник USF Tampa, Team 19-5, Blackwell Winter 2015

USFT-BLACKWELL-W15S19G5

3 членов

Автор 8 руководств

0 Комментариев

Добавить комментарий

Просмотр статистики:

За последние 24часов: 1

За последние 7 дней: 8

За последние 30 дней: 34

За всё время: 4,330