Перейти к основному содержанию

Kodak EasyShare M532 Screen Replacement

Выберете то, что вам нужно

  1. Kodak EasyShare M532 Screen  Replacement, Screen: шаг 1, изображение 1 из 2 Kodak EasyShare M532 Screen  Replacement, Screen: шаг 1, изображение 2 из 2
    • Open the battery compartment on the bottom of the camera and remove the battery.

  2. Kodak EasyShare M532 Screen  Replacement: шаг 2, изображение 1 из 3 Kodak EasyShare M532 Screen  Replacement: шаг 2, изображение 2 из 3 Kodak EasyShare M532 Screen  Replacement: шаг 2, изображение 3 из 3
    • Remove two Phillips screws from each side of the camera (four screws total).

    • Remove one additional Phillips screw from the bottom of the camera.

  3. Kodak EasyShare M532 Screen  Replacement: шаг 3, изображение 1 из 3 Kodak EasyShare M532 Screen  Replacement: шаг 3, изображение 2 из 3 Kodak EasyShare M532 Screen  Replacement: шаг 3, изображение 3 из 3
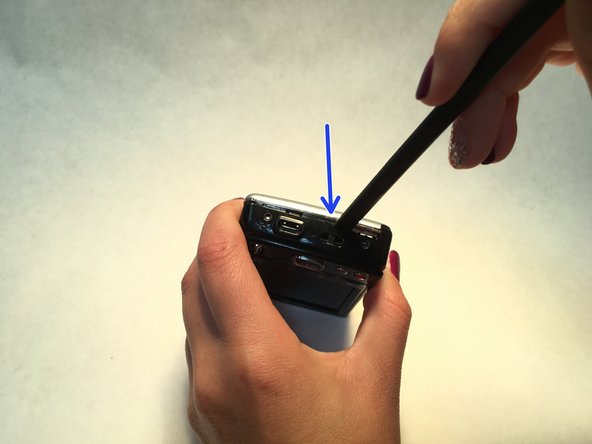
    • Inserting the prying tool as shown, gently separate the front and back pieces of the camera exterior.

  4. Kodak EasyShare M532 Screen  Replacement: шаг 4, изображение 1 из 3 Kodak EasyShare M532 Screen  Replacement: шаг 4, изображение 2 из 3 Kodak EasyShare M532 Screen  Replacement: шаг 4, изображение 3 из 3
    • Carefully remove the front and back exterior pieces from the camera body.

  5. Kodak EasyShare M532 Screen  Replacement: шаг 5, изображение 1 из 3 Kodak EasyShare M532 Screen  Replacement: шаг 5, изображение 2 из 3 Kodak EasyShare M532 Screen  Replacement: шаг 5, изображение 3 из 3
    • Gently remove the frame with the top buttons.

    • You should now have the screen and inside parts exposed as shown.

  6. Kodak EasyShare M532 Screen  Replacement: шаг 6, изображение 1 из 2 Kodak EasyShare M532 Screen  Replacement: шаг 6, изображение 2 из 2
    • Lift the screen off the body. Note that it is still connected on one side by the orange tape.

    • Flip it over gently and let it rest off to the side where the tape is.

    • It is okay if the orange tape clips out of its spot.

  7. Kodak EasyShare M532 Screen  Replacement: шаг 7, изображение 1 из 2 Kodak EasyShare M532 Screen  Replacement: шаг 7, изображение 2 из 2
    • Remove the two Phillips screws. There is one at the top center and one in the bottom left corner.

  8. Kodak EasyShare M532 Screen  Replacement: шаг 8, изображение 1 из 3 Kodak EasyShare M532 Screen  Replacement: шаг 8, изображение 2 из 3 Kodak EasyShare M532 Screen  Replacement: шаг 8, изображение 3 из 3
    • Remove the top Phillips screw from the right side.

    • Move the silver tape aside to access and remove the Phillips screw in the bottom corner.

  9. Kodak EasyShare M532 Screen  Replacement: шаг 9, изображение 1 из 3 Kodak EasyShare M532 Screen  Replacement: шаг 9, изображение 2 из 3 Kodak EasyShare M532 Screen  Replacement: шаг 9, изображение 3 из 3
    • Gently pry up the clip on the top corner to release the metal casing and lift the casing out of the way.

    • The casing is also connected via an orange tape on the right side that you may leave in place.

    • Be sure to wear safety glasses while prying the clip.

  10. Kodak EasyShare M532 Screen  Replacement: шаг 10, изображение 1 из 3 Kodak EasyShare M532 Screen  Replacement: шаг 10, изображение 2 из 3 Kodak EasyShare M532 Screen  Replacement: шаг 10, изображение 3 из 3
    • Find the silver clip where the orange tape from the screen attaches to the circuit board.

    • Lift up the silver clip. The orange tape will slide out, completely disconnecting the screen from the camera.

Заключение

To reassemble your device, follow these instructions in reverse order.

Samantha Vasquez

Участник с: 05/31/16

101 Репутация

1 руководство автора

Команда

Central Coast New Tech High, Team 4-8, Rushing Spring 2016 Участник Central Coast New Tech High, Team 4-8, Rushing Spring 2016

CCNTH-RUSHING-S16S4G8

2 членов

Автор 1 руководств

0 Комментариев

Добавить комментарий

Просмотр статистики:

За последние 24часов: 1

За последние 7 дней: 1

За последние 30 дней: 8

За всё время: 764