Введение
This will give instructions on how to remove the two different speakers inside the tablet and how to remove them.
Выберете то, что вам нужно
-
-
To remove the back panel of the device, start by attempting to fit the plastic opening tool in the crease between the screen and the back panel of the tablet.
-
Try opening picks if the case is not flexing enough, or if it is already cracked to prevent further damage.
-
You can use your hands to push against the corners of the device to attempt to make the gap larger for your plastic opening tool to fit in.
-
If you are replacing your screen because it is damaged, it may be useful to pick away at some of the glass to expose the clips in the edges of the plastic.
-
Insert the corners of your plastic opening tool into the slots that are on the very outside edge of your device to start disconnecting the panel.
-
-
-
Once the edge of your device's panel is separate from the screen, continue moving around the outside of the device while continuing to pry the two pieces apart from each other.
-
-
-
Insert another plastic opening tool (or a similar tool) between the screen and the back panel on the opposite side of the device to hold it open.
-
-
-
Disconnect the battery by inserting the point of a spudger underneath the white tabs on either side of the connector and gently pry up.
-
-
-
Remove the five 2 mm Phillips #000 screws securing the motherboard.
-
The silver EMI shield may come off during this step. Just set it aside until reassembly.
-
-
-
Disconnect the cable from the battery to the motherboard by grabbing the cable and pulling upwards.
-
-
-
-
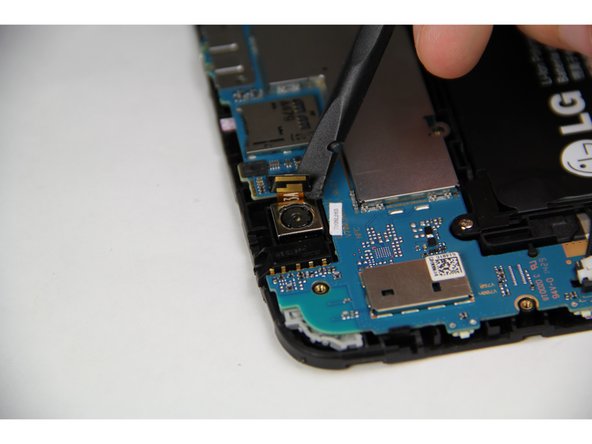
Using the spudger, pry up the connector on the motherboard from the back camera to disconnect it.
-
-
-
Then move to the front camera towards the end of the motherboard and disconnect that by using the spudger to pull up on the clip.
-
-
-
Now that all of the wires and screws are disconnected, use the spudger or a prying tool on the bottom corner of the motherboard to release it from one of the clips holding it in place.
-
-
-
Once the corner is removed, repeat the same action at the far end of the motherboard to release the second clip.
-
-
-
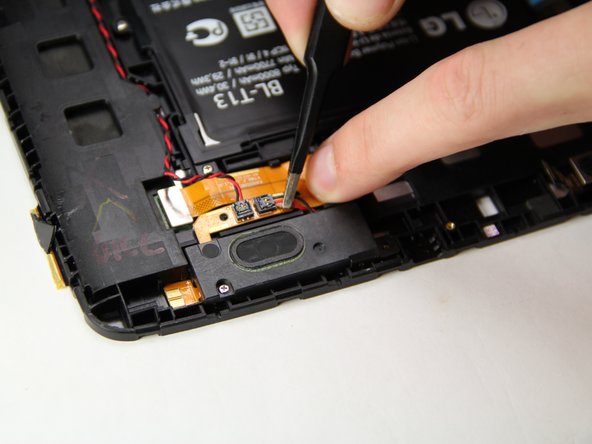
Remove the protective tape that is covering the speaker connections to the device by pulling upwards with either tweezers or your hands.
-
-
-
While holding the orange ribbon cable in place with your finger, grab the wires and pull upwards to disconnect the speaker from the device.
-
-
-
Using either the prying tool or your hands, pull the speaker to remove it from the tablet.
-
-
-
Once the screws are removed, pull the speaker up with either the tweezers or plastic opening tool.
-
-
-
If you have been following steps to remove both speakers, skip this step.
-
Remove the protective tape that is covering the speaker connections to the device by pulling upwards with either tweezers or your hands.
-
-
-
Trace the red and black wire down the side of the device while sliding it out from under the small black clips as you work your way towards the end of the cable.
-
While holding the orange ribbon cable in place with your finger, grab the wires and pull upwards to disconnect the speaker from the device.
-


To reassemble your device, follow these instructions in reverse order.
To reassemble your device, follow these instructions in reverse order.
Отменить: Я не выполнил это руководство.
Еще один человек закончил это руководство.
Команда

USF Tampa, Team 15-1, Blackwell Fall 2015 Участник USF Tampa, Team 15-1, Blackwell Fall 2015
USFT-BLACKWELL-F15S15G1
4 членов
Автор 12 руководств