Введение
Want to Disassemble your LG K40? This is your guide!
Выберете то, что вам нужно
-
-
Prepare the LG K40 for Disassembly by placing the back against the Heatpad.
-
Heat the phone until it is hot to the touch.
-
-
-
Once the phone is hot to the touch, place the phone screen facedown away from the heatpad.
-
Use your spudger, and carefully pry the back off of the Phone. Be extra careful to not damage the rear camera ribbon cable.
-
Once the back is free, place it next to the phone for continuing the disassembly.
-
-
-
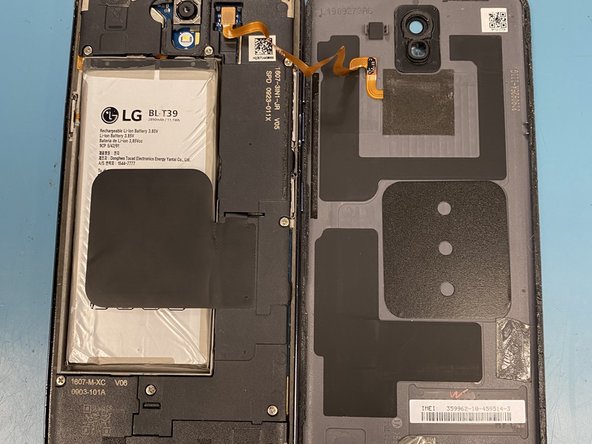
Using your spudger once more, carefully unplug the rear touch sensor ribbon cable, and set the back aside.
-
-
-
-
Using your PH000 screw bit, remove the 15 screws on the internal motherboard casing. In the image, one of the 15 screws is shown.
-
-
-
To remove the top half of the cover, push in the plastic tabs around the casing. Then lift it off gently.
-
The remove the bottom half of the casing, push in the tabs and gently lift as well. Remember to be gentle to not damage the board underneath, as the bottom half is more difficult to remove.
-
-
-
To remove the battery, begin by unplugging the ribbon cable near the top of the battery.
-
Then, gently lift the battery with your spudger. In some cases, heat from the heat pad may help loosen the battery.
-
-
-
To remove the Motherboard, begin by removing the SIM Card tray from the bottom right half of the casing. This will make removal much easier.
-
Next, lift the board gently away from its tabs that keep it in place.
-
Once lifted from all tabs, lift the board away from the phone case.
-
-
-
Gently lift the vibrating unit from the top left corner of the case.
-


To reassemble your device, follow these instructions in reverse order.
To reassemble your device, follow these instructions in reverse order.
Отменить: Я не выполнил это руководство.
5 человек успешно провели ремонт по этому руководству.