Перейти к основному содержанию

LG Optimus Dynamic II L39C Camera Replacement

Выберете то, что вам нужно

  1. LG Optimus Dynamic II L39C Camera Replacement, Remove the back case: шаг 1, изображение 1 из 2 LG Optimus Dynamic II L39C Camera Replacement, Remove the back case: шаг 1, изображение 2 из 2
    • Make sure not to push the tool into the USB port. Doing so may cause damage to your phone.

    • Hold the blue plastic opening tool at the edge of the USB opening. Push down and pry the case off the phone gently.

  2. LG Optimus Dynamic II L39C Camera Replacement, Remove the Battery: шаг 2, изображение 1 из 1
    • Lift the battery out of the phone and replace with your new one.

  3. LG Optimus Dynamic II L39C Camera Replacement, Remove the SD Card: шаг 3, изображение 1 из 1
    • Grab the end of the SD Card and pull it out of the phone.

  4. LG Optimus Dynamic II L39C Camera Replacement, Remove the screws from the midframe: шаг 4, изображение 1 из 2 LG Optimus Dynamic II L39C Camera Replacement, Remove the screws from the midframe: шаг 4, изображение 2 из 2
    • Use the PH #000 screwdriver to remove the six screws from the midframe

  5. LG Optimus Dynamic II L39C Camera Replacement, Remove the midframe: шаг 5, изображение 1 из 2 LG Optimus Dynamic II L39C Camera Replacement, Remove the midframe: шаг 5, изображение 2 из 2
    • Using the plastic opening tool, work gently to go around the perimeter of the phone and remove the midframe.

  6. LG Optimus Dynamic II L39C Camera Replacement, Disconnect the screen from the motherboard: шаг 6, изображение 1 из 3 LG Optimus Dynamic II L39C Camera Replacement, Disconnect the screen from the motherboard: шаг 6, изображение 2 из 3 LG Optimus Dynamic II L39C Camera Replacement, Disconnect the screen from the motherboard: шаг 6, изображение 3 из 3
    • Use the plastic opening tool to disconnect the small orange tab from the motherboard.

    • Next disconnect the silver tab slightly above where the orange tab was.

  7. LG Optimus Dynamic II L39C Camera Replacement, Separate the screen and motherboard: шаг 7, изображение 1 из 1
    • Gently feed the orange and silver tabbed ribbons through the hole in the motherboard and the screen will be free.

  8. LG Optimus Dynamic II L39C Camera Replacement, Detach tabs to separate the camera: шаг 8, изображение 1 из 2 LG Optimus Dynamic II L39C Camera Replacement, Detach tabs to separate the camera: шаг 8, изображение 2 из 2
    • Using the spudger, push the black tabs on the sides of the motherboard off carefully.

    • They should snap off easily.

  9. LG Optimus Dynamic II L39C Camera Replacement, Separate orange tab: шаг 9, изображение 1 из 1
    • Turn the phone over and pull up the orange tab connected to the camera.

  10. LG Optimus Dynamic II L39C Camera Replacement, Separate the camera from the motherboard: шаг 10, изображение 1 из 2 LG Optimus Dynamic II L39C Camera Replacement, Separate the camera from the motherboard: шаг 10, изображение 2 из 2
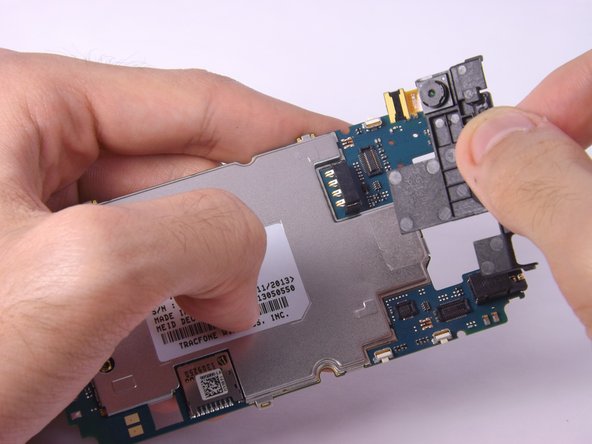
    • You should be able to remove the camera easily with your fingers.

Заключение

To reassemble your device, follow these instructions in reverse order.

Еще один человек закончил это руководство.

Stephanie Reyes

Участник с: 10/08/14

138 Репутация

Автор 2 руководств

Команда

USF Tampa, Team 14-3, Leahy Fall 2014 Участник USF Tampa, Team 14-3, Leahy Fall 2014

USFT-LEAHY-F14S14G3

4 членов

Автор 3 руководств

0 Комментариев

Добавить комментарий

Просмотр статистики:

За последние 24часов: 0

За последние 7 дней: 0

За последние 30 дней: 0

За всё время: 409