Перейти к основному содержанию

Lenovo 100e Chromebook (1st Gen) Battery Replacement

Выберете то, что вам нужно

  1. Lenovo 100e Chromebook (1st Gen) Battery Replacement, Get the equipment ready: шаг 1, изображение 1 из 3 Lenovo 100e Chromebook (1st Gen) Battery Replacement, Get the equipment ready: шаг 1, изображение 2 из 3 Lenovo 100e Chromebook (1st Gen) Battery Replacement, Get the equipment ready: шаг 1, изображение 3 из 3
    • Unplug and turn off the chromebook device.

    • Remove the SD card if you are using one.

  2. Lenovo 100e Chromebook (1st Gen) Battery Replacement, Remove back cover: шаг 2, изображение 1 из 3 Lenovo 100e Chromebook (1st Gen) Battery Replacement, Remove back cover: шаг 2, изображение 2 из 3 Lenovo 100e Chromebook (1st Gen) Battery Replacement, Remove back cover: шаг 2, изображение 3 из 3
    • Turn the laptop over.

    • Remove the 10 phillips head screws and keep them organized.

    • Using a Spudger, carefully separate the cover from the corner. It snaps back in, so make sure to not break any clips.

    • Take out the cover and set it aside.

  3. Lenovo 100e Chromebook (1st Gen) Battery Replacement, Disconnect the battery: шаг 3, изображение 1 из 2 Lenovo 100e Chromebook (1st Gen) Battery Replacement, Disconnect the battery: шаг 3, изображение 2 из 2
    • In the lower side of the motherboard you will find the battery connector.

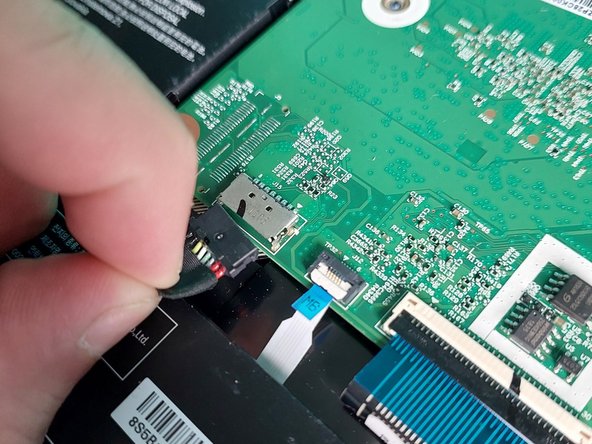
    • To disconnect the battery, carefully pull the black connector in a parallel direction to the laptop.

    • Remember to take the conector out fully to avoid any shortcircuits.

  4. Lenovo 100e Chromebook (1st Gen) Battery Replacement, Disconnnect Daughterboard: шаг 4, изображение 1 из 3 Lenovo 100e Chromebook (1st Gen) Battery Replacement, Disconnnect Daughterboard: шаг 4, изображение 2 из 3 Lenovo 100e Chromebook (1st Gen) Battery Replacement, Disconnnect Daughterboard: шаг 4, изображение 3 из 3
    • The daugtherboard ribbon it's over the battery.

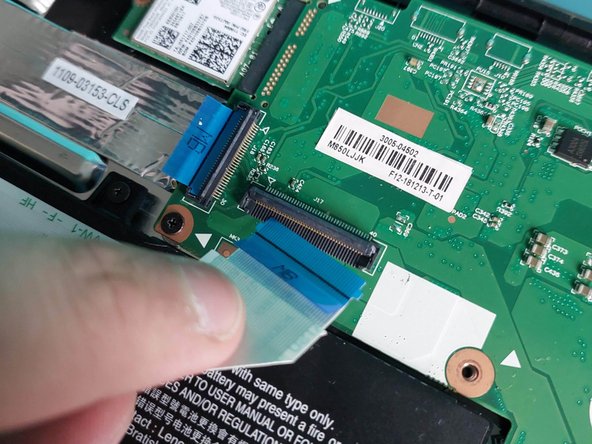
    • Lift the clip on the motherboard connector.

    • Take out the ribbon cable in an up and out direction from the motherboard connector.

    • Gently peel it off, it has some mild glue to attach it to the battery.

    • YOU MUST NEVER BEND THIS RIBBON IN A HARD WAY!

  5. Lenovo 100e Chromebook (1st Gen) Battery Replacement, Remove the battery: шаг 5, изображение 1 из 2 Lenovo 100e Chromebook (1st Gen) Battery Replacement, Remove the battery: шаг 5, изображение 2 из 2
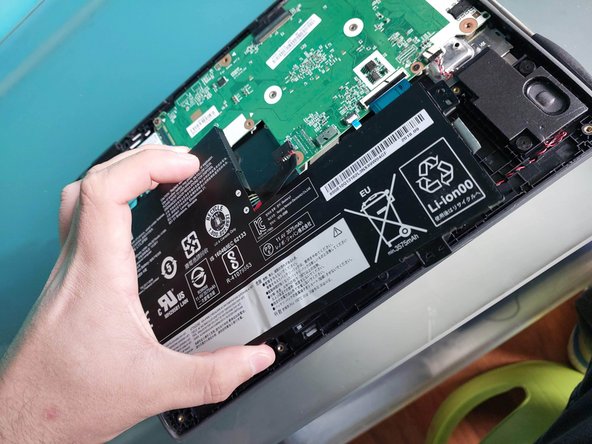
    • Remove the four Phillips head screws attaching the Battery.

    • Lift the battery from the casing.

    • If you are changing it for a new one, make sure you are disposing the old one in a safe way.

  6. Lenovo 100e Chromebook (1st Gen) Battery Replacement, Battery overview: шаг 6, изображение 1 из 1
    • This is a Li-ion Battery.

    • It runs at 11.4V and it has a 3685 mAh capacity.

    • For this model it reads battery model as "L17L3PB0". The main difference with another similar batteries is the location of its anchor points. Make sure they're the same when ordering.

Заключение

To reassemble your device, follow these instructions in reverse order. You must plug it back to the wall power to turn it back on!

Congrats! You've upgraded your laptop battery!

Franco Iván Bello Rojas

Участник с: 02/28/22

869 Репутация

Автор 5 руководств

0 Комментариев

Добавить комментарий

Просмотр статистики:

За последние 24часов: 0

За последние 7 дней: 1

За последние 30 дней: 15

За всё время: 142