Перейти к основному содержанию

Lenovo IdeaPad 330S-14IKB RAM Replacement

Выберете то, что вам нужно

  1. Lenovo IdeaPad 330S-14IKB RAM Replacement, RAM: шаг 1, изображение 1 из 1
    • Begin by placing your laptop upside down so that you can see the labels on the back.

  2. Lenovo IdeaPad 330S-14IKB RAM Replacement: шаг 2, изображение 1 из 2 Lenovo IdeaPad 330S-14IKB RAM Replacement: шаг 2, изображение 2 из 2
    • Remove the 10 screws from the bottom of the laptop.

    • (Silver, 5.8mm Phillips #0)

    • Safely store these screws in a secure location, like a magnet pad, to prevent them from getting lost.

  3. Lenovo IdeaPad 330S-14IKB RAM Replacement: шаг 3, изображение 1 из 1
    • Carefully remove the back panel from the laptop.

    • Be sure to proceed slowly and use wedges to avoid damaging the panel.

  4. Lenovo IdeaPad 330S-14IKB RAM Replacement: шаг 4, изображение 1 из 1
    • Locate the black panel and remove these three black screws.

    • (Black, 5.83mm Phillips #0)

  5. Lenovo IdeaPad 330S-14IKB RAM Replacement: шаг 5, изображение 1 из 2 Lenovo IdeaPad 330S-14IKB RAM Replacement: шаг 5, изображение 2 из 2
    • To access your RAM, remove the black panel you just removed the screws from.

    • Remember to keep these screws separate and do not mix them with others.

  6. Lenovo IdeaPad 330S-14IKB RAM Replacement: шаг 6, изображение 1 из 1
    • Your RAM will be a blue rectangle, positioned almost in the center of the device.

  7. Lenovo IdeaPad 330S-14IKB RAM Replacement: шаг 7, изображение 1 из 2 Lenovo IdeaPad 330S-14IKB RAM Replacement: шаг 7, изображение 2 из 2
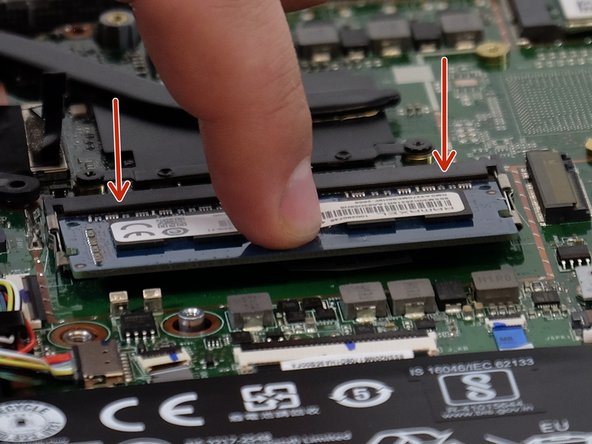
    • To remove your RAM, gently pull back on the metal clips holding it in place.

    • Carefully slide the RAM out of the slot.

    • Be gentle to avoid damaging the slot

  8. Lenovo IdeaPad 330S-14IKB RAM Replacement: шаг 8, изображение 1 из 1
    • Now, take your new RAM module and locate the notch on it.

  9. Lenovo IdeaPad 330S-14IKB RAM Replacement: шаг 9, изображение 1 из 1
    • Align the notch on your replacement RAM as shown in the previous step with the corresponding slot on the device's RAM slot.

  10. Lenovo IdeaPad 330S-14IKB RAM Replacement: шаг 10, изображение 1 из 2 Lenovo IdeaPad 330S-14IKB RAM Replacement: шаг 10, изображение 2 из 2
    • Gently insert the RAM module.

    • Once it's as far in as it can go, lower it slowly until the metal clips lock it into place.

    • You should hear an audible click when it's securely in place.

Заключение

To reassemble your device, follow steps 6-1 in reverse order.

3 участников успешно повторили данное руководство.

Luke Garrett

Участник с: 09/27/23

238 Репутация

1 руководство автора

Команда

Linn Benton Community College, Team 1-3, Karnes Fall 2023 Участник Linn Benton Community College, Team 1-3, Karnes Fall 2023

LBCC-KARNES-F23S1G3

5 членов

Автор 4 руководств

0 Комментариев

Добавить комментарий

Просмотр статистики:

За последние 24часов: 1

За последние 7 дней: 5

За последние 30 дней: 25

За всё время: 144