Перейти к основному содержанию

Lenovo IdeaPad U410 Solid State Drive Replacement

Выберете то, что вам нужно

  1. Lenovo IdeaPad U410 Solid State Drive  Replacement, Bottom Cover: шаг 1, изображение 1 из 2 Lenovo IdeaPad U410 Solid State Drive  Replacement, Bottom Cover: шаг 1, изображение 2 из 2
    • Using the metal spudger, remove all the rubber squares on the bottom of the laptop.

  2. Lenovo IdeaPad U410 Solid State Drive  Replacement: шаг 2, изображение 1 из 3 Lenovo IdeaPad U410 Solid State Drive  Replacement: шаг 2, изображение 2 из 3 Lenovo IdeaPad U410 Solid State Drive  Replacement: шаг 2, изображение 3 из 3
    • Remove the three 6 mm Phillips #1 screws holding the panel on the laptop.

    • Pry the panel from the laptop using your hands or the metal spudger if necessary.

  3. Lenovo IdeaPad U410 Solid State Drive  Replacement, Solid State Drive: шаг 3, изображение 1 из 3 Lenovo IdeaPad U410 Solid State Drive  Replacement, Solid State Drive: шаг 3, изображение 2 из 3 Lenovo IdeaPad U410 Solid State Drive  Replacement, Solid State Drive: шаг 3, изображение 3 из 3
    • Make sure your laptop is powered off.

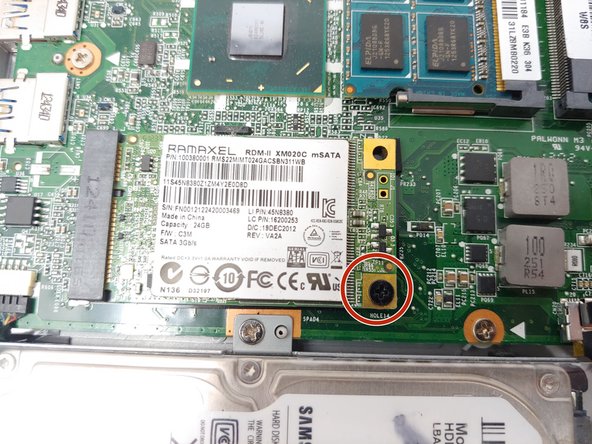
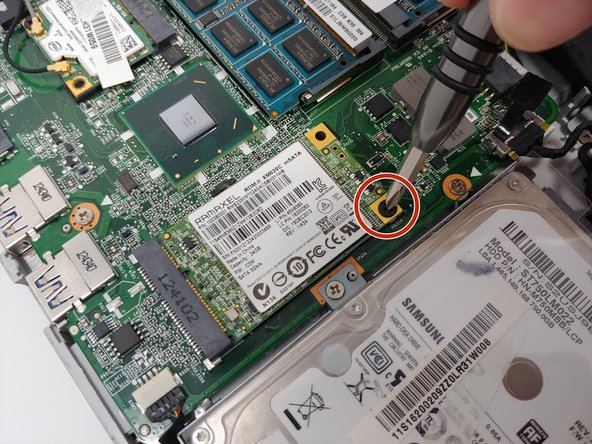
    • Use a Phillips #1 screwdriver to remove the 3 mm screw holding the SSD in place.

  4. Lenovo IdeaPad U410 Solid State Drive  Replacement: шаг 4, изображение 1 из 1
    • Grab the SSD and pull it out from the mSATA slot.

Заключение

To reassemble your device, follow these instructions in reverse order.

Еще один человек закончил это руководство.

Edric An

Участник с: 09/18/18

433 Репутация

Автор 3 руководств

Команда

University of North Texas, Team S3-G5, Raign Fall 2018 Участник University of North Texas, Team S3-G5, Raign Fall 2018

UNT-RAIGN-F18S3G5

4 членов

Автор 6 руководств

0 Комментариев

Добавить комментарий

Просмотр статистики:

За последние 24часов: 0

За последние 7 дней: 3

За последние 30 дней: 4

За всё время: 674