Выберете то, что вам нужно
-
-
Take out the 10 Torx T6 screws as marked and pry open the back cover. I pried from the top (midpoint of the chassis in between the two hinges) as it felt easier that way. You can use a prying tool for completion of this step.
-
-
-
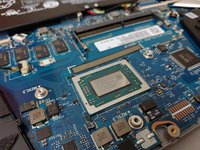
All parts have been identified on the photos.
-
-
-
-
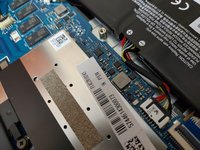
Disconnect battery as shown. This is a very important step before doing any upgrades or further disassembly
-
-
-
Take out the metal shield. You can use a prying tool to take it out. Once out, you should be able to see the RAM and the connector.
-
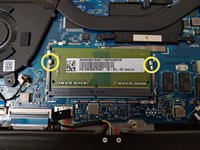
Removing the RAM is easy. You will need both your hands. Gently push the metal prongs outside of the RAM as shown with yellow markers and the RAM should pop out upwards. Once done, gently pull it out of the socket.
-
For installation of new RAM, insert the RAM at a 45 degree angle into the socket and push it down until the metal prongs click it back in.
-
-
-
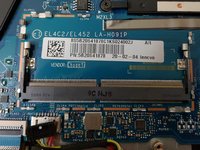
The RAM is from Samsung and the spec is DDR4 2666 MHz. My unit came with 8 GB of RAM (4 GB soldered on board and 4 GB on an user upgrade-able stick).
-
It is surprising to see that though the AMD Ryzen 5 3500U supports up to 2400 MHz DDR4 RAM, Lenovo is using 2666 MHz RAM on it. The memory operates at 2400 MHz only which can be seen from CPU-Z or other similar software.
-
-
-
Lenovo has used a Samsung PM981 NVMe SSD. My variant came with a 1 TB one.
-
Lenovo has used a warranty seal and hence they will know if the SSD has been removed.
-
Replacement is pretty straight forward, Once the screw is out, lift the SSD gently and pull it out. Reverse the procedure to install another SSD.
-
-
-
Take out the three screws as shown and gently take the heatsink out. Do not force the heatsink out as the existing thermal paste will cause some adhesion.
-
-
-
Clean the existing thermal paste from CPU and bottom of the heatsink. You can use IPA and some Qtips for the procedure.
-
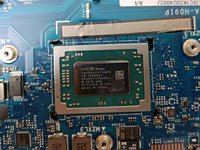
My unit came with an AMD Ryzen 5 3500U quad core CPU with 8 threads
-
After completion of thermal paste application, follow steps in reverse.
-
Before connecting the battery, make sure everything on the motherboard is connected. Before you connect the battery, you should have completed all the tasks (reinstall CPU heatsink, install memory and the shield and plug in any other cables you removed)
-


To reassemble your device, follow these instructions in reverse order.
To reassemble your device, follow these instructions in reverse order.
Отменить: Я не выполнил это руководство.
10 человек успешно провели ремонт по этому руководству.
13Комментарии к руководству
Hi, I wanted to replace My motherboard. what more do I need to get the keyboard out.
I want to know everything before I start dissembling anything.
Hi, I did not get to the keyboard but from what I believe is that the keyboard is riveted with plastic tabs or secured with screws (unlikely) with the palmrest. You need to take out the battery and the motherboard and then need to remove the insulation to expose the tabs. Then using a precision knife, you need to cut off those plastic tabs and the keyboard out. For securing the new keyboard, you can use some plastic and melt them with a soldering iron so that the keyboard stays flat. The best solution is to get the entire palmrest section as replacement with the keyboard attached.
I had a coworker spill apple juice over his keyboard. Unfortunately the whole C-Cover had to be replaced which required a complete disassambly. You have to take everything apart.
Fred -
The screws should be about 2.5 cm.